Using This Manual
The following formatting conventions are used in this manual to highlight important information:
Italicized text indicates a location, for example a particular Folder, Tab, or Window.
Bold text indicates a specific user action, such as clicking a button.
Red text and this symbol (!!) are used in Notes to bring attention to crucial information.
Acronyms
All acronyms used in this document are defined in the following table:
Acronym | Definition |
|---|---|
ADR | Alternative Dispute Resolution |
Acronym | Definition |
|---|---|
AJ | Administrative Judge |
AP | Aggrieved Person |
EEO | Equal Employment Opportunity |
FAD | Final Agency Decision |
ROI | Report of Investigation |
UI | User Interface |
1. Introduction to eComplaint
1.1 About eCASE eComplaint
eCASE eComplaint is a complaint processing application developed to run on the eCASE platform. eCASE is a low-code application development platform that provides out-of-the-box features (case management, document management, workflows, business rules, reporting and searching, full text searching on documents and more) required for business applications. If a user has access to other business applications deployed on the eCASE platform, the user can toggle between eComplaint and the other available applications by using the Application Selector.
eComplaint is designed to cover the entire complaint lifecycle, from initial Equal Employment Opportunity (EEO) Contact to initiation of Informal and Formal Complaints, with the ability to document Alternative Dispute Resolution (ADR), Appeals, Investigations, Hearings, Civil Action, and eventually Complaint Closure.
The following subsections provide a high-level view of processing complaints using the eComplaint application:
System Roles: A description of each defined system role in eComplaint, including each
role’s basic abilities.
Application Login: How to access the application.
eComplaint Dashboard: Description of the unique eComplaint User Interface (UI).
Case Folder UI: How to work within the eComplaint case folder, including descriptions of the various specialized folder tabs.
Withdraw from Complaint: At all points in the process, eComplaint allows the Aggrieved Person to withdraw from the complaint. These steps are outlined in this section.
Request Due Date Extension: At most points in the process, an extension can be requested. These steps are outlined in this section.
1.2 System Roles
The eComplaint application utilizes the following system roles:
Role | Description |
|---|---|
Counselor | The Counselor role only processes Inquires and Informal Complaints. |
Manager | The Manager role oversees the complaint. Managers can complete any task in the workflow on behalf of the Counselor or Specialist. They are also responsible for converting the Informal Complaint to a Formal Complaint once a Formal Complaint is received. |
Specialist | The Specialist role can process Formal Complaints once converted from an Informal Complaint request. |
ADR Specialist | ADR Specialists can perform all ADR activities (Offer ADR, ADR Acceptance, ADR Event, ADR Outcome, and Withdraw from ADR). ADR Specialists can also add Corrective Actions. |
Super User | The Super User role oversees the entire application. They can complete any task in the workflow in any complaint on behalf of the Counselor, Specialist, and Manager |
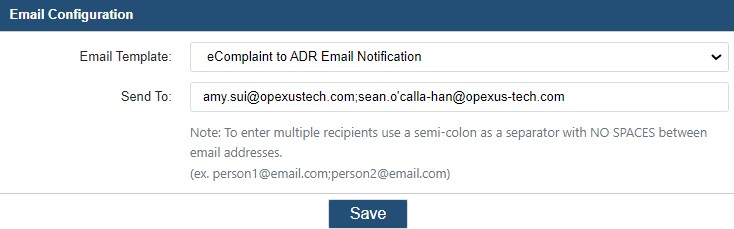
Administrator | The Administrator role is used to configure and maintain system settings. Within Main Menu > Configuration, the Administrator can configure the Entities or Offices in the organization, as well as the parameters for the 462 Report. The Administrator also has access to system settings. The system requires an additional login before accessing system settings. The Administrator can configure terminology, users, roles, permissions, email templates, notifications, choice lists (application drop-down lists), audit reports, and more. |
1.3 About this Manual
This manual focuses on the following subjects:
Introduction to eComplaint: This section covers the eComplaint application, as well as logging into the application, the Case Folder UI, and some other basic eComplaint functionality (withdrawing from the complaint, requesting Due Date extension, etc.)
EEO Contact Processing: Consult this subsection for information about how to create an EEO Contact, the EEO Contact Folder, how to process an Inquiry, as well as completing or reopening an EEO Contact.
Informal Complaints: The contents of this subsection explain how to create a new Informal Complaint, the Informal Complaint Case Folder tabs, and some important sections of the Informal Complaint workflow.
Formal Complaints: This section discusses the Formal Complaint case folder, how to create a Formal Complaint case folder, as well as converting the Formal Complaint, and some basic Case Folder processing functionality.
eComplaint Reports: Consult this subsection for guidance on creating and executing reports within the eComplaint application.
eComplaint Configuration: This section discusses the functionality of the tabs in the eComplaint Configuration folder.
1.4 Application Login
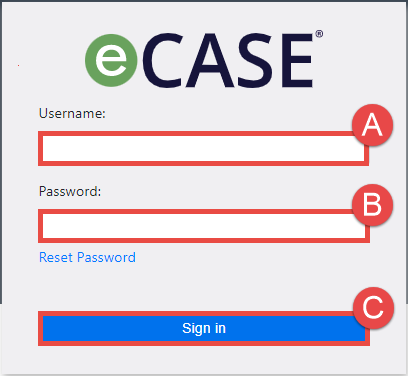
eCASE eComplaint is accessible via web browser (Internet Explorer, Chrome, or Firefox). Navigate to the eCASE eComplaint Login screen, using the URL provided by the administrator. Enter the (A) Username and corresponding (B) Password in the Login screen and click (C) Sign In.
1.5 eComplaint Dashboard
After logging in to the eComplaint application, the system dashboard appears. Each eComplaint role has a specific dashboard engineered to show the data most relevant to that user. An example Dashboard is shown below:

Regardless of system role, all users see the following basic elements in their dashboard:
Launch Pad: The Launch Pad allows users to quickly access primary system functions, including searching for and creating new case folders, their Inbox, Reports, and more.
Workspace: After login, the Workspace displays widgets designed to highlight information most relevant to that user’s system role. This is also the area where the user works with case folders, reports, and more.
Navigation Bar: The Navigation Bar is visible in any page in the application and provides easy access to the Quick Search, User Preferences, and the Help functions.
For information on standard portions of the eCASE interface, including the Main Menu, Navigation Bar, and Case Folders, see the eCASE User Manual.
1.6 Case Folder UI
Each eComplaint case type has a unique Case Folder UI, described in detail in each case type’s respective section of this manual. An example of one UI is shown below, with important areas highlighted:
Each case folder contains a (C) Workspace, where the selected folder (B) Tab is displayed, as well as (A) Actions that can be taken on the folder. For details on the Actions bar, see the eCASE User Manual. Standard case folder tabs (Attachments, Assignments, Project Team, etc.) are also described in the eCASE User Manual.
eComplaint case types each utilize several unique folder tabs, depending on the user’s role
and current case type. These tabs are described in the following sections.
1.6.1 Complaint Information
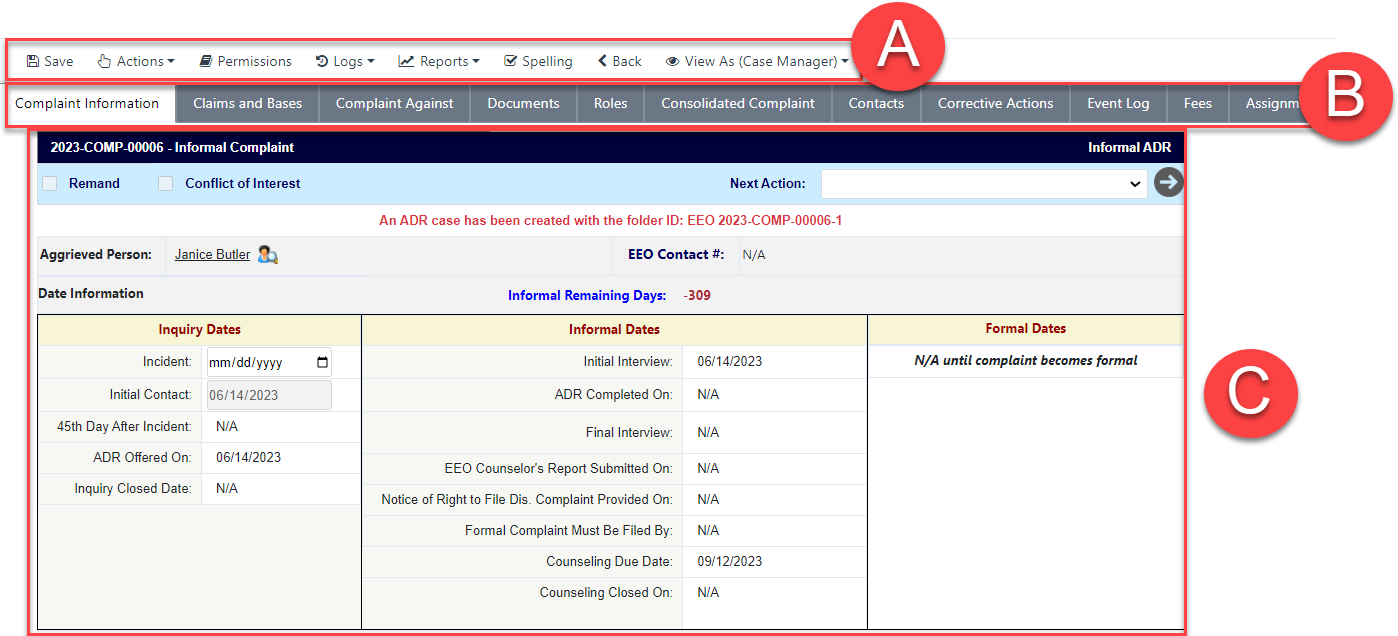
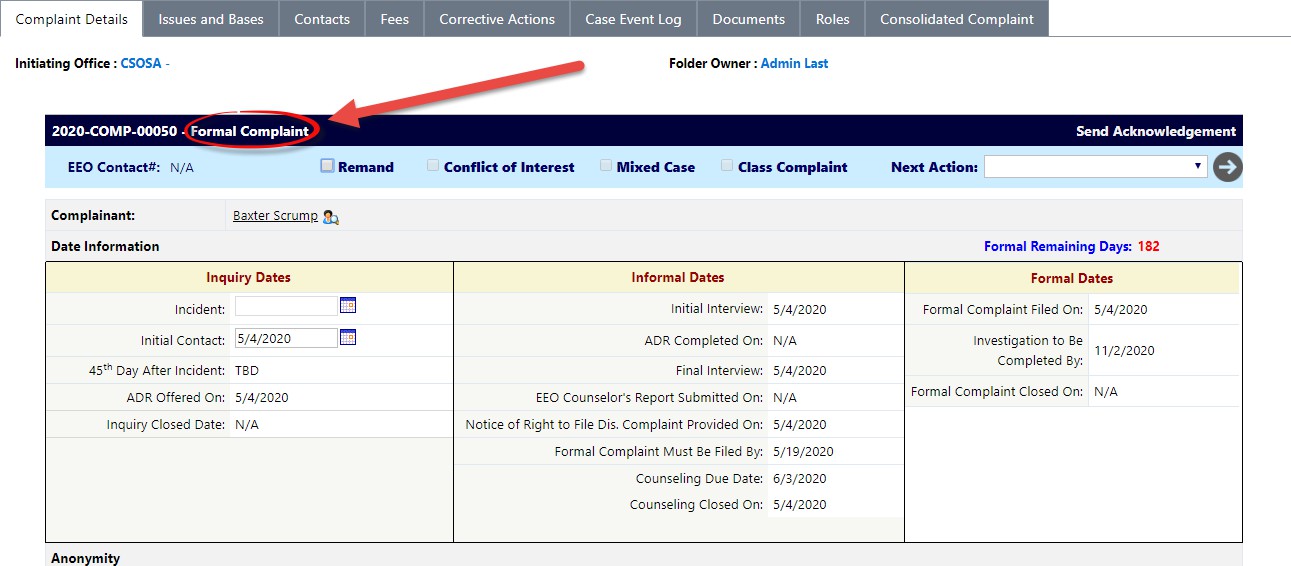
The Complaint Information tab is the primary tab of the case folder and the first one that appears after opening a Complaint case folder.
Note: The Description field is required, but it should have been transferred over from the Inquiry/Concern field in the Inquiry case folder if originally filed as an inquiry. If previously determined in the Configuration folder, the EEO specialist is automatically assigned based on the entity selected.
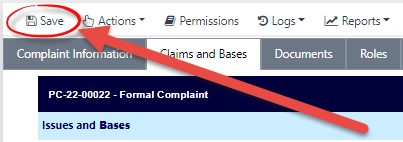
1.6.2 Claims and Bases Tab
The Claims and Bases tab allows users to add specific Issues (and associated Bases) to be tracked and resolved through the complaint process. An example tab is shown below:
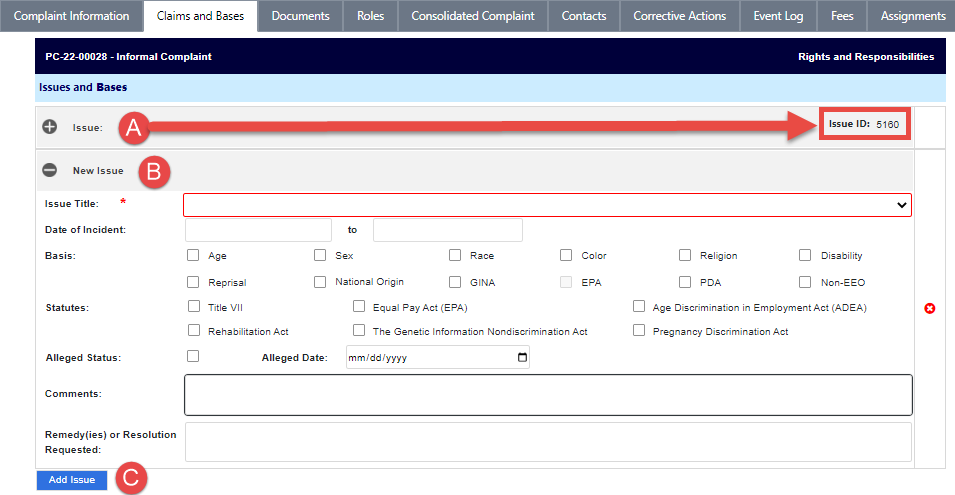
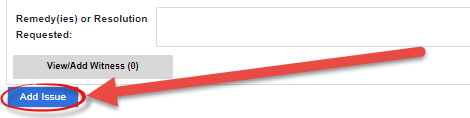
After Issues are added to a complaint, they are listed in (A) Issues and Bases workspace along with a specific Issue ID. Users can click (C) Add Issue to add a (B) New Issue entry, where issue information is captured in multiple fields.
You can add witnesses to New Issues after they are created and saved by clicking + Expand.
1.6.3 Documents
The Documents tab allows users to add attachments and child attachments to a case, as well as manage these attachments using the Check Out/In, Send To and OCR Document functions. Attachments across the case folder are stored within this tab and are sorted by Attachment Type and Document Type.
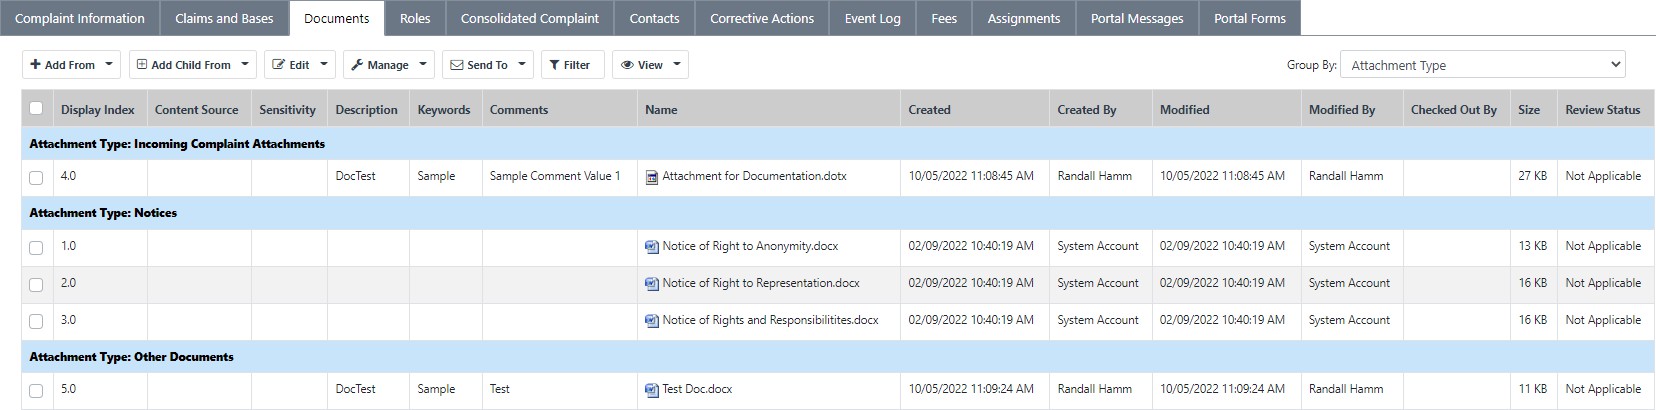
The Add From drop-down list is the primary method in which new attachments can be added to a case folder. Upon upload, users must select the following values: Attachment Type, Description, etc. to add an attachment. The Add From drop-down list allows the user to add attachments to the case from the following locations:
My Computer: Add an attachment from the local desktop
Default Attachments: Add an attachment from the default attachments, if configured.
Case: Add an attachment from an existing case. eCASE opens the Search Case Documents window, allowing users to search for and select any existing case documents.
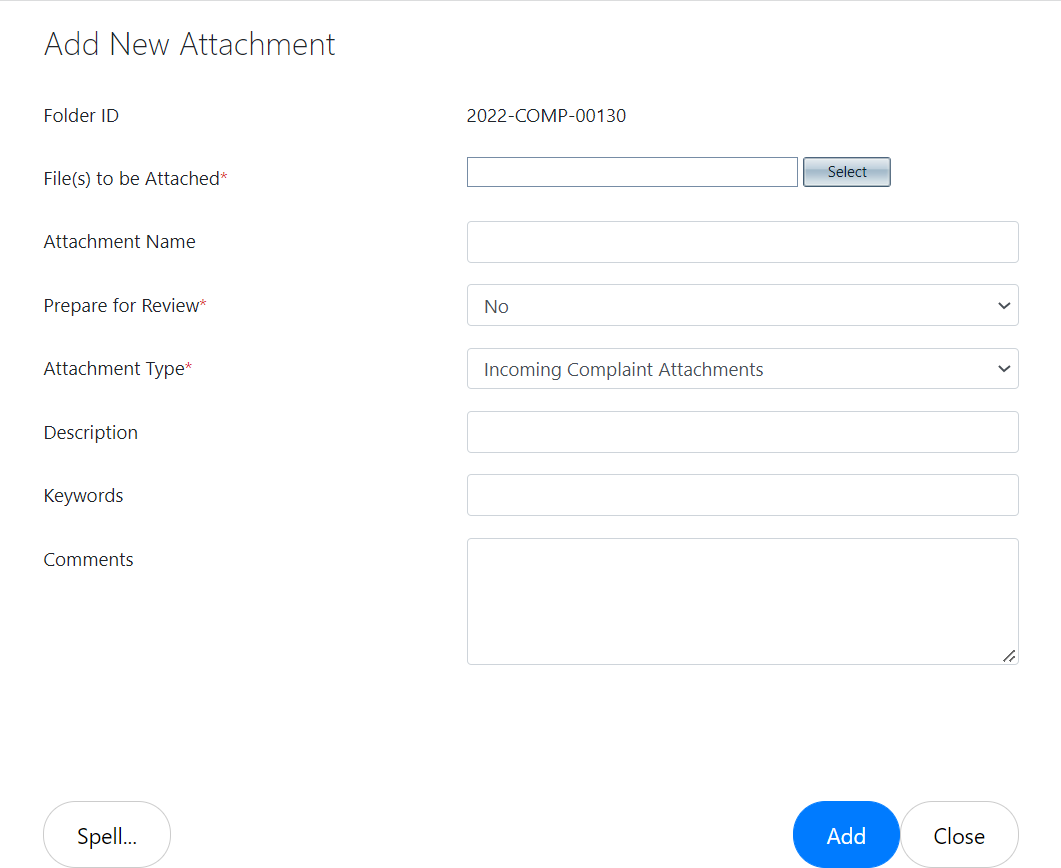
The fields described below are only available within the Add From > My Computer option, which is the most frequently used attachment upload source. They include:
Case Number: This field is auto-populated and inherited from the current case.
File(s) to be Attached: The Select button opens the Select File pop-up window, allowing users to select the attachment(s) from a local computer.
Note: Required fields are indicated by a red asterisk (*).
Attachment Name: Users can enter an alternative name for the attachment into the
Attachment Name field, which replaces the original file name within eCASE.
Prepare for Review: Select Yes to automatically assign the attachment to the designated user for review. Selecting Yes in this field prompts additional fields to appear. You can click the Assigned To lookup to designate the user to assign this review.
Attachment Type: Select the attachment type from the Attachment Type drop-down list.
Description: Enter a description of the attachments within the Description field.
Keywords: Enter the Keywords associated with this attachment, separated by Commas.
Comments: Use this free text field to upload information about the Attachment.
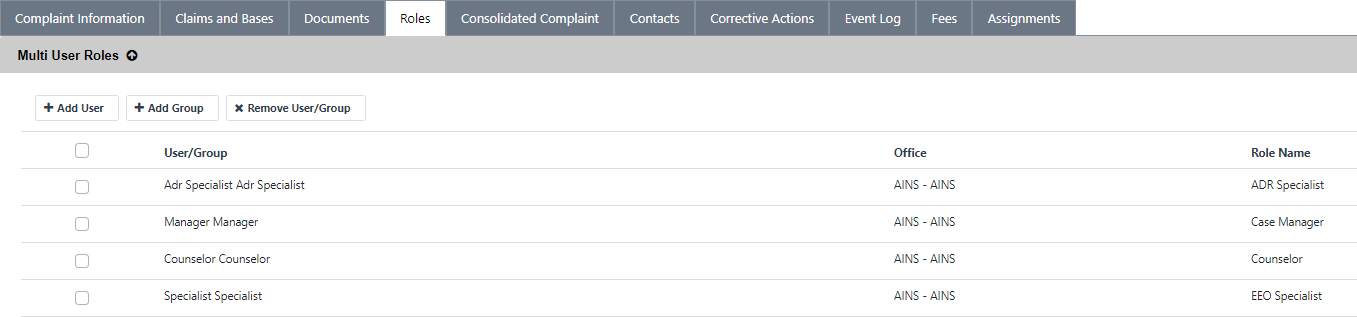
1.6.4 Roles
The Roles tab allows authorized users to manage the users and groups who have access to a case. Additionally, authorized users can add a new user or group, or remove an existing user/group.
Note: If an additional user is added to the case via the Roles tab, any tasks assigned to any previous users with the same role are automatically reassigned to the new user.
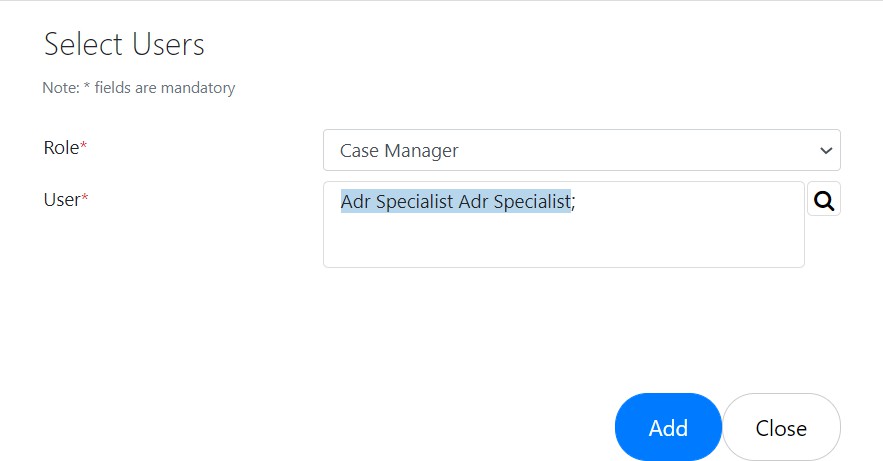
1.6.4.1 Add New User
To add a new user to the staff list:
Open the desired case folder and navigate to the Roles tab.
Click Add User. The Assign Role pop-up window appears.

Select the user role from the Role drop-down list. After making a selection, the pop-up window refreshes to display additional fields.
Click the User lookup. The pop-up window refreshes to display a list of eligible users.
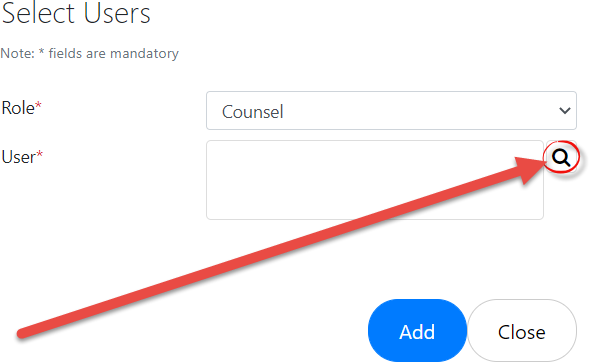
Click the checkbox adjacent the desired user name, and then click OK.

The pop-up window refreshes to display the selected user name in the User field. Click Add. The pop-up window closes, and the selected user now has access to the case and is visible within the Roles tab.
1.6.4.2 Add New Group
To add a new group to the staff list:
Open the desired case folder and navigate to the Roles tab. Click Add Group.
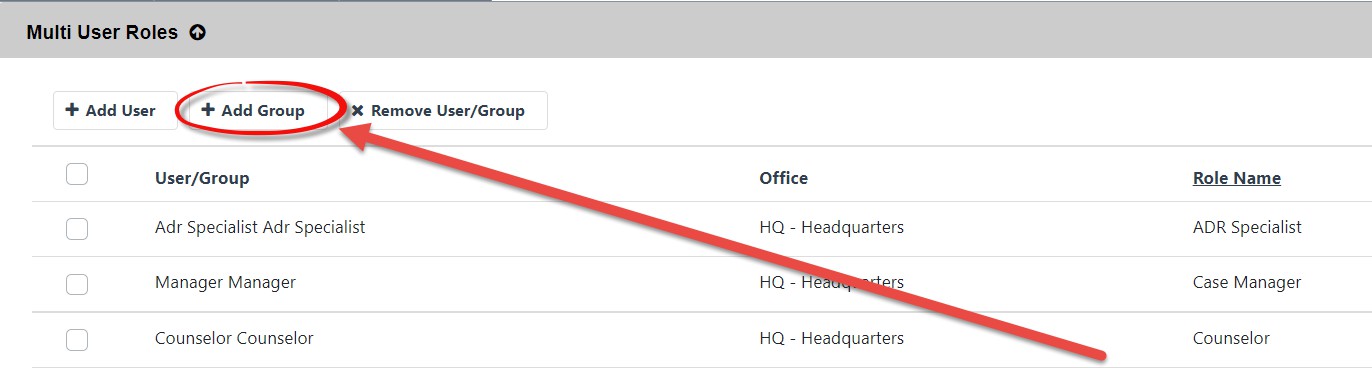
The Assign Role window appears. Select the user role from the Role drop-down list.
The pop-up window refreshes to display the Group field. Click the Group lookup icon.

The pop-up window refreshes to display a list of eligible groups. Click the checkbox adjacent the desired group and then click OK.

The pop-up window refreshes, and the selected Group appears in the field. Click Add.
The pop-up window closes, the Roles tab refreshes, and the selected group now has access to the case and is visible within the Roles tab.
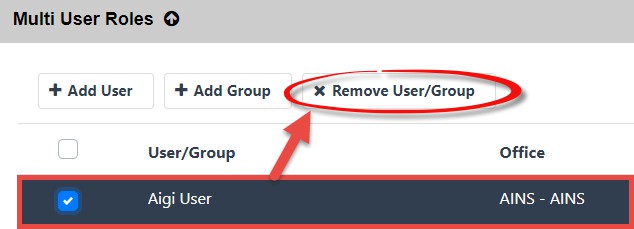
1.6.4.3 Remove User/Group
To remove a user or group:
Open the desired case folder and navigate to the Roles tab.
Select a user or group from the list within the Roles tab.
Click Remove. The page refreshes and the selected user/group is removed from the Roles tab.
1.6.5 Contacts
The Contacts tab allows users to manage contacts associated with the complaint, including Witnesses, Complaint Person(s) Against, and Representatives. Users can also add new contacts using this tab. An example Contacts tab is shown below:

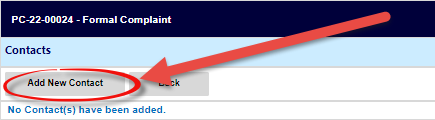
All Contacts added to the case are included in the (A) Contacts List, with fields noting the contact’s Phone, Email, Contact Type and associated Issue (if applicable). There is also the option to (C) Remove a contact from the folder. Follow the steps below to (B) Add New Contact:
Navigate to the Contacts tab and click Add New Contact. The Add Contact form appears:
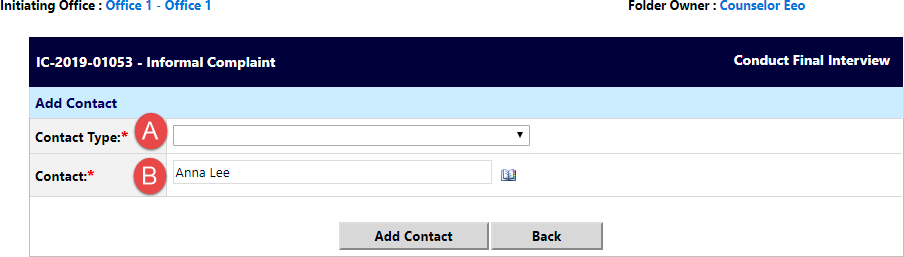
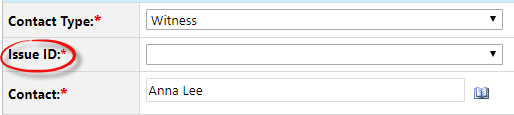
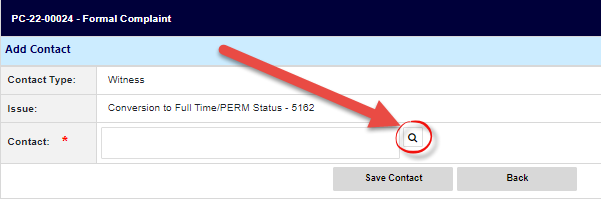
Select a (A) Contact Type from the Contact Type drop-down list, then click the lookup icon to select a (B) Contact to add.
If the Witness contact type is selected, connect the Witness to an existing Issue ID using the Issue ID drop-down list.
If the contact does not exist in the system, authorized users can add a new system contact from the Search for Contact screen (accessible via the Lookup icon). From this screen, click New > Employee:

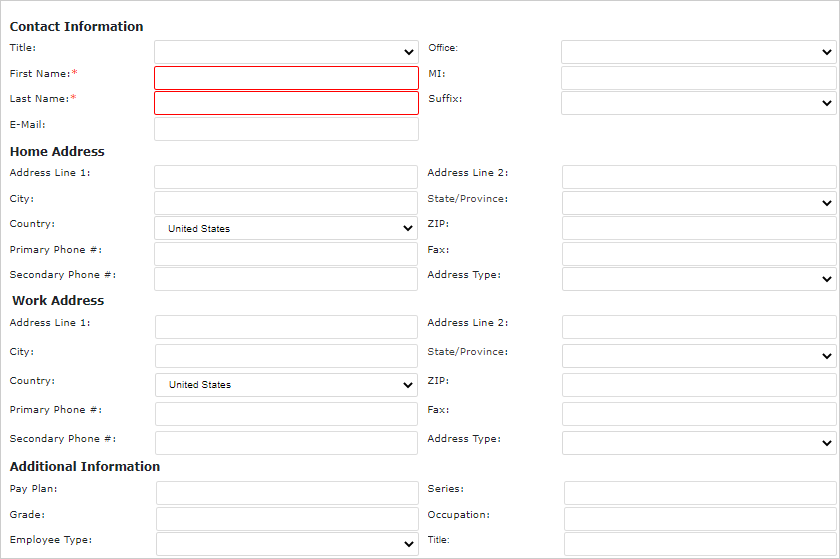
The New Contact screen appears as shown below:
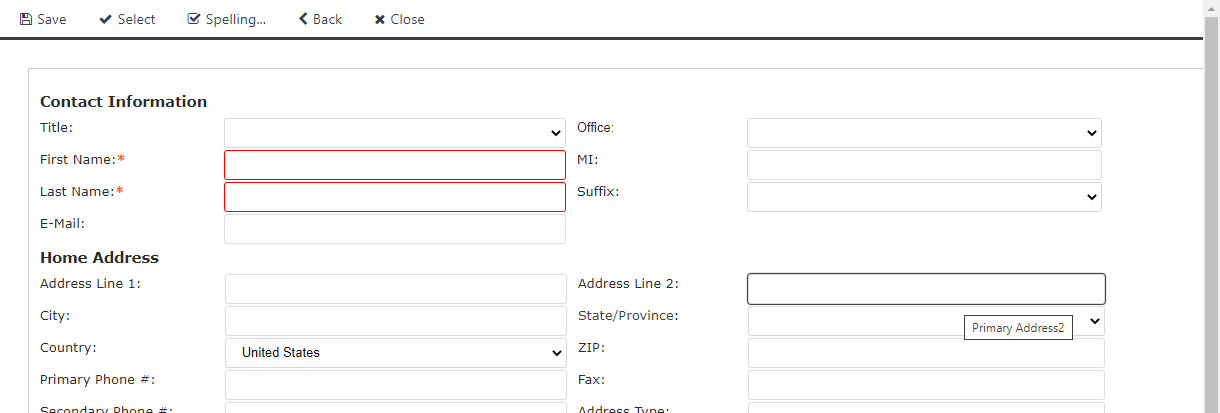
Complete all required fields. Required fields are outlined in red. When complete, click Save to save the new contact, or Select to save the new contact and add the contact to the case folder.
After adding the contact to the case folder, the person appears on the Contacts tab:

1.6.6 Fees
The Fees tab allows users to capture fees related to the Complaint. Fees can be added under separate types as defined in the system. An example Fees screen is shown below:
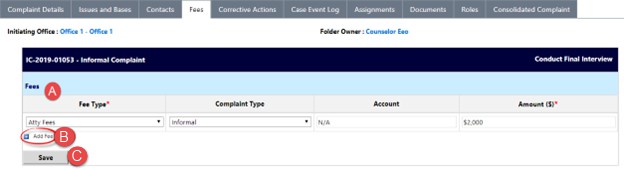
All Fees added to the folder are listed under the (A) Fees list. Users can click (B) Add Fee to insert additional fields for capturing fees. Click (C) Save to save any fees added to the folder.
1.6.7 Corrective Actions
The Corrective Actions tab allows for capturing specific actions taken to resolve the complaint. Corrective Actions can be monetary or non-monetary. Actions can be captured, viewed, edited, or removed from this tab. A sample Corrective Actions tab is displayed below:
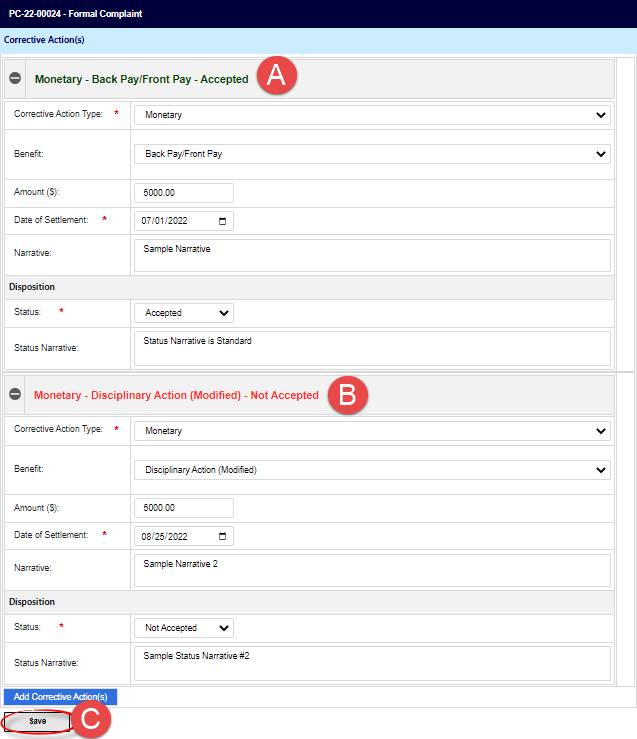
All (A) Corrective Actions added to the folder are listed here. Each action listed also indicates the action’s (B) Disposition (whether it was Accepted or Not Accepted by the AP). There is also the option to click (C) Add Corrective Action(s) to add more Corrective Actions.
1.6.8 Event Log
While working within Formal and Informal Complaints, case events are tracked in the Case Event Log. An example Case Event Log tab is shown below:
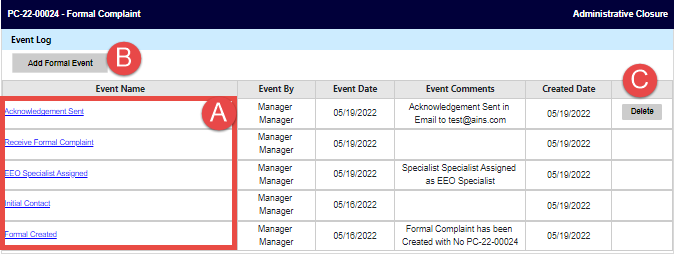
Case Events are listed in the (A) Event Name column. You can click the hyperlink within the
Event Name column to view details on the case events.
The Add Formal Event button allows you to (B) Add Formal Event if you want to manually add a case event. You may also have the option to (C) Delete case events depending on your role.
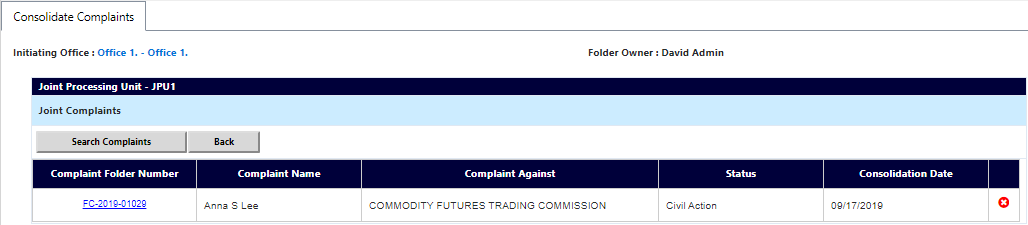
1.6.9 Consolidated Complaint
Complaints which share similarities are eligible to be entered into a Consolidated Complaint. Additionally, multiple complaints from a single AP, or multiple APs with similar allegations are eligible to be entered into a consolidated complaint. While the Consolidated Complaints feature is always present in a case folder, it only contains relevant information for the associated cases after the cases have been added into a Joint Processing Unit.

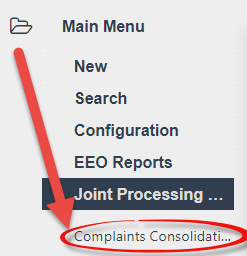
To join consolidated complaints:
Within the Main Menu, click Joint Processing Units > Complaints Consolidation.
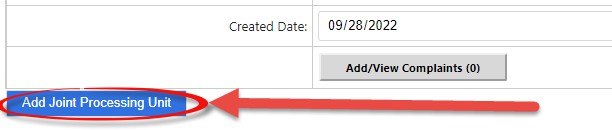
The Consolidate Complaints window appears. Click Add Joint Processing Unit.
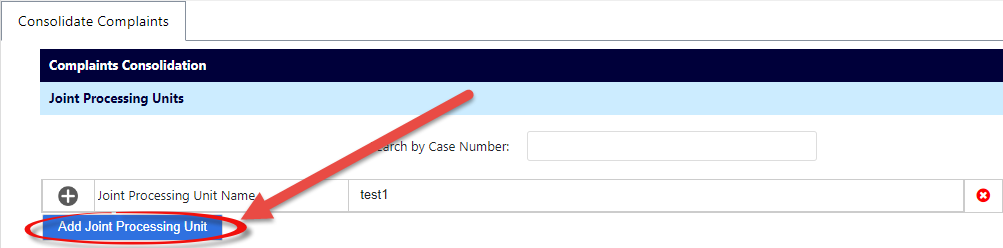
A blank Joint Processing Unit Name section appears. Complete all empty fields.
Click Save. The Consolidate Complaints window refreshes and displays the New Joint Processing Unit row.
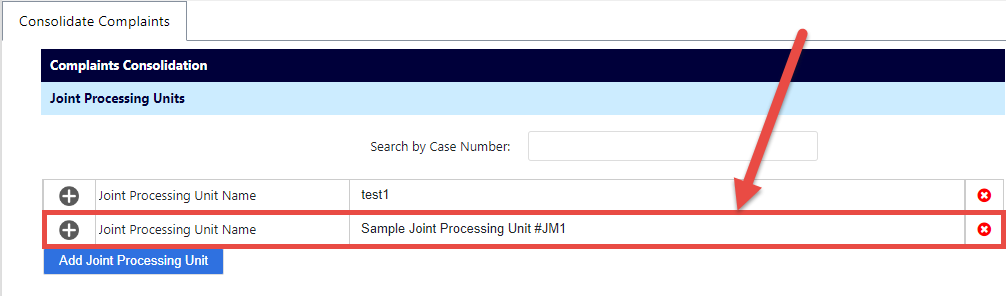
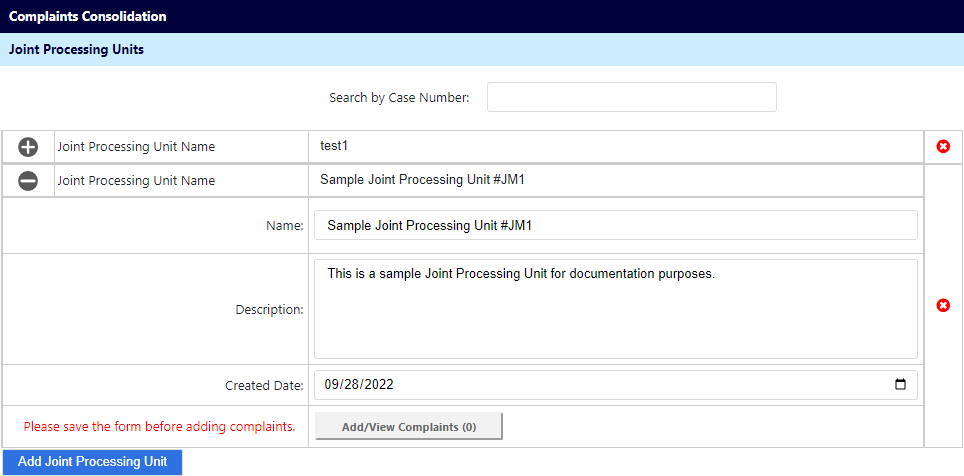
Expand the Joint Processing Unit row by clicking the + button. The workspace refreshes to display the full Joint Processing Unit entry and all its fields. Click Add/View Complaints.
A list of complaints that have been added to this Joint Processing Unit appears.
Click Search Complaints. The page refreshes and the Search For Complaints screen appears.
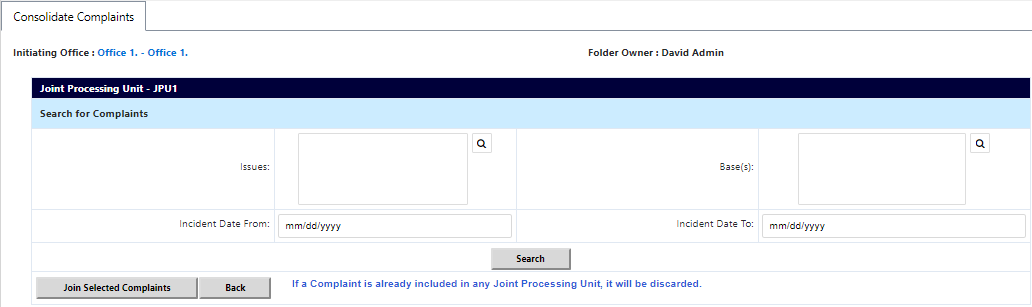
Use the lookups to select the Issues, and the Base(s), and then use the date pickers to select Incident Dates for the desired Consolidated Complaint.
Click Search.
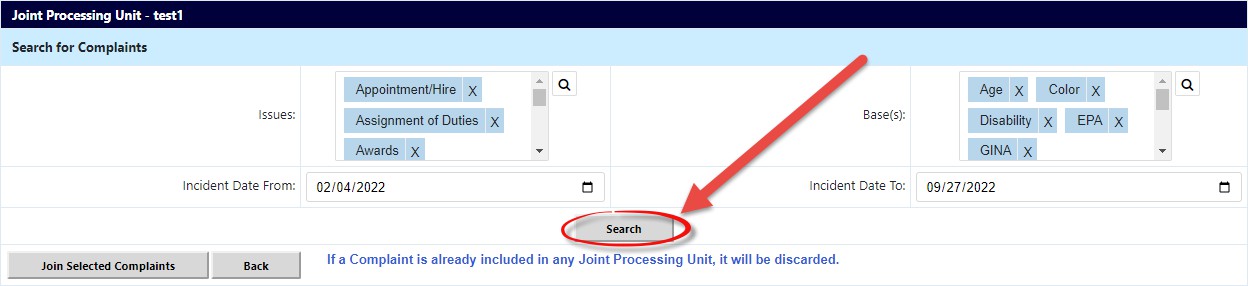
The page refreshes to display a list of complaints which match the selected criteria. Click the checkboxes associated with the desired complaints.
Click Join Selected Complaints.
The screen refreshes and displays the selected complaints within the Consolidated Complaint section. These cases are now considered to be in a Joint Processing Unit, and information related to the other joined cases can be viewed within the Consolidated Complaint tab.

1.7 General Actions
There are several general actions that you may need to take while processing EEO Contacts and Complaints, including adding Issues to complaints, requesting extensions, and withdrawing complaints. Each is described in the following sections:
1.7.1 Add Issue
Many steps in the eComplaint process require having issues present in the case folder. Follow the steps below to add a new issue to the Issues and Bases tab.
Open the desired Complaint case folder and navigate to the Issues and Bases tab. Click Add Issue to add a new Issue to the case folder.

The page refreshes to display additional fields. Select an Issue Title from the drop-down list.
Select the Basis from the available checkboxes. Depending on the selected checkbox, additional fields may appear to capture more information.
Complete the remaining fields on the form with the required details.
Click Save to save the issue.
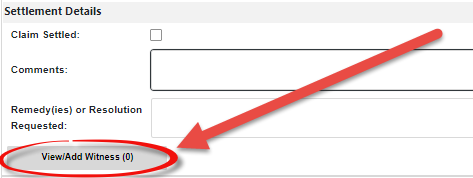
After saving, the View/Add Witness button appears to allow users to add witnesses to the issue, if required. Click View/Add Witness.
The screen below appears. Click Add New Contact.
The page refreshes to display the Add Contact workspace. Click the Contact lookup.
The Search for Contact pop-up window appears. Enter the Contact Search Criteria in the available fields, and then click Search.
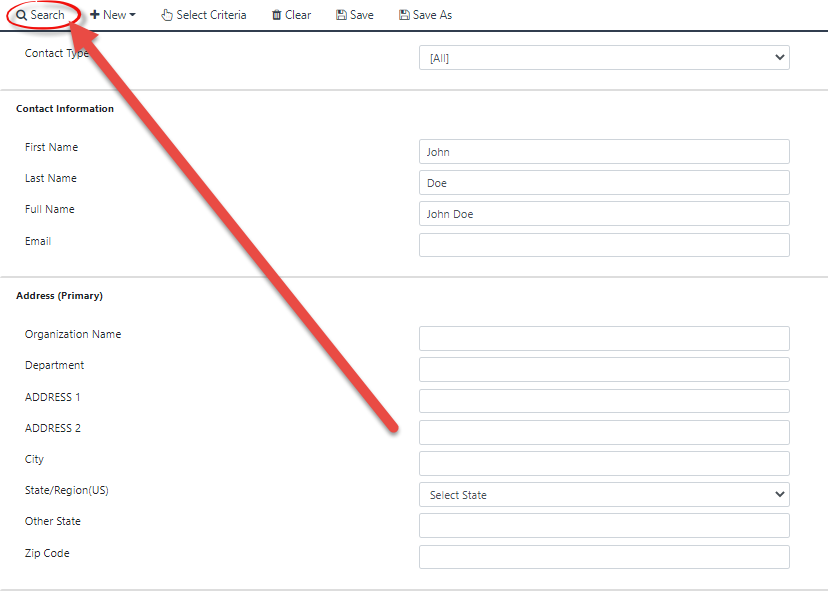
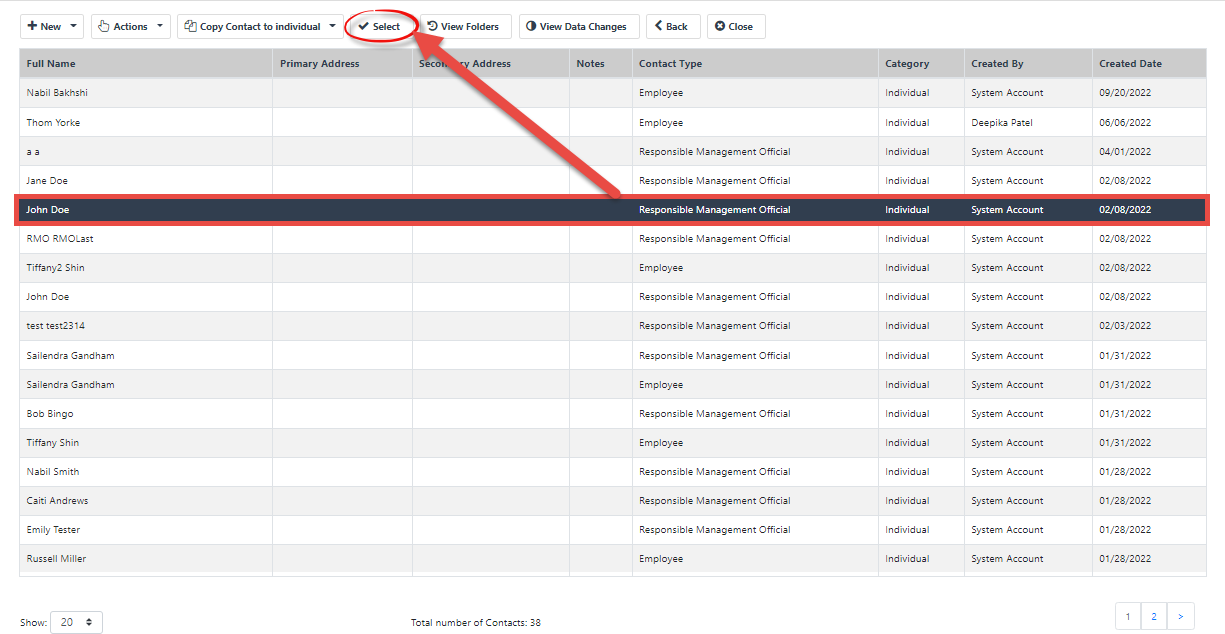
The pop-up window refreshes to display the search results. Select the desired Contact and click Select.
If you are unable to locate the desired contact using a search, click the New drop-down list and select the desired contact type to create a new contact.

After selecting the Contact Type, the pop-up window refreshes to display additional fields. The New Employee Contact Type form is displayed below. Complete the required fields and then click Save.
1.7.2 Request Due Date Extension
The Request Due Date Extension option allows authorized users to extend the due date for the complaint. Extensions can be requested for both Informal and Formal Complaints. Follow the steps below to request a due date extension for a Formal or Informal Complaint:
Note: For Informal Complaints, the due date cannot be extended until ADR has been offered.
From within a complaint case folder (at most points in the process), select the option Request Due Date Extension from the Next Action drop-down list and then click the Green arrow button. The Request Due Date Extension pop-up window appears as shown below:
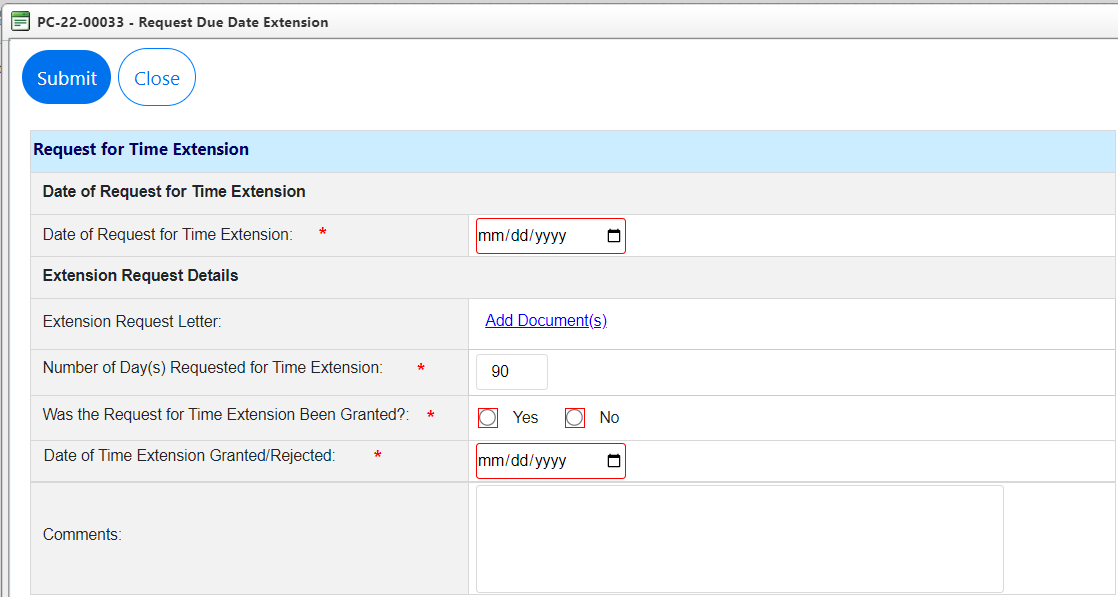
Use the date picker to select the Date of Request for Time Extension.
Click the Add Document link to upload supporting documentation.
Note: If the extension is granted, adding an Extension Request Letter to the request is required.
Enter a number in the Number of Day(s) Requested for Time Extension field.
Within the Was the Request for Time Extension Been Granted? field, Select the Yes radio button to grant the extension.
Note: After selecting to grant the extension, a new due date automatically populates.
Use the date picker to select the Date of Time Extension Granted/Rejected.
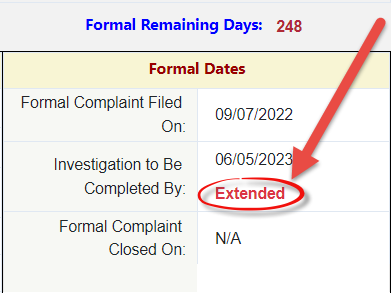
Click Submit. The pop-up window closes, the page refreshes, and the Due Date Extension is applied, and is indicated as shown below:
1.7.3 Withdraw from Complaint
At most phases in the complaint process, the AP can withdraw the complaint and cease case processing activities. If the AP withdraws a complaint, it is via one of the selections available under the Next Action drop-down list. Follow the steps below to withdraw from a complaint.
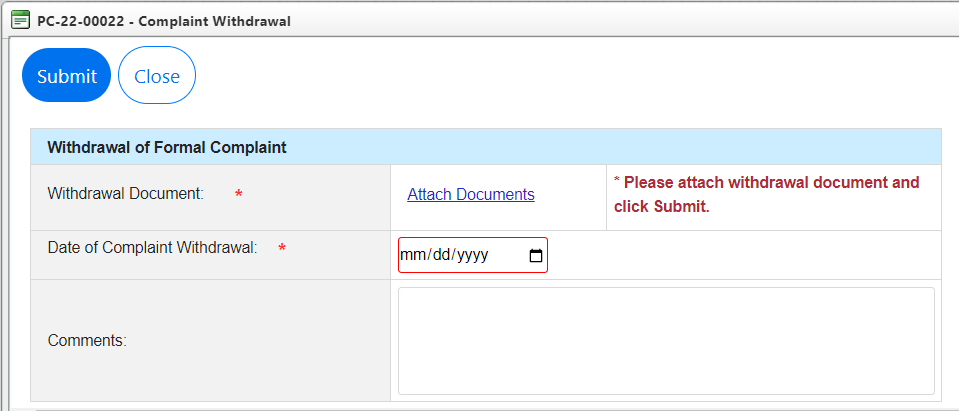
From within a complaint (at most points in the process), select the option Withdraw from Complaint under the Next Action drop-down list and then click the Green arrow button. The page refreshes and the Complaint Withdrawal pop-up window appears as shown below:
Note: The Withdraw from Complaint Next Action selection is always available, regardless of the complaint folder status.
Click Attach Document(s) to upload a Withdrawal Document.
Use the date picker to select a Date of Complaint Withdrawal when the action took place.
Enter any Comments, if applicable.
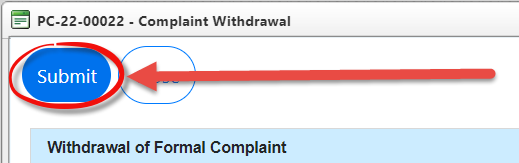
When complete, click Submit to submit the withdrawal request.
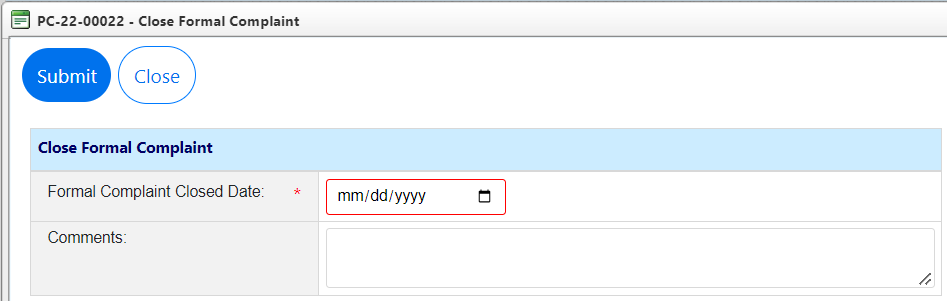
After committing the withdrawal, the Complaint is now in Complaint Withdrawn status. Next the complaint must now be closed. Select Close Complaint from the Next Action drop-down list and then click the Green arrow button to close the complaint:

The Close Complaint pop-up window appears. Select the Complaint Closed Date and click Submit.
The page refreshes and the Complaint is now withdrawn and closed. The complaint can be re-opened after withdrawal. To re-open the complaint, open the withdrawn complaint case folder and select Re-Open from the Next Action drop-down list, and then click the Green arrow button. The Re-Open pop-up window appears.
Use the date picker to select the Re-Open Date and then enter any Comments in the field.
Click Submit to re-open the complaint. The pop-up window closes, and the complaint refreshes to indicate it is in the Complaint Withdrawn status.
Note: After re-opening a case folder, the case reverts to the most recent status prior to withdrawal.
2 EEO Contact Processing
When an Aggrieved Person (AP) contacts the agency regarding an EEO complaint, it is first logged as an EEO Contact. This EEO Contact begins the complaints process and can be advanced to the Informal Complaint and Formal Complaint stages if required or kept on file in case the AP decides to file a complaint in the future. This chapter provides information about:
Creating an EEO Contact.
Working with the EEO Contact folder.
Processing an EEO Contact.
Completing an EEEO Contact (including multiple possible outcomes.)
2.1 Create an EEO Contact
Follow the steps below to initiate an EEO Contact after contact from an AP.
A Counselor role user logs in to eComplaint, then from the Main Menu click Main Menu > New > EEO Contact:
.jpg?sv=2026-02-06&spr=https&st=2026-06-16T07%3A33%3A28Z&se=2026-06-16T09%3A13%3A28Z&sr=c&sp=r&sig=rBfZLddJvTtTAXJKEG4ltuAeesprC2RMiAO2c0EnngE%3D)
The New EEO Contact page appears. Click the Aggrieved Person lookup to locate an existing contact or create a new one:

The Search for Contact screen appears.
To search for an existing contact, use the search fields and click (A) Search to locate the contact, then select the contact and click Select.
Alternatively, click (B) New > Employee to create a new contact. The pop-up window refreshes to display the New Contact page.
c. Complete the required information (required fields are highlighted in red) and click (A) Save to save the new contact.
Note: If errors are present on the form, the system displays an error message detailing the field that requires correcting
d. After successfully creating the new contact, a confirmation message appears. Click OK.
e. Click (B) Select to select the newly added contact. The pop-up window closes, and the selected contact appears in the Aggrieved Person field.
Click the Region lookup.

The Region Selection pop-up window appears. Expand the Region folders until you locate the desired region and click the checkbox adjacent the region.

Click OK. The pop-up window closes, and the selected Region appears in the field.
Click Next.

The page refreshes to display additional Contact Information fields. Click Save.
Within this screen, you can click the Assign Counselor button to assign a counselor to the case folder, if you are not a counselor. You can click the Create Informal Complaint button to directly create an Informal Complaint using the new EEO Contact.
The EEO Contact screen and processing/completing a contact are explored in the following section.
2.2 EEO Contact Folder
After the EEO Contact is created and saved, it appears in the workspace as shown below:
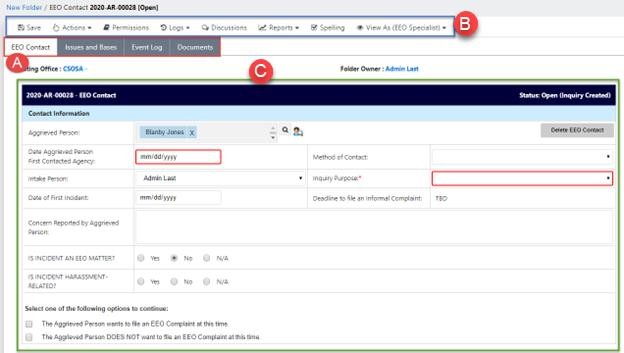
The page opens to the (A) EEO Contact tab, where all information related to the EEO Contact is located. There are also tabs for Issues and Bases, the Event Log, and Documents.
Additional actions can be taken on the EEO Contact using the (B) Action Bar (see the eCASE User Manual for more information on these actions).
Finally, the (C) EEO Contact Case Form displays in the workspace.
2.3 Process Inquiry
Follow the steps below to process an EEO Contact in eComplaint.
After saving the initial EEO Contact, open the EEO Contact folder. The EEO Contact tab appears.
Note: Within the context of this manual, the Inquiry is the processing of the EEO Contact request.
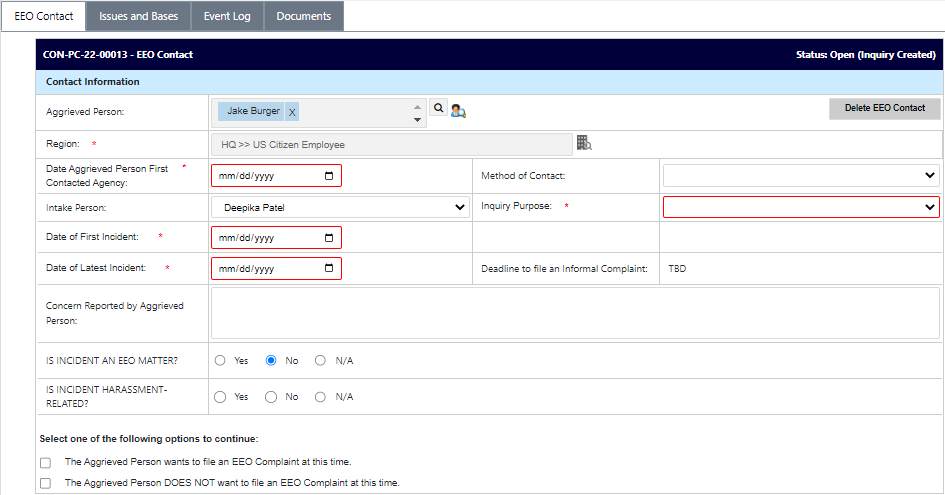
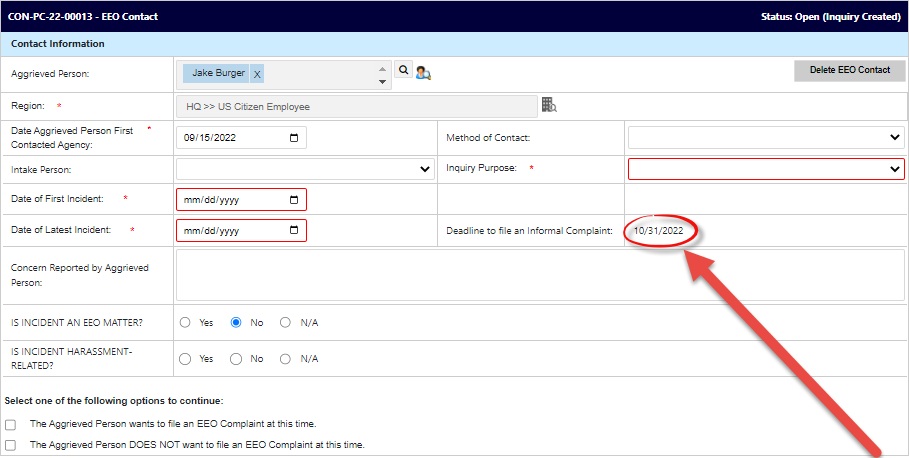
Use the date picker to select the Date Aggrieved Person First Contacted Agency. After selecting a date, the Deadline to file an Informal Complaint automatically calculates and displays:
Select the Inquiry Purpose from the drop-down list.
Use the date picker to select the Date of First Incident.
Use the date picker to select the Date of Latest Incident.
Additional fields and selections are available on this form. Review all questions to ensure the proper selections are made depending on the facts and circumstances surrounding the complaint.
Under Is incident harassment related? if Yes is selected, an additional field appears to Notify management? If Yes is selected, a button appears to Send Email, as shown below. You can click this button to send an email to management.

Click Save to save the details entered on the form. All required fields must be complete to save the form.
2.4 Complete EEO Contact
To complete the EEO Contact process, the user must determine which pathway to follow. Under the field Select one of the following options to continue, two checkboxes are available.
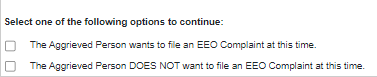
One of these checkboxes must be selected to continue to Inquiry process. Each option is described in the table below:
Option | Description |
|---|---|
The Aggrieved Person wants to file an EEO Complaint at this time. | The AP elects to move forward in creating an EEO Complaint. Selecting this option prompts the page to refresh and display to Create Formal Complaint or Assign Counselor buttons.
|
The Aggrieved Person DOES NOT want to file an EEO Complaint at this time. | The AP does not wish to proceed with the EEO Complaint process at this time. This selection prompts the page to refresh and display the Closing Comments free text field. |
Depending on the selection made, see the following subsections for next steps in the process.
2.4.1 Create Informal Complaint from an Inquiry
From the Inquiry screen, follow the steps below to proceed to Complaint creation:
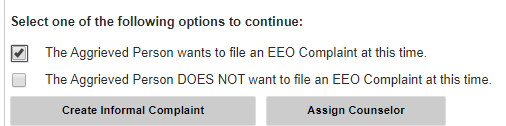
Within the EEO Contact page, ensure the required fields are complete and then click the Aggrieved Person wants to file an EEO Complaint at this time checkbox.
The workspace refreshes to display additional buttons. Click Create Informal Complaint.
.png?sv=2026-02-06&spr=https&st=2026-06-16T07%3A33%3A28Z&se=2026-06-16T09%3A13%3A28Z&sr=c&sp=r&sig=rBfZLddJvTtTAXJKEG4ltuAeesprC2RMiAO2c0EnngE%3D)
The screen refreshes to display an updated EEO Contact case folder, with the status updated to (A) Completed On Time (Informal Complaint Created). You can also click the link to view the newly created (B) Informal Complaint.
.png?sv=2026-02-06&spr=https&st=2026-06-16T07%3A33%3A28Z&se=2026-06-16T09%3A13%3A28Z&sr=c&sp=r&sig=rBfZLddJvTtTAXJKEG4ltuAeesprC2RMiAO2c0EnngE%3D)
The Informal Complaint is now available for further action, and this EEO Contact is now closed.
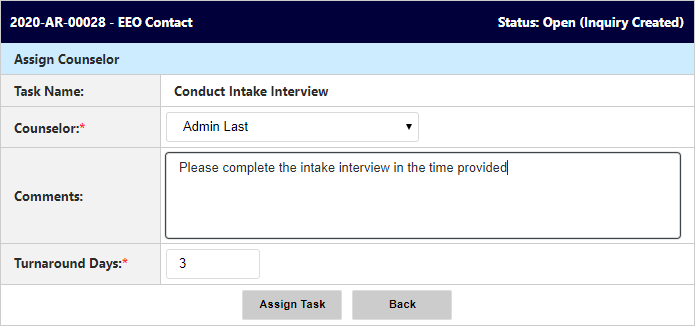
2.4.2 Assign a Counselor
If you’d like to assign a counselor at this point (not required), follow the steps below on the Inquiry screen.
Within the Inquiry form, after selecting one of the first two options, select Assign Counselor:
.png?sv=2026-02-06&spr=https&st=2026-06-16T07%3A33%3A28Z&se=2026-06-16T09%3A13%3A28Z&sr=c&sp=r&sig=rBfZLddJvTtTAXJKEG4ltuAeesprC2RMiAO2c0EnngE%3D)
The Inquiry screen refreshes to show the Assign Counselor fields, as shown below:
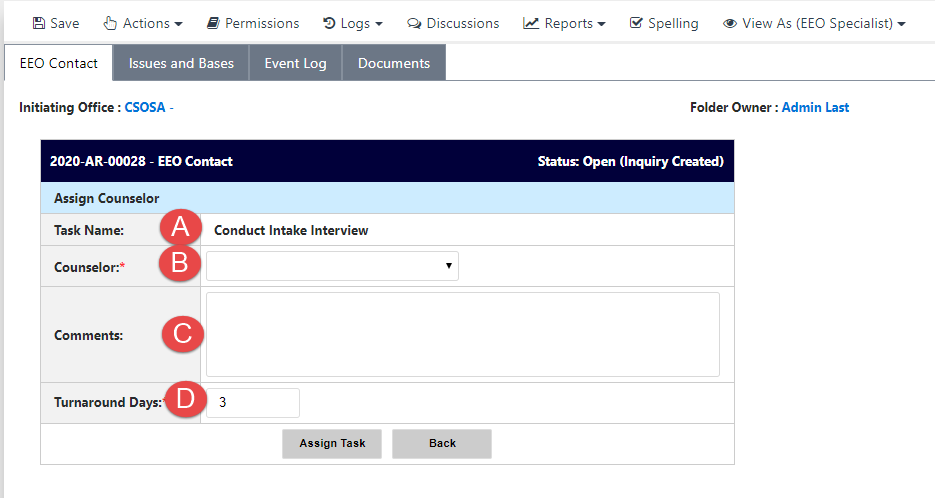
The (A) Task Name field is auto populated, as it defaults to the first task in the Informal Complaint process.
Select a (B) Counselor from the Counselor drop-down list.
Add (C) Comments in the Comments field, if desired.
Enter the (D) Turnaround Days for the assigned task. A default value is automatically entered but can be changed as needed.
Click Assign Task to assign the task to the selected Counselor:
2.4.3 Do Not File an EEO Complaint
An AP may wish not to file an EEO Complaint at the present time. If so, follow the steps below to close the Inquiry.
Within the EEO Contact form, select the The Aggrieved Person DOES NOT want to file an EEO Complaint at this time checkbox. The page refreshes to display additional fields.
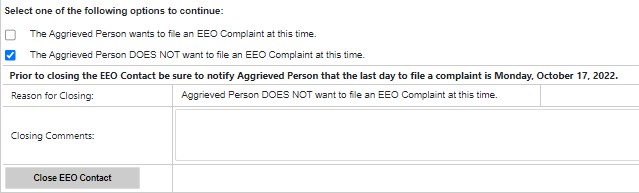
The Reason for Closing field is auto populated and cannot be changed. Add a comment in the Closing Comment free-text field to explain circumstances around the closure.
Note: As indicated above the Reason for Closing field, contact the AP and notify them of their last day to file a complaint. This date is also displayed in the notification message.
Click Close EEO Contact.

A confirmation message appears. Click Yes to close the EEO Inquiry.
The pop-up window closes, and the EEO Contact page refreshes to display that the status of the Inquiry is now updated to Completed On Time (Closed).
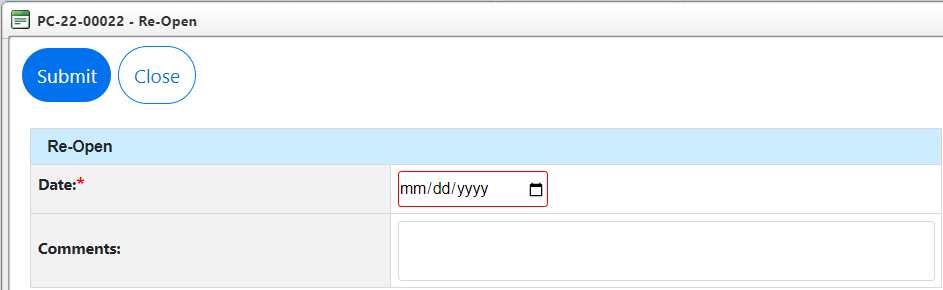
2.5 Reopen EEO Contact
Within the allotted time frame, an AP who initially elected not to pursue a complaint may change their mind and elect to pursue an EEO Complaint. Follow the steps below to reopen a closed EEO Contact.
Navigate to the EEO Contact folder for the contact that needs to be reopened.
Within the EEO Contact tab, click Reopen.
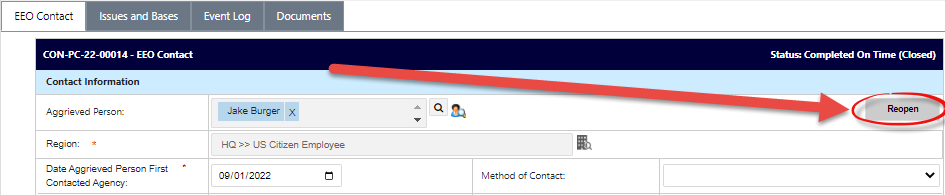
The page refreshes to display the Reopen workspace. Enter any relevant information in the Comments field.
Click OK.
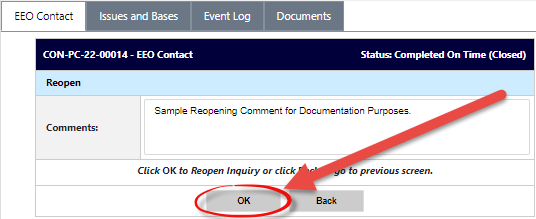
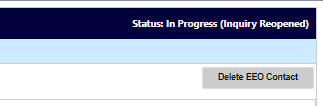
The page refreshes to display the full EEO Contact case folder, and the status is updated to In Progress (Inquiry Reopened).
3 Informal Complaints
After an Inquiry is complete, the Aggrieved Person may opt to proceed to creating an Informal Complaint.
This section contains information about:
Creating a new Informal Complaint
Working in an Informal Complaint folder
Rights and Responsibilities
Conducting the Initial Interview
Traditional Counseling
Documenting the Final Interview
Submitting Corrective Actions
Issuing a Notice of Right to File
Converting an Informal Complaint to a Formal Complaint
Alternative Dispute Resolution
Informal Closure
Informal Complaints are recommended be processed from an existing Inquiry. From the Inquiry folder, there are options to create an Informal Complaint. Consult the Create Informal Complaint from an Inquiry subsection of this document for more information about how to create an Informal Complaint from an existing Inquiry. Alternatively, a new Informal Complaint can be created without proceeding from an Inquiry. This process is described in the subsection below.
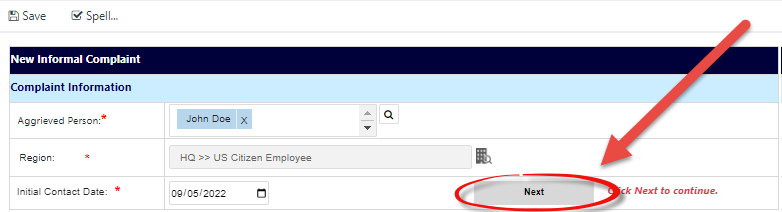
3.1 Create New Informal Complaint
Follow the steps below to create a new Informal Complaint.
Counselors are responsible for creating Informal Complaints. The Counselor must login to the eComplaint application.
Within the Home Page, click Main Menu > New > Informal Complaint:

The page refreshes to display a blank New Informal Complaint form.
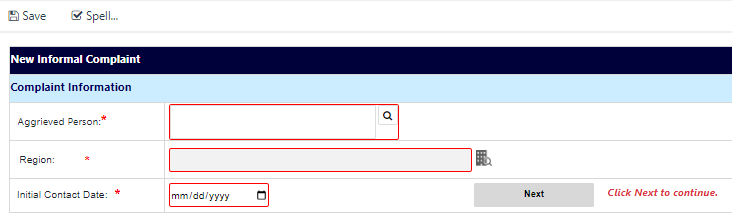
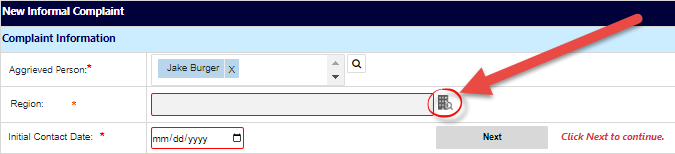
In the Aggrieved Person field, click the Lookup icon. The Search for Contact pop-up window appears. Use this pop-up window execute a search, select the contact to be added to the Complaint, and then click Select.
Note: The Aggrieved Person is also the Claimant.

Note: Within the Search for Contact pop-up window, the +New drop-down list allows you to create new Contacts from within the lookup screen if the contact does not exist in the system. Locate the contact, or create a new one, then click Select to add this contact to the complaint.
Click the Region lookup. The Region Selection pop-up window appears.
Expand the folder tree and click the checkbox adjacent the desired location. Click OK.

The pop-up window closes, and the selected value appears in the Region field. Use the date picker to select the Initial Contact Date.
Click Next.
The page refreshes to display the Complaint Information tab of the newly created Informal Complaint case folder.
Before additional action can be taken on the case folder, determine whether the AP elects to remain anonymous. Locate the Anonymity section and click the Yes radio button if the AP elects to remain anonymous. If the AP waives the right to remain anonymous, select No:

Click Save to save the status. Consult the subsections below for information about the actions you can now take in the Informal Complaint folder.
3.2 Informal Complaint Folder
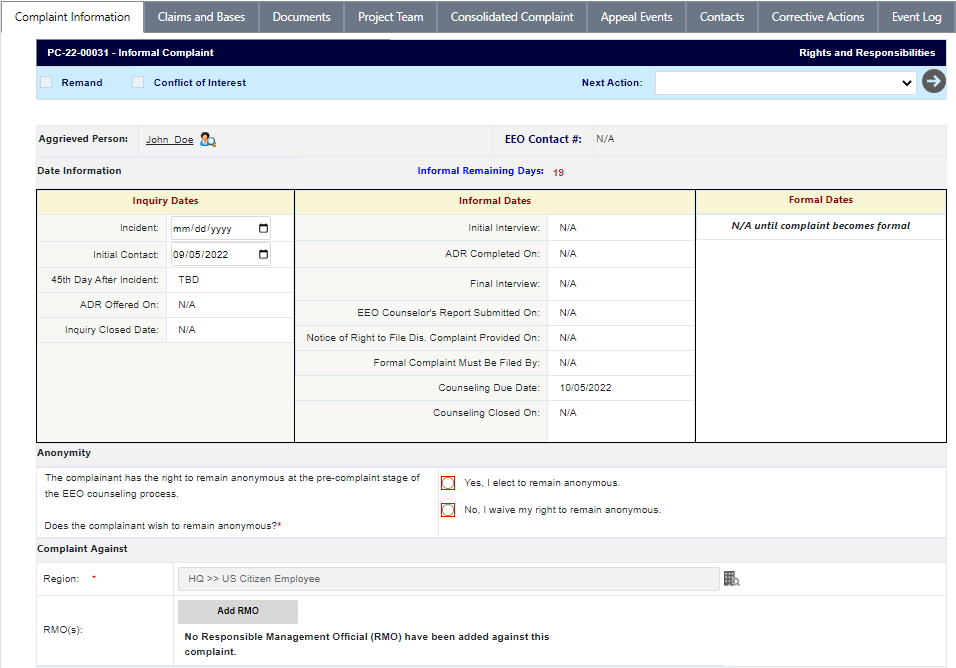
After the Informal Complaint is created in the system, the Complaint Information appears as shown in the example below:

The Informal Complaint interface consists of two primary elements: The (A) Complaint Information form, where the user lands after opening the complaint, and the various (B) Tabs for processing the complaint. Each are detailed in the following sections.
3.2.1 Complaint Information Form Fields
The fields on the Complaint Information tab are shown below, and described in the following table:

Reference | Field | Description |
|---|---|---|
A | Complaint ID | The Informal Complaint Identification Number. If there is an associated EEO Contact Case, the ID appears as a hyperlink. If there is an associated EEO Contact, this is linked in the EEO Contact # field. |
B | Date Information | This section tracks the pertinent dates for each period in the complaint process. There are fields for Incident Date, Inquiry Dates, Informal Dates, and Formal Dates. |
C | Anonymity | Use the radio buttons to indicate whether the AP wishes to remain anonymous. |
D | Complaint Against | The Region lookup is used to select the region of the person against whom the complaint is being filed. Use the
Additionally, use the Add RMO button to add a Responsible Management Official to the compliant. (!!) Note: This field can be altered after the complaint case folder is created by clicking the lookup and selecting another value from the pop-up window. |
 Lookup icon to select a region. The Region list includes nested fields, use the Show/Hide button to show nested lists and use the checkbox to select the entity against whom the complaint is filed:
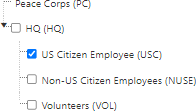
Reference | Field | Description |
E | Case Details | This subsection tracks information about the complaint including the Action Office (if applicable), a Description for the case, and the Add Representatives button. If this information was provided in an origination EEO Contact, these details are automatically added to the IC. |
F | Role Assignments | Assigned roles for processing the complaint, including Counselor, Manager, EEO Specialist, and ADR Specialist. |
3.2.2 Tabs
The Informal Complaint case folder includes the following tabs, as described in the table below:

Reference | Tab | Description |
|---|---|---|
A | Complaint Information | Details about the Informal Complaint are captured in this tab. Important dates are also listed in this tab to aid in visibility while processing complaints. |
B | Claims and Bases | Specific Issues related to the complaint are added and managed from this tab. Each issue can be associated with a basis of discrimination, as well as Witnesses who can be included in complaint-related activities, such as interviews. |
C | Complaint Against | Details about the organization the complaint has been filed against are captured on this tab. |
Reference | Tab | Description |
|---|---|---|
D | Documents | Documents associated with the complaint can be viewed and managed from the Documents tab. Documents can also be added and removed, if required. |
E | Roles | Manage the users, groups, and permissions associated with this Complaint. |
F | Consolidated Complaint | View associated consolidated complaints (if any have been created). |
G | Contacts | Manage Contacts related to this complaint. These can be added as new contacts or pulled from existing system contacts. |
H | Corrective Actions | This tab allows authorized users to create and record Corrective Action entries. Multiple Corrective Actions can be logged within this tab. |
I | Event Log | View a list of events captured in the system while the complaint is processed. Step outcomes and associated documentation can be viewed from this tab. See the Case Event Log section for details. |
J | Fees | Create and manage fees related to this Complaint. |
K | Assignments | The Assignment tab typically drives the case folder workflow, however, in the eComplaint application, the Assignments tab is used to record Sub Folders, Linked Folders, and FYI Copies. |
Reference | Tab | Description |
L | ADR Case Information | If eComplaint – ADR integration is configured, the ADR Case Information tab is available once an ADR case has been initiated from the folder. |
Note: Additional case tabs may appear depending upon the organizational configuration.
3.3 Anonymity/Rights and Responsibilities
The Aggrieved Person has rights and responsibilities throughout the Complaint lifecycle, including the right to remain anonymous. Before additional action can be taken on the IC, determine whether the AP elects to remain anonymous, and provide their Rights and Responsibilities. Follow the steps below to log these actions:
Open the desired Informal Complaint case folder and within the Complaint Information tab, locate the Anonymity subsection. Click the Yes radio button if the AP elects to remain anonymous. Alternatively, if the AP waives the right to remain anonymous, click the No radio button.

Click Save to save the change in status.
Select Rights and Responsibilities from the Next Action drop-down list, and then click the Next arrow.

The Rights and Responsibilities pop-up window appears. First, use the date picker to select the Date the following provided to the aggrieved.
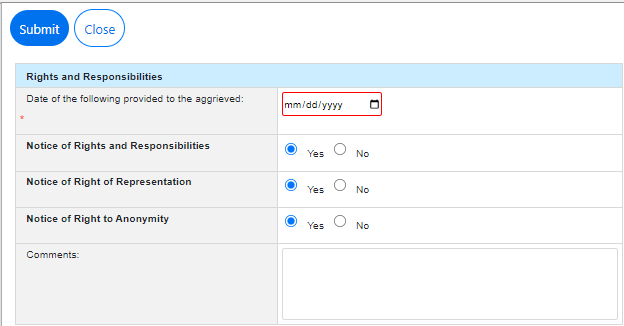
The aggrieved party should also be provided with the Notice of Rights and Responsibilities, Notice of Right of Representation, and Notice to Right to Anonymity. Select the Yes radio button beside each to indicate that the aggrieved party was provided with all documentation.
Enter any relevant information in the Comments field.
Click Submit. The pop-up window closes, and the Informal Complaint folder refreshes to display the updated status.
3.4 Initial Interview
Complete the steps outlined below to process the complaint through the normal lifecycle starting with conducting the Initial Interview:
Note: The Anonymity radio button must be complete before logging the Initial Interview.
Open the desired Informal Complaint. The folder opens to the Complaint Information.
Click the (A) Next Action drop-down list and select Complete Initial Interview, then click the (B) Arrow:

The Initial Interview pop-up window appears. Use the date picker to select the Date of Initial Interview.
Enter the name of the Initial Interview EEO Counselor in the field.
Enter a summary of initial interview using the free text field.
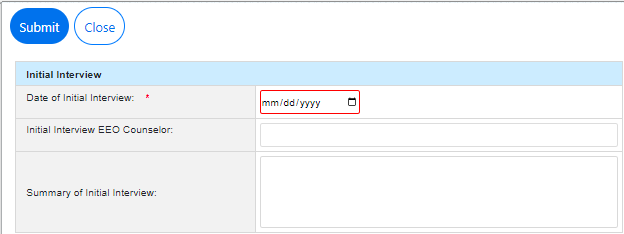
When complete, click Submit.
The pop-up window closes, and the case folder refreshes.
3.5 Offer ADR
After the Initial Interview has been conducted, the next step is to offer ADR. To complete the Offer ADR workflow step:
Open the desired case folder and navigate to the Complaint Information tab. Select Offer ADR from the Next Action drop-down list, then click the Arrow button.

The ADR Offer pop-up window appears. Use the date picker to select the Date ADR Offered by Agency.
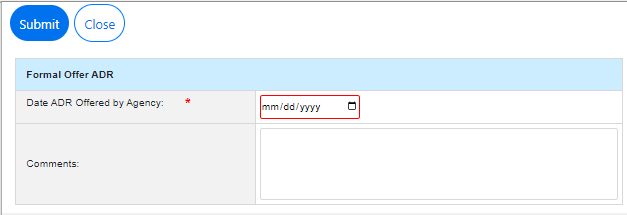
Enter any relevant information in the Comments field.
Click Submit. The pop-up window closes, and the case folder page refreshes to display a new Status: Review IP.
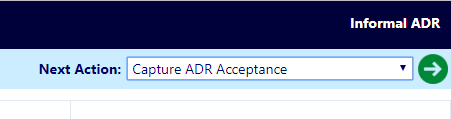
Within the Next Action drop-down list, select Capture ADR Acceptance and click the Arrow button.

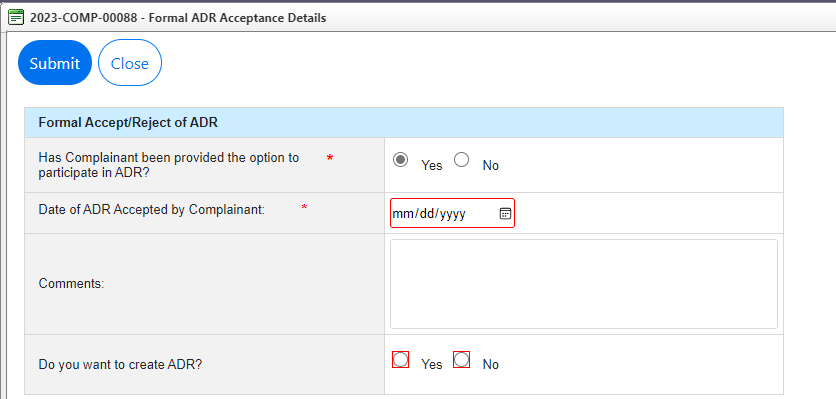
The ADR Acceptance Details pop-up window appears. Select one of the Did the Aggrieved Person accept ADR? radio buttons based on the AP’s decision.
Use the date picker to select the Date of ADR Accepted/Rejected.
Enter any relevant information in the Comments field.
If the AP accepted ADR, the Do you want to create ADR? field appears. If you select Yes, an ADR case will be created from eComplaint. If No is selected, you can proceed with ADR through eComplaint, but no ADR case will be created. When an ADR case is created, all pertinent fields specified on the eComplaint - ADR Configuration tab will map to the newly created ADR case.

Click Submit to log the decision. If ADR is accepted, consult the Informal ADR section for next steps. Otherwise, see the Traditional Counseling section.
3.6 Informal Alternative Dispute Resolution
APs have the option to pursue ADR to resolve their complaint. ADR must be offered to the AP as part of the Initial Interview process. The AP decides whether to pursue ADR. If the AP does not accept ADR, traditional counseling is pursued. The following sections capture the Informal ADR process.
Note: If the AP elects to remain anonymous, you cannot pursue ADR.
3.6.1 ADR Acceptance
Follow the steps below to complete the ADR Acceptance stage.
After the AP is offered ADR, users can indicate if the ADR was accepted or declined during the Capture ADR Acceptance phase.
Select Capture ADR Acceptance from the Next Action drop-down list and click the Arrow button.
The Informal Accept/Reject of ADR pop-up window appears. Select one of the Did the Aggrieved Person accept ADR? radio buttons based on the AP’s decision. If No is selected, the case proceeds into Traditional Counseling. See the Traditional Counseling section for details. If Yes is selected, the case folder proceeds into ADR.
Note: If the No radio button is selected, then this is the formal designation that the AP has rejected ADR.
Provide a Date ADR Accepted (this is required), and optionally provide any comments.
If you selected the Yes Did the Aggrieved Person accept ADR? radio button, the Do you want to create ADR? field appears. If you select Yes, an ADR case will be created from eComplaint.
Click Submit to submit the acceptance.
The complaint enters Informal ADR. See the following sections for details on completing the ADR process.
3.6.2 ADR Event
Complaints in the Informal ADR process require to capture ADR Events. Follow the steps below to capture an ADR event:
Open a complaint in the Informal ADR Process, and select Capture ADR Event from the Next Action menu and click the Arrow button:

The Conduct Informal ADR pop-up window appears. Fields are available to capture details about the ADR event, as described in the following table:

Field | Description |
|---|---|
ADR Document | Use the Add Document link to add any supporting documentation as an attachment available of the Documents tab. |
Date ADR Held | Use the calendar icon to select a date when the ADR event occurred. |
Type of ADR Held | Use the drop-down list to select the type of ADR event being captured. Out-of-the-box options include Early Neutral Evaluation, Facilitation, Fact Finding, Mediation, Ombuds, Peer Review and Settlement Conferences. |
Resources Used | Indicate the resources used for the Informal ADR Event. Out-of-the-box options include Federal Executive Board, In-house, Other, Other Federal Agency, and Private Organizations. |
Field | Description |
|---|---|
Agency Official at ADR | Note the agency official in attendance during the ADR. |
Comment | Provide any comments. |
Click Submit.
After the ADR Event is submitted, it can be viewed from the Case Event Log. Select the Informal ADR Event to view the details and any associated documentation:
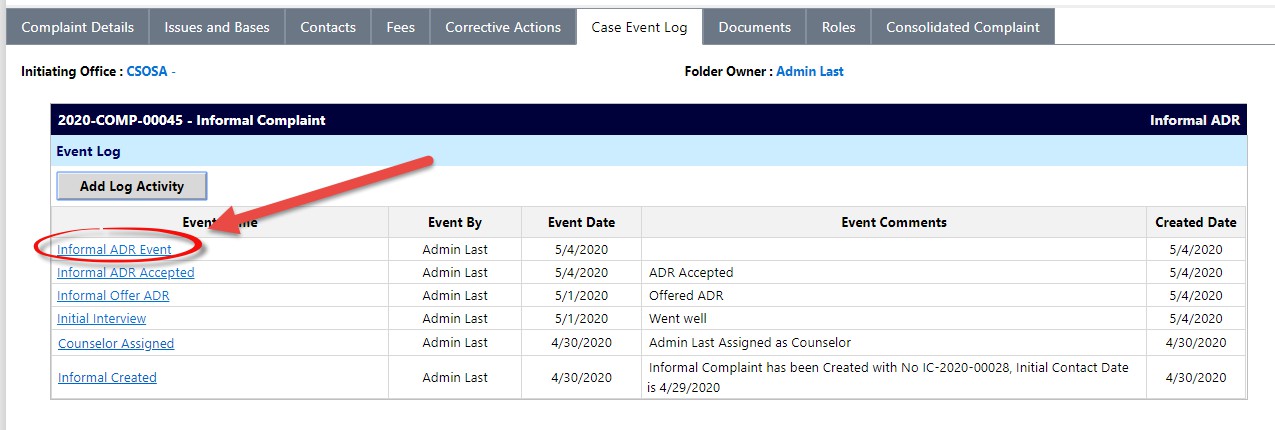
Repeat this process to add more ADR Events as needed. Any events added to the complaint can be viewed from the Case Event Log.
3.6.3 ADR Outcome
After submitting ADR Events, the ADR Outcome must be captured. Follow the steps below to capture the ADR Outcome.
Open the desired Informal Complaint case folder, and navigate to the Complaint Details tab
Select Capture ADR Outcome from the Next Action drop-down list and click the Arrow button

The ADR Outcome screen appears. Use the date picker to select the Date ADR Ended.
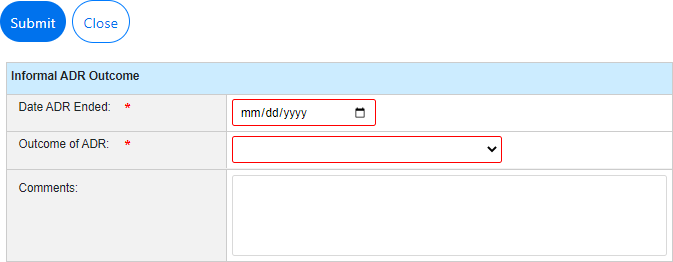
Select the Outcome of ADR from the drop-down list. Selections include: Settlement, No Settlement, and No ADR Attempt.
Note: The Outcome of ADR drop-down list selection determines the Next Actions that the case folder must take.
Enter Comments, if applicable.
Click Submit. The next step depends on the selected Outcome; see the table below.
Outcome | Next Steps |
|---|---|
No Settlement | Complaints that did not reach settlement through ADR must proceed to Conduct Final Interview. Additionally, select a No Settlement Type. |
No ADR Attempt | If No ADR Attempt is selected, the complaint routes to Traditional Counseling. See the Traditional Counseling section for more details |
Settlement | If Settlement is reached, the complaint moves into Informal Closure. See the Informal Closure section for more details. Additionally, there is the option to add a Settlement Agreement attachment document. |
3.7 Traditional Counseling
If the AP does not opt for ADR, or a resolution is not reached in the ADR process, the complaint enters Traditional Counseling. This counseling takes place offline with the outcome logged in eComplaint. Complete the steps below to record the Traditional Counseling information:
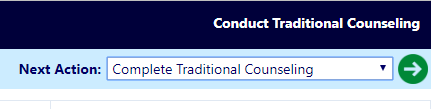
Open a Complaint eligible for Traditional Counseling, open the desired case folder and navigate to the Complaint Information tab. Select Complete Traditional Counseling from the Next Action drop-down list, then click the Arrow button to proceed:
The Complete Traditional Counseling pop-up window appears. Use the date picker to select the Date of Counseling when the counseling was completed.
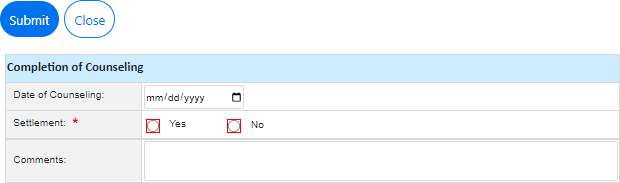
Indicate if there was a Settlement by selecting the Yes or No radio button.
If the Yes radio button is selected, the pop-up window refreshes to display additional fields.
Use the date picker to select the Settlement Date.
Click Add Documents upload a Settlement Agreement.

Enter any additional information in the Comments field.
Click Submit. The pop-up window closes and the Complaint Information tab refreshes to display the updated status:
If Settlement was reached, the status updates to Informal Closure. See the Corrective Actions section for details of next steps.
If no settlement is reached, the next step is to Conduct Final Interview. See the Final Interview section for details.
3.8 Final Interview
The Final Interview portion of the process, if required per your configuration, occurs outside the application, however the results of this interview can be logged in eComplaint. To log Final Interview details:
When a complaint is eligible for Final Interview, the next step appears as Conduct Final Interview on the Complaint Information tab. Open the desired Complaint case folder.
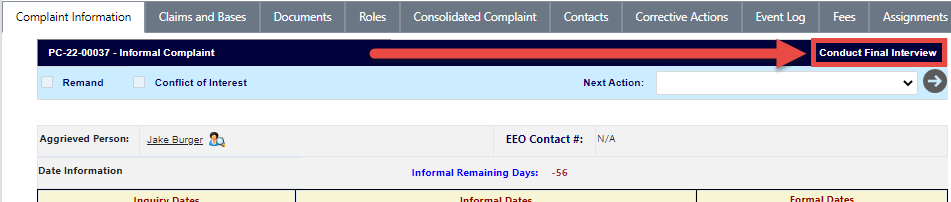
Select Conduct Final Interview from the Next Action drop-down list and then click the Arrow button. The Final Interview pop-up window appears.
Note: The screen below is an example. The actual outcome details will vary depending upon customer configuration.
.png?sv=2026-02-06&spr=https&st=2026-06-16T07%3A33%3A28Z&se=2026-06-16T09%3A13%3A28Z&sr=c&sp=r&sig=rBfZLddJvTtTAXJKEG4ltuAeesprC2RMiAO2c0EnngE%3D)
Use the date picker to select the Date of Final Interview.
Enter any additional information in the Comments field, if desired.
Click Submit. The pop-up window closes and the Complaint Information tab refreshes to display the updated status Informal Closure.
If the complaint successfully reached settlement, proceed to the Submit Corrective Actions section. Otherwise, if no settlement was reached, see section Issue Notice of Right to File.
3.9 Corrective Actions
Informal Complaints which have reached settlement proceed to Informal Closure. As part of Informal Closure, Corrective Actions must be submitted for the complaint. Follow the steps below to create Corrective Actions.
Open a complaint case folder in Informal Closure status and select Corrective Actions from the Next Action drop-down list.
Click the Arrow button. The Corrective Actions pop-up window appears:
![]()
Click Add Corrective Action(s). The pop-up window refreshes, and additional fields appear for capturing the Corrective Actions:
.png?sv=2026-02-06&spr=https&st=2026-06-16T07%3A33%3A28Z&se=2026-06-16T09%3A13%3A28Z&sr=c&sp=r&sig=rBfZLddJvTtTAXJKEG4ltuAeesprC2RMiAO2c0EnngE%3D)
Select the Corrective Actions Type from the drop-down list. This selection determines the options within the Benefit drop-down list.
Select the Benefit from the drop-down list.
Use the date picker to select the Date of Settlement.
Enter Narrative Information in the Narrative field.
Select the Status from the drop-down list.
Complete any remaining required fields.
Click Submit. The pop-up window closes and the Complaint Information tab refreshes to display a new status: Pre Closure.
Click Save record the changes to the case folder. If desired, navigate to the Corrective Actions tab and click the Add Corrective Action button to add more Corrective Action Entries as needed.
3.10 Issue Notice of Right to File
During the final interview phase, the AP may elect not to settle the dispute. For disputes which do not reach settlement, the AP must be issued a notice of right to file, informing the AP of their right to file a formal complaint.
Note: Cases require a Case Manager before issuing a Notice of Right to File.
Follow the steps below to issue a notice of right to file:
Within a complaint where Settlement was not reached, navigate to the Complaint Information tab, and select Issue Notice of Right to File from the Next Action menu then click the Arrow button.

The Letter Template Information appears. This pop-up window contains a predefined letter template for issuing a notice of right to file, including fields completed with information specific to this complaint:

Click the Calendar tool to select the Issue Date for this letter. The date is important as it is used to calculate the time the AP has to issue the notice to file (must occur within 15 days of the issue date):
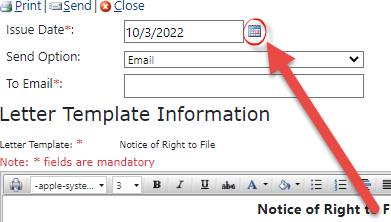
Under the Send Option drop-down list there are selections for Email or Hand Mail Copy. If using Email, enter the To Email in the field.
You can configure the body of the message via the text editing tools, if required. Complete any edits and click Send. Alternatively, use the Print option to print to hard copy and send via post.
The Complaint status updates to Receive and Convert to Formal Complaint status.
If the AP elects to proceed to a Formal Complaint, follow the steps outlined in the Convert to Formal Complaint section.
Note: Before the IC is converted to a formal complaint, the following actions may still be available: Offer ADR (if not previously offered), ADR Events, Acceptance and Outcome, as well as Settlement and Withdrawal.
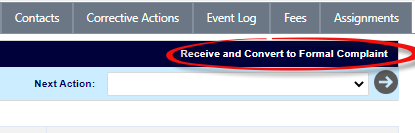
3.11 Receive and Convert to Formal Complaint
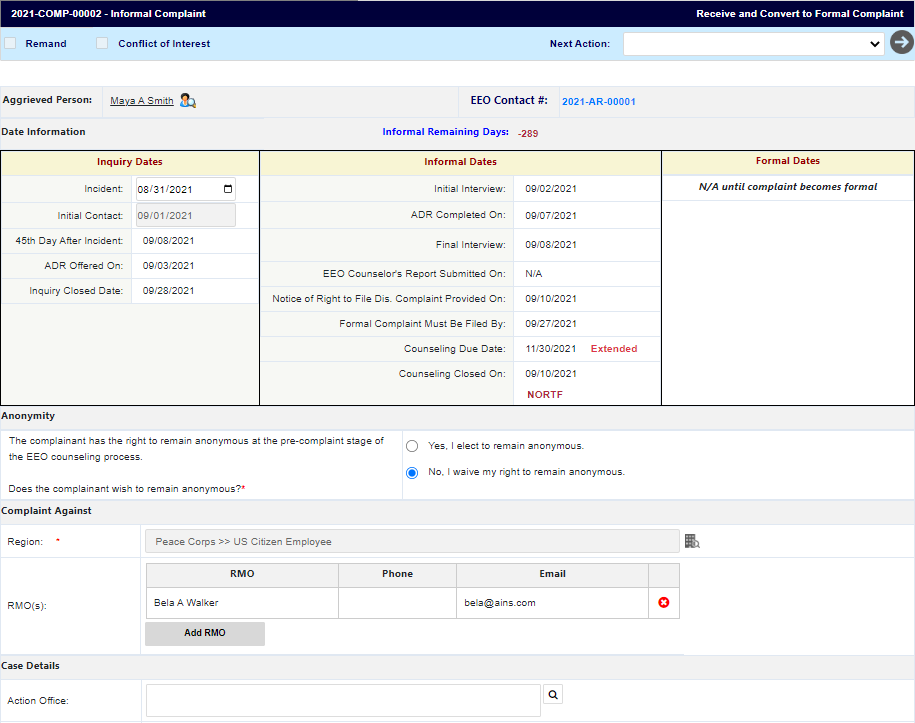
An AP may elect to change a Complaint from an Informal Complaint to a Formal Complaint following receipt of a Notice of Right to File. Follow the steps below to convert to a Formal Complaint:
Note: Only Managers and Superusers can convert an Informal Complaint to a Formal Complaint.
Open the desired Informal Complaint case folder in Receive and Convert to Formal Complaint status.
Select Receive and Convert Formal Complaint from the Next Action drop-down list.

Click the Arrow button. The Complaint Information tab refreshes to display the Receipt of Formal Complaint workspace:
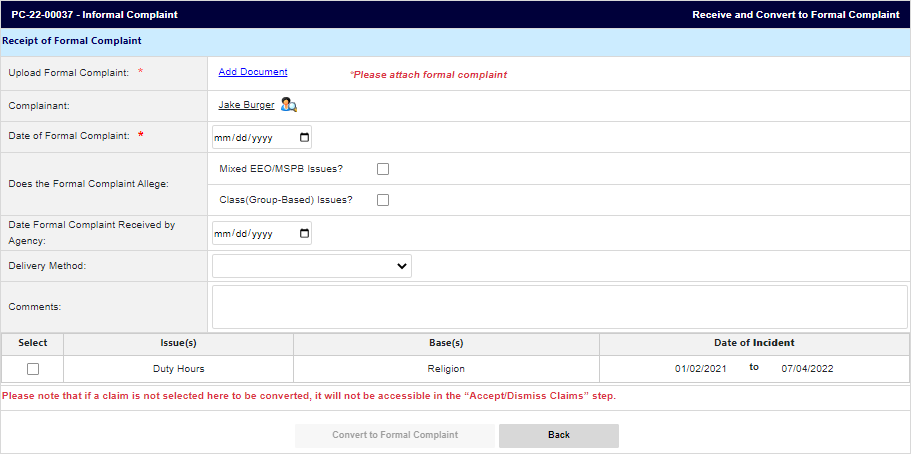
Click Add Document to upload the letter received from the AP in the Upload Formal Complaint field.
Use the date picker to select the Date of Formal Complaint.
Complete any remaining required fields. The Convert to Formal Complaint button is activated. Click Convert to Formal Complaint.

Note: If this is a Mixed EEO/MSPB type (see the Does the Formal Account Allege field), hearing events are not allowed, and Final Agency Decision (FAD) is to be issued within 120 days of filing the Formal Complaint.
A confirmation message appears. Click OK. The case folder refreshes to display the newly converted Formal Complaint case folder, as shown below.
The Informal Complaint is now converted to a Formal Complaint. Proceed to the Formal Complaint section to begin processing the Formal Complaint.
3.12 Pre-Closure
ICs in Pre Closure status must have the complaint closed using the Close Complaint step. Follow the steps below to close a complaint in Pre Closure status.
Open a complaint in Pre Closure Status.
Select Close Complaint from the Next Action drop-down list and then click the Next arrow.

The Close Informal Complaint pop-up window appears. Use the date picker to select the Informal Complaint Closed Date.
Enter any Comments, then click Submit.
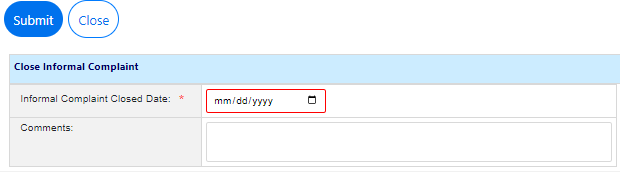
A confirmation pop-up window appears. Click OK to close the complaint.
Closed complaints can also be reopened if needed, while in Pre Closure status. After a complaint is closed, select Re-Open from the Next Action drop-down list and then click the Arrow button.

The Re-Open pop-up window appears. Select the Date when the complaint was re-opened, and provide any Comments, then click Submit:

The case is re-opened in Pre Closure status.
3.13 Conduct Final Interview
After a case folder reaches Pre-Closure status, you can complete the Final Interview. To conduct Final Interview:
Open the desired Case Folder and within the Complaint Information tab, select Conduct Final Interview from the Next Action drop-down list.

Click the Arrow button. The Final Interview pop-up window appears.
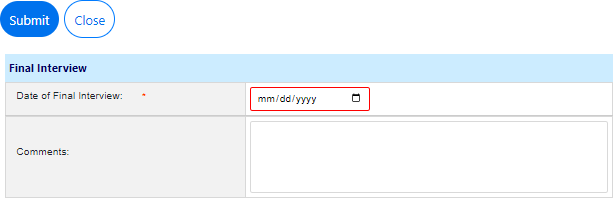
Use the date picker to select the Date of Final Interview.
Enter any relevant information in the Comments field.
Click Submit. The pop-up window closes and the Complaint Information tab refreshes. The Complaint is now in the Informal Closure status.
4 Formal Complaints
After an Informal Complaint has been converted to a Formal Complaint it can begin the resolution process and eventually reach closure. Formal Complaints must be processed from an existing Informal Complaint after conversion. This section contains details on:
The Formal Complaint Folder
Conversion and Processing
Alternative Dispute Resolution
The Investigation Phase
EEOC Hearings
Final Agency Decision
Appeals
Case Closure
Remands, Abeyances, and Compliance
4.1 Create New Formal Complaint
The Manager must login to eComplaint to convert an Informal Complaint to a Formal Complaint or create a new Formal Complaint. Follow the steps below to create a new Formal Complaint.
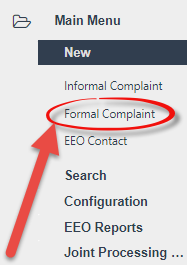
Within the Launch Pad, click Main Menu > New > Formal Complaint:
The page refreshes to display a blank New Formal Complaint form, as shown below.
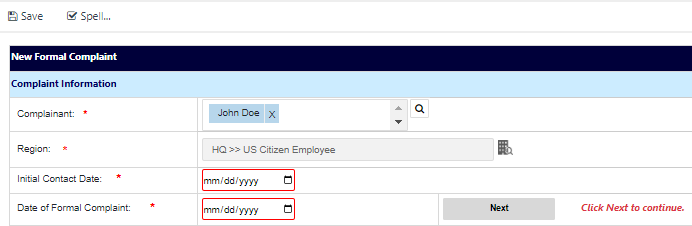
In the Complainant field, click the Lookup icon. The Search for Contact pop-up window appears. Use the fields this pop-up window to create the search criteria and click Search.

The pop-up refreshes to display a list of contacts that match the search criteria. Select the contact to be added to the Complaint, and then click Select.

Note: If the contact does not exist within eCASE, within the Search for Contact pop-up window, click the New drop-down list to create a new Contact from within the lookup screen. Alternatively, locate the contact, or create a new one, then click Select to add this contact to the complaint.
Click the Region lookup. The Region Selection pop-up window appears.
Expand the folder tree and click the checkbox adjacent the desired region. Click OK.

The pop-up window closes, and the selected value appears in the Region field. Use the date picker to select the Initial Contact Date.
Use the date picker to select the Date of Formal Complaint.
Click Next.
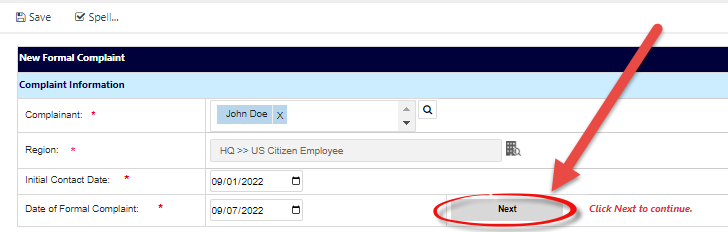
The page refreshes to display the newly created Formal Complaint case folder.
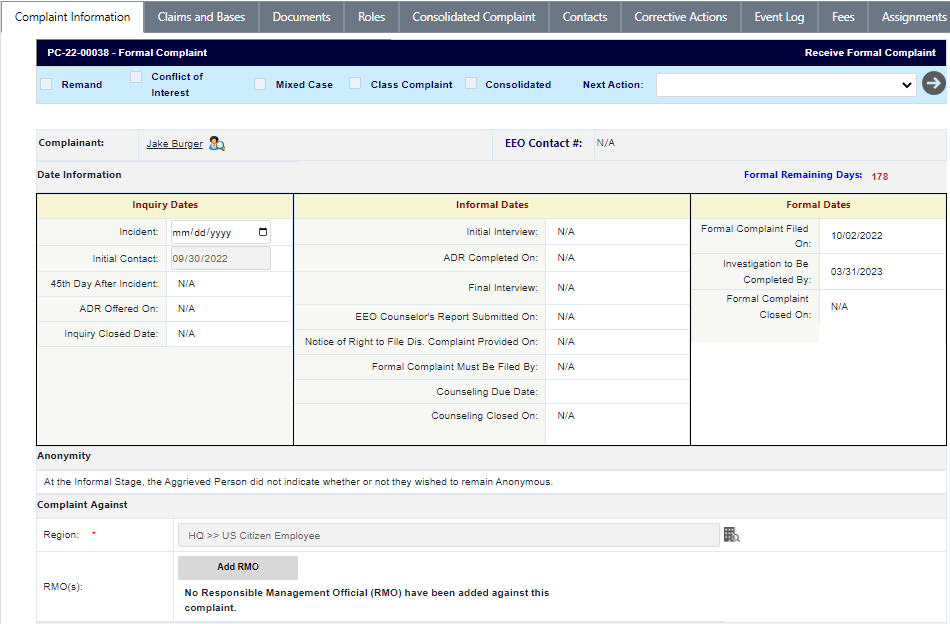
4.2 Formal Complaint Folder
After a Formal Complaint is created from an Informal Complaint, it opens to the Complaint Information tab, as shown in the example below:
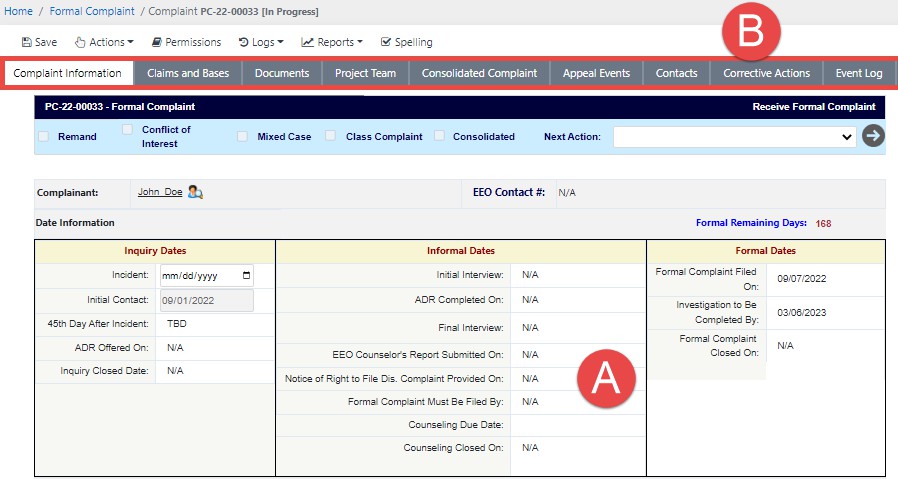
The Formal Complaint interface consists of two primary elements: The (A) Complaint Information form, where the user lands after opening the complaint, and the various (B) Tabs for processing the complaint. Each are detailed in the following sections.
4.2.1 Form Fields
The fields on the Complaint Information form are identified in the image below and described in the following table:
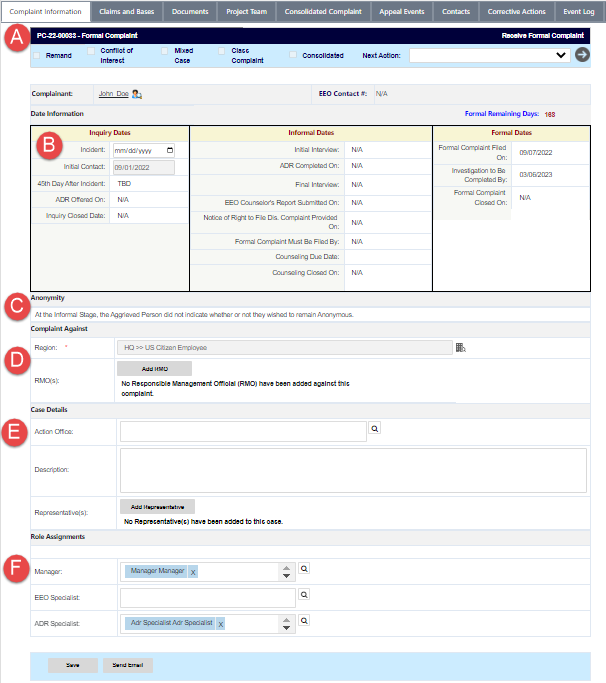
Reference | Field | Description |
|---|---|---|
A | Complaint ID | The Formal Complaint ID as well as an associated EEO Contact # (if applicable). If there is an associated EEO Contact Case, the ID appears as a hyperlink. |
B | Date Information | Pertinent dates for each period in the complaint process. There are columns for Inquiry Dates, Informal Dates, and Formal Dates. |
C | Anonymity | The AP’s anonymity declaration as made in the Informal Complaint stage. |
D | Complaint Against | The Region where the complaint is being filed. Use the
|
E | Case Details | Information about the complaint including the Action Office (if applicable), a Description for the case, and Representatives. |
F | Role Assignments | Assigned roles for processing the complaint, including Counselor, Manager, EEO Specialist, and ADR Specialist. |
 Lookup icon to select a region. The list includes nested fields, use the Show/Hide button to show nested lists and use the checkbox to select the entity against whom the complaint is filed:
4.2.2 Tabs
The Formal Complaint case includes the both the tabs present in the Informal Complaint and the tabs highlighted in the image and table below:

Reference | Tab | Description |
|---|---|---|
A | Corrective Actions | The Corrective Actions tab is where authorized users can upload information regarding any Corrective Actions that are suggested during the Formal Complaints process. |
B | Hearing Events | The Hearing Events tab is where users can upload information regarding hearings that occur with regards to the Formal Complaint. |
C | Documents | Documents associated with the complaint can be viewed and managed from the Documents tab. Documents can also be added and removed, if required. |
D | Roles | Manage the users, groups, and permissions associated with this Complaint. |
E | Consolidated Complaint | View associated consolidated complaints (if any have been created). |
F | Contacts | Manage Contacts related to this complaint. These can be added as new contacts or pulled from existing system contacts. |
Reference | Tab | Description |
G | Corrective Actions | This tab allows authorized users to create and record Corrective Action entries. Multiple Corrective Actions can be logged within this tab. |
H | Event Log | View a list of events captured in the system while the complaint is processed. Step outcomes and associated documentation can be viewed from this tab. See the Case Event Log section for details. |
I | Fees | Create and manage fees related to this Complaint. |
J | Assignments | The Assignment tab typically drives the case folder workflow, however, in the eComplaint application, the Assignments tab is used to record Sub Folders, Linked Folders, and FYI Copies. |
4.3 Conversion and Case Folder Processing
This subsection details creating new Formal Complaints and some of the basic Formal Complaint process. Managers, eComplaint Specialists, and Superusers can process the Formal Complaint through to Closure.
If you are creating a new Formal Complaint, see the Create New Formal Complaint section. If converting from an Informal Complaint, see the Receive and Convert to Formal Complaint subsection.
4.3.1 Acknowledgement of Formal Complaint
To begin the Formal Complaint Resolution Process:
Locate and open the desired Formal Complaint case folder. The Complaint Information page appears.

Review the details of the Complaint and ensure that an EEO Specialist has been assigned to the case folder. If not, assign one now and click Save.
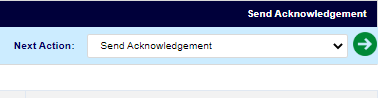
After review, select Send Acknowledgement from the Next Action drop-down list and then click the Arrow button.
The Send Template To File pop-up window appears, displaying the Acknowledgement Letter Template which is distributed by the system. First, use the date picker to select the Acknowledgment Letter Sent Date.
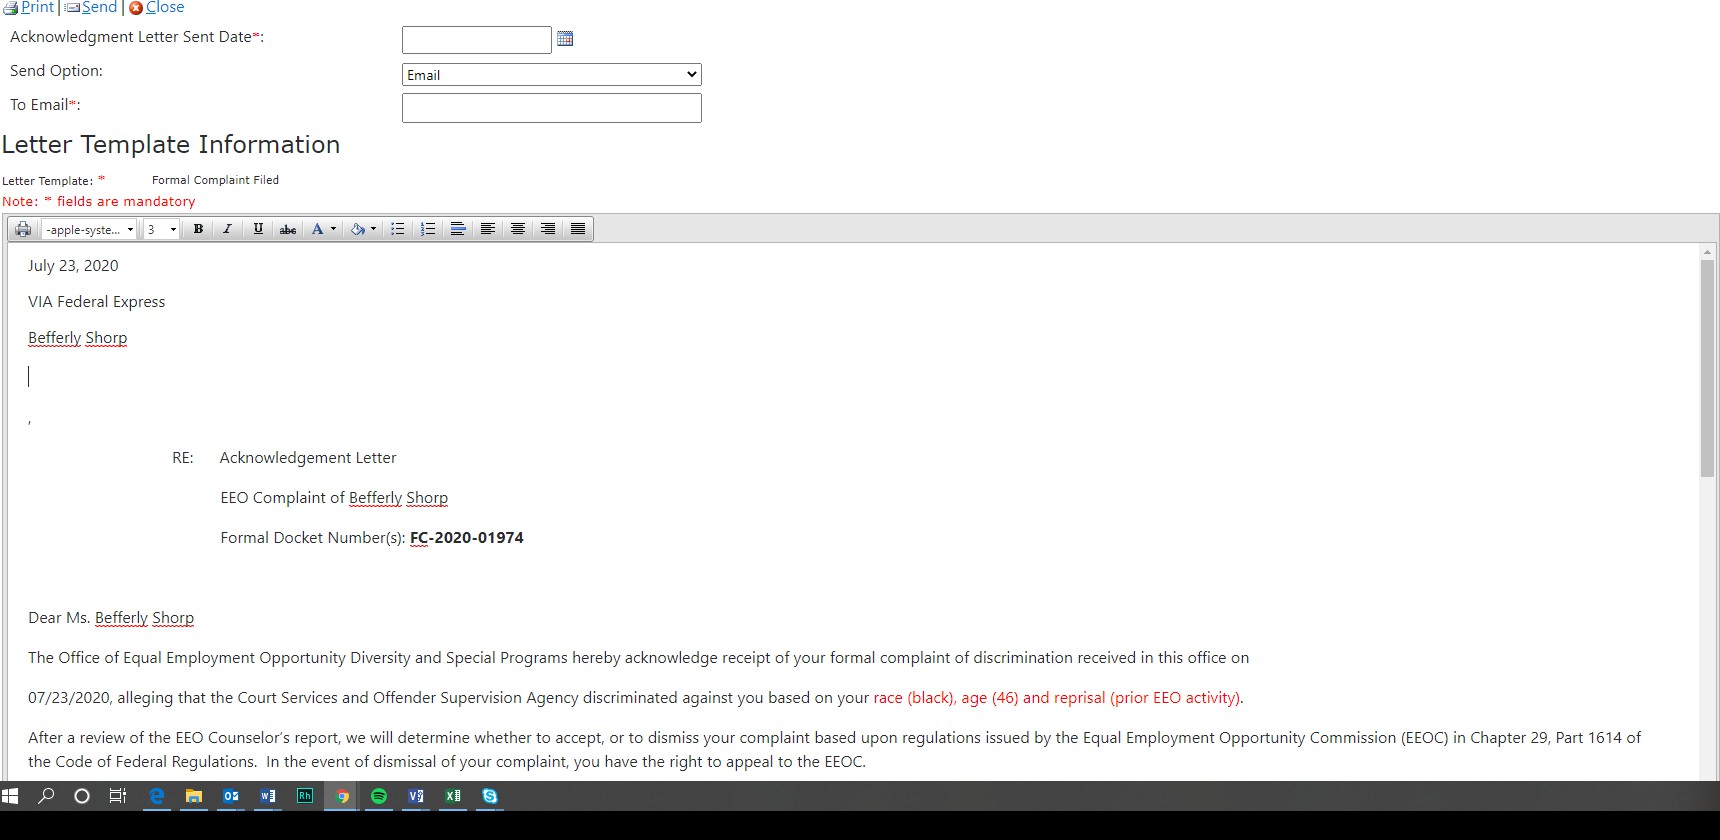
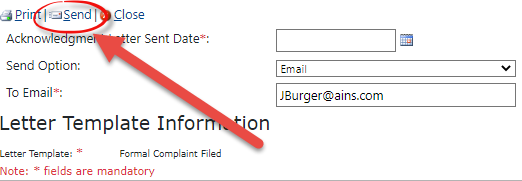
Select the Send Option from the drop-down list. If Email is selected, you are required to provide the To Email Address.
Review the text in the Acknowledgement Letter, make any required changes, and click Send.
Alternatively, click Print to print a copy of the Acknowledgement Letter, or click Close to close the window without sending the letter.
The pop-up window closes, and the Complaint Information tab refreshes.
4.3.2 Add Counselor Report
After sending the Acknowledgment (see Acknowledgment of Formal Complaint), you’ll have the option to add a Counselor Report. Follow the steps below to create a Counselor Report:
Open the Formal Complaint case folder, and within the Complaint Information tab, select
Add Counselor Report from the Next Action drop-down list and click the Arrow button.

The Add Counselor Report pop-up window appears as shown below. Click Add Documents to attach a Counselor Report:
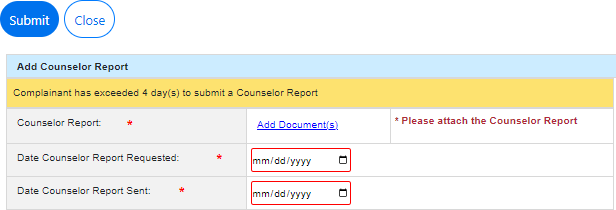
Use the date pickers to select the Date Counselor Report Requested and Date Counselor Report Sent.
Click Submit. The pop-up window closes, and the Complaint Information tab refreshes to display the Assign EEO Specialist status. The report is now logged and can be viewed from the Case Event Log.
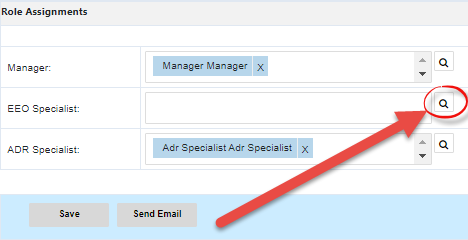
4.3.3 Assign EEO Specialist
You are required to add an EEO Specialist before additional action can be taken on the Formal Complaint. From the Complaint Information tab, navigate to the Role Assignments section of the Complaint Information tab and click the lookup to select and assign the EEO Specialist role:
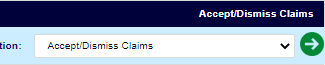
4.3.4 Accept/Dismiss Claims
Follow the steps below to Accept or Dismiss Formal Complaint claims:
Open a Formal Complaint in Accept/Dismiss Claims status.
Select Accept/Dismiss Claims from the Next Action drop-down list, then click the Arrow button.
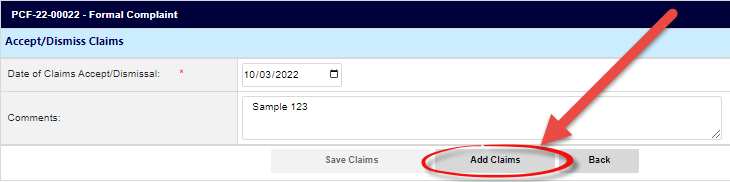
The Complaint Information tab refreshes to display the Accept/Reject Claims section. First, use the date picker to select the Date of Claims Accept/Dismissal.
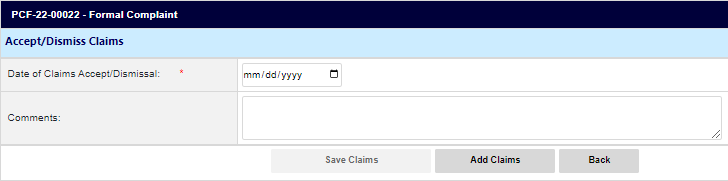
Enter any relevant information in the Comments field.
Click Add Claims.
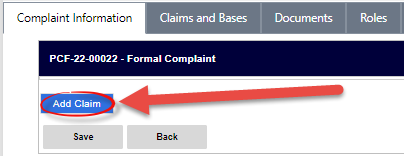
The tab refreshes to display the Add Claim workspace. Click Add Claim.
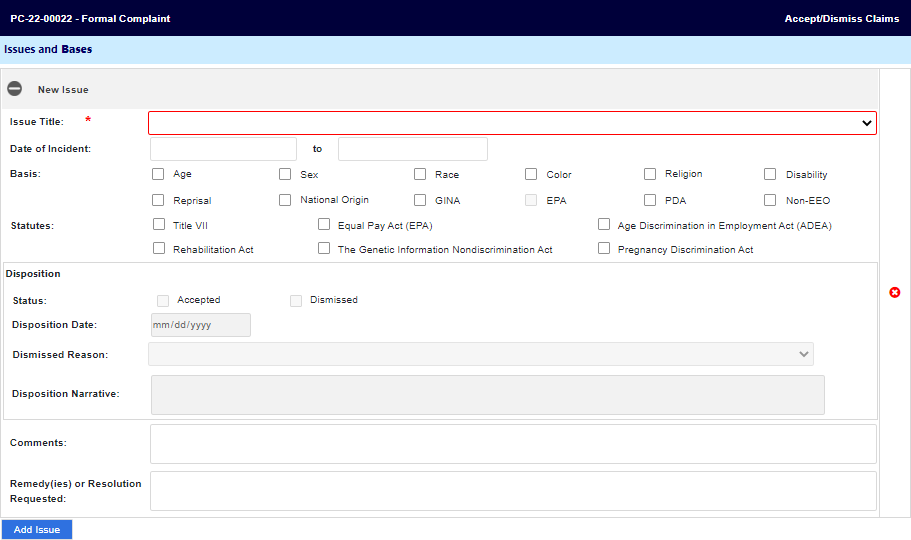
The page refreshes to display additional fields. Select the Issue Title from the drop-down list.
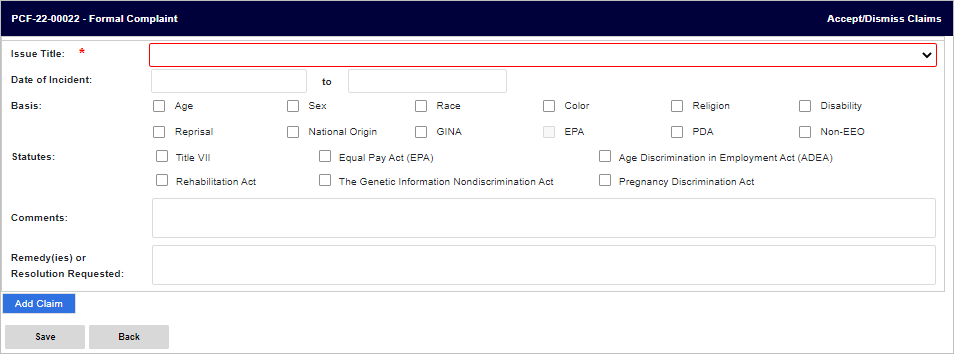
Select any of the Basis checkboxes that apply.
Note: Some of these checkboxes may prompt additional fields to appear.
Enter any Comments in the field.
Enter the Remedy or Resolution Requested within the field.
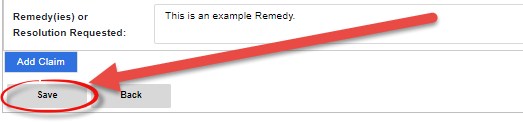
Click Save. The page refreshes and the Claim information is recorded.
The page refreshes and the Accept/Dismiss Claims workspace appears. Click Take Action to act on an existing claim.
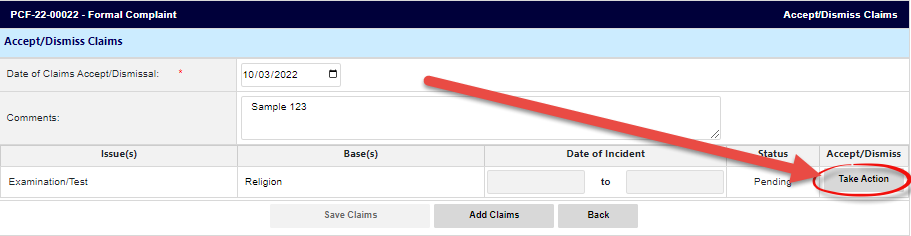
The page refreshes and the Take Action on Issue workspace appears as shown below.
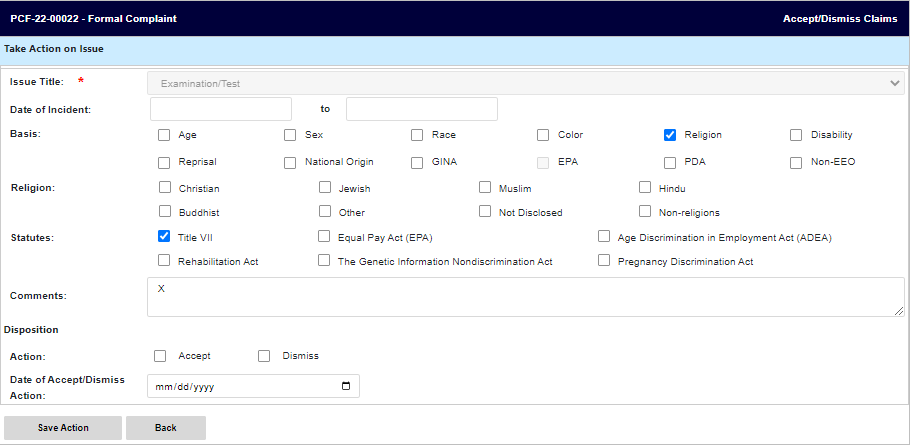
Provide as much information as possible and complete all required fields.
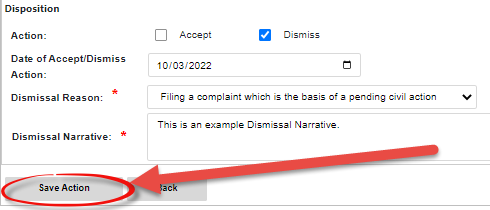
Navigate to the Disposition section and click either the Accept or Dismiss checkbox.
If Dismiss is selected, additional fields appear for capturing the Dismissal Reason and Dismissal Narrative. Both fields are required.
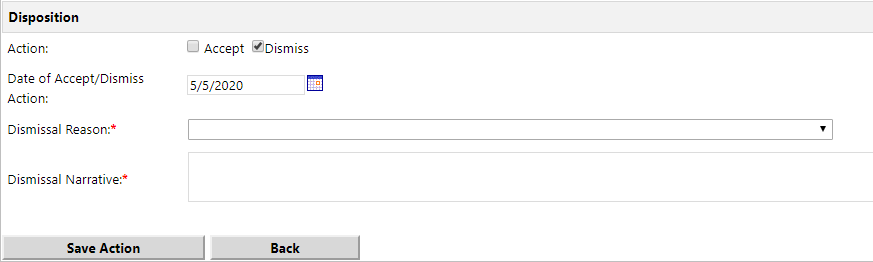
Use the date picker to select the Date of Accept/Dismiss Action.
When complete, click Save Action.
The tab refreshes to display the Accept/Dismiss Claims workspace, with the Status updated to reflect the selected disposition.

To add any additional claims, click Add Claims. Continue to add claims and take action on these claims until the claim(s) analysis is complete.
Click Save Claims when action is taken on all claims in the complaint.
The page refreshes to display the full Complaint Information tab and featuring an updated status of Send Acceptance/Dismissal Letter.
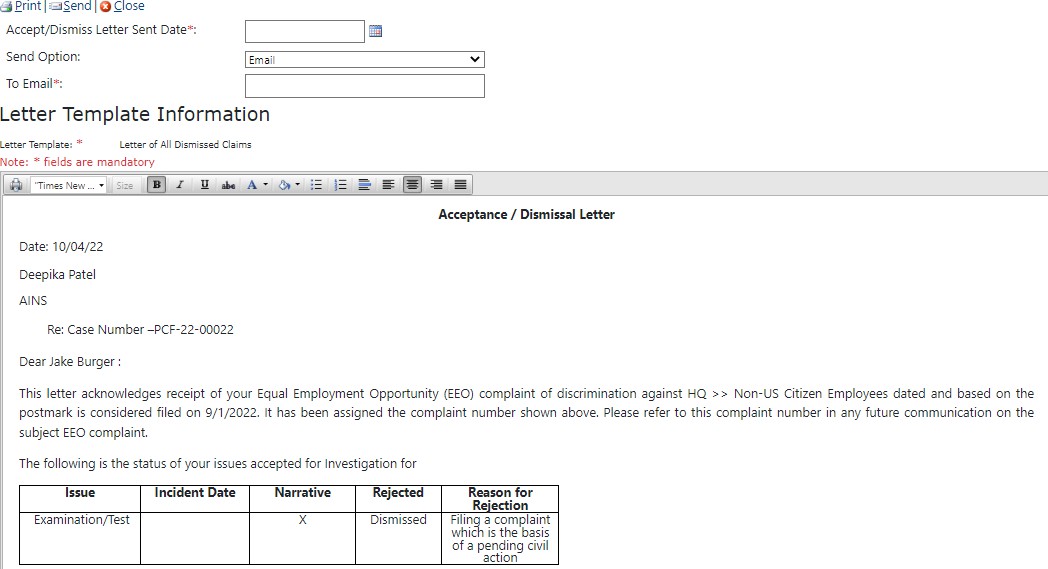
Select Send Acceptance/Dismissal Letter from the Next Action drop-down list, then click the Arrow button.

The Letter Template Information pop-up window appears, displaying the Acceptance/Dismissal Letter Template which is distributed by the system. First select the Send Option from the drop-down list.
If you select Email, enter the To Email in the field.
Use the date picker to select the Accept/Dismiss Letter Sent Date, which is required.
Review the text in the Letter, make any required changes and click Send. Alternatively, click Print to print a copy of the Acceptance/Dismissal Letter, or click Close to close the window without sending the letter.
The next actions depend on whether the complaint was Accepted or Dismissed. Consult the following table for details on next steps for either outcome:
Action | Next Steps |
|---|---|
Dismiss | The complaint is dismissed and enters FAD/Hearing Request status. The following actions are available:
|
Accept | The complaint is accepted and enters Assignment of Investigation status. The following actions are available:
|

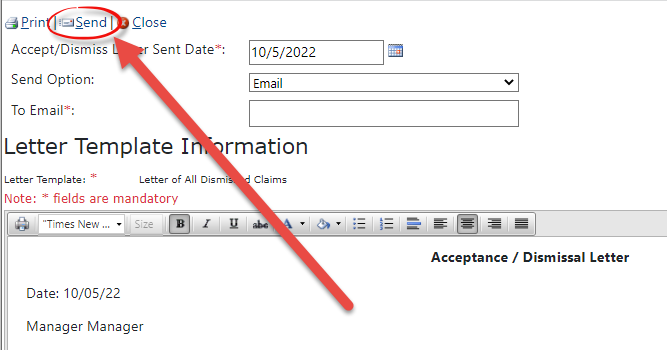
4.3.5 Send Acceptance/Dismissal Letter
If a claim is accepted or dismissed, the AP must send the Acceptance or Dismissal Letter. Follow the steps below to send Acceptance/Dismissal Letter:
Navigate to a request in Send Acceptance/Dismissal Letter status.
Select Send Acceptance/Dismissal Letter from the Next Action menu, and then click theArrow button.
.png?sv=2026-02-06&spr=https&st=2026-06-16T07%3A33%3A28Z&se=2026-06-16T09%3A13%3A28Z&sr=c&sp=r&sig=rBfZLddJvTtTAXJKEG4ltuAeesprC2RMiAO2c0EnngE%3D)
The Letter Template pop-up window appears, with the selected Acceptance/Dismissal Letter template displayed in the Text Editor. Make any required changes to the content of the message.
Use the date picker to select the Accept/Dismiss Letter Sent Date.
If the letter template is to be sent using a different format than Email, select the new format from the Send Option drop-down list.
Enter the recipients email address in the To Email field.
Click Send. The pop-up window closes, and the Complaint Information tab refreshes to display the new status FAD/Hearing Request.
4.3.6 Receive FAD/Hearing Request
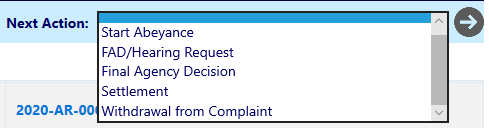
If a claim is dismissed, the AP has the option to request a Hearing. Follow the steps below tolog the AP’s decision.
Navigate to a request in FAD/Hearing Request status.
Select FAD/Hearing Request from the Next Action menu, then click the Arrow button.

4.4The FAD/Hearing Request pop-up window appears as shown below.
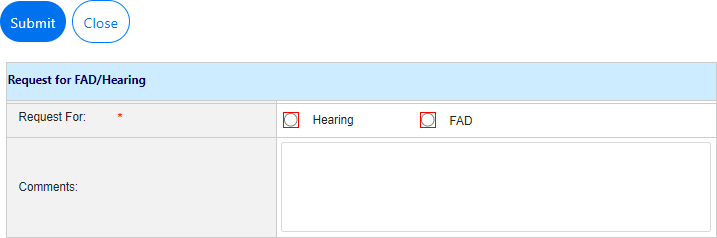
Select the radio button to indicate the type of request being made, Hearing or FAD. Additional fields appear in the pop-up window.
Use the date picker to select the Date of Hearing Request/Date of FAD Request.
Enter any Comments information in the Comments field.
Click Submit to submit the request. Consult the EEOC Hearing section for next steps.
If a Hearing is requested, see the EEOC Hearing section for next steps.
If Immediate FAD is requested, see the Final Agency Decision section for next steps.
The pop-up window closes and the Complaint Information tab refreshes to display an updated status of Final Agency Decision.
4.4 Final Agency Decision
The Final Agency Decision phase includes two possible outcomes: Standard FAD, or FAD with AJ Decision. Each is described in the following subsections.
4.4.1 Standard FAD
Formal Complaints which are dismissed reach the Final Agency Decision stage. Follow the steps below to process a Final Agency Decision:
Navigate to a request in Final Agency Decision status.
Within the Complaint Information tab, select Final Agency Decision from the Next Action menu, then click the Arrow button. The Final Agency Decision pop-up window appears as shown below:
.png?sv=2026-02-06&spr=https&st=2026-06-16T07%3A33%3A28Z&se=2026-06-16T09%3A13%3A28Z&sr=c&sp=r&sig=rBfZLddJvTtTAXJKEG4ltuAeesprC2RMiAO2c0EnngE%3D)
Complete all the fields in this pop-up window. All fields except Comments are required.
Field | Description |
|---|---|
Final Agency Decision Document | Attach the Final Agency Decision document using the Add Document link |
Date of FAD | Select the date of the FAD |
Final Agency Decision | Within the Final Agency Decision workspace, each Issue is listed, along with associated Basis(es). Within the Agency Found Discrimination column, a selection must be made for all Basis(es). Click one of the Dismissal, Discrimination, or No Discrimination checkboxes. |
FAD Summary Findings | Use the checkboxes to designate the result of the FAD Findings. Note that the summary should match to the selections made under Agency Found Discrimination. |
Comments | Provide comments about the FAD |
Click Submit to submit the FAD.
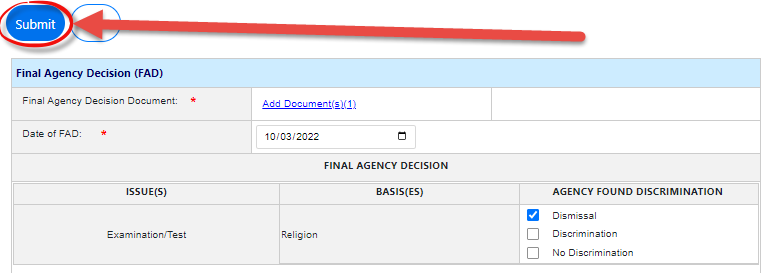
The Complaint is now eligible for Complainant Appeal. See the Complainant Appeal section for next steps.
4.4.2 FAD with AJ Decision
If a FC completes the EEOC Hearing phase and enters into FAD, the FAD has some differences to account for the additional AJ Decision. Follow the steps below to process FAD with an AJ Decision.
Navigate to a request in Final Agency Decision status.
Select Final Agency Decision from the Next Action menu, then click the Arrow button. The Final Agency Decision screen appears as shown below, featuring a row in the workspace for each Issue/Basis.

Complete all the fields on this screen. These fields are described in the table below:
Field | Description |
|---|---|
Final Agency Decision Document | Attach the Final Agency Decision document by clicking the Add Document link. |
Date of FAD | Provide the date of the FAD. |
Final Agency Decision | Under the Final Agency Decision, each Issue is listed, along with associated Basis(es). Click the checkboxes in the Agency Found Discrimination column to indicate the result. |
FAD Summary Findings | Use the checkboxes to indicate the result/a summary of the FAD Findings. Note that the summary should match to the selections made under Agency Found Discrimination. If the FAD findings do not match with the FAD summary finding, a message displays indicating “Please check that the findings of each issue and bases align with the FAD summary findings.” (!!) Note: Depending upon your configuration, selecting one of these checkboxes may prompt additional fields to appear. |
Implement AJ Decision? | Determine whether the AJ Decision is to be implemented. Options are Fully Implemented if all Issues/Bases are also implemented, Partially Implemented if some but not all Issues/Bases are implemented, or Not Implemented if none of the Issues/Bases are implemented. |
Comments | Provide comments about the FAD. |
Click Submit to submit the FAD. The pop-up window closes and the Complaint Information tab refreshes to display the updated status.
4.5 Complainant Appeal
After a complaint has reached the Final Agency Decision stage, the Complaint is now eligible for Complainant Appeal.
4.5.1 Create an Appeal
To create an appeal of a Final Agency Decision:
Navigate to a request in Final Agency Decision status.
Select Complainant Appeal from the Next Action menu, then click the Arrow button.

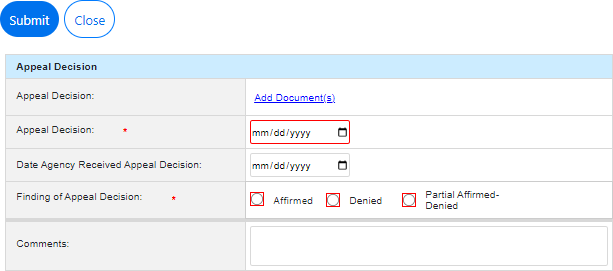
The Appeal Creation pop-up window appears as shown below. Click Add Document(s) to upload the Notice of Appeal.
.png?sv=2026-02-06&spr=https&st=2026-06-16T07%3A33%3A28Z&se=2026-06-16T09%3A13%3A28Z&sr=c&sp=r&sig=rBfZLddJvTtTAXJKEG4ltuAeesprC2RMiAO2c0EnngE%3D)
Select one of the Appeal by (Appellant) radio buttons.
Use the date picker to select the Date of Notice of Appeal.
Select the Basis for Appeal from the drop-down list.
Enter any Comments in the field.
When complete, click Submit to submit the appeal. The pop-up window closes, and the
Complainant Information tab refreshes to display the new status.
4.5.2 Appeal Decision – Affirm
Follow the steps below to affirm an appeal decision:
Navigate to a request in Appeal Process status.
Select Appeal Decision from the Next Action menu, then click the Arrow button. The
Appeal Decision screen appears as shown below.

Use the date picker to select the Date of Appeal Decision.
Under Finding of Appeal Decision, select the Affirmed radio button.
Enter any relevant Comments in the field.
Click Submit.
4.5.3 Appeal Decision – Denied/Denied in Part
Follow the steps below to apply a finding of Denied or Partial Denied for an appeal decision.
Navigate to a request in Appeal Process status.
Select Appeal Decision from the Next Action menu, then click the Arrow button. The
Appeal Decision pop-up window appears as shown below.
Click Add Documents to open the Select Item pop-up window and upload the Appeal Decision Document.
Use the date picker to select the Date of Appeal Decision.
Under Finding of Appeal Decision, select Denied or Partial Affirmed-Denied.
Additional fields appear for capturing remands, as shown below. All of these fields are required.
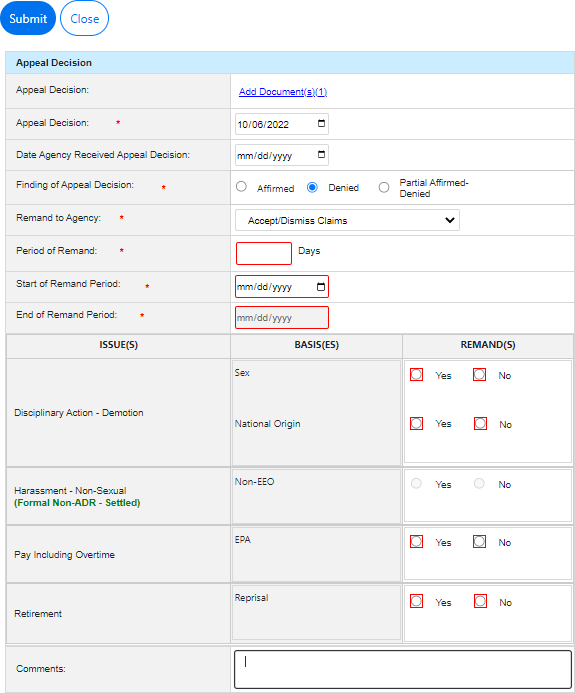
Select from the Remand to Agency drop-down list. Options include Accept/Dismiss Claims, Informal, and Reinvestigation. Based on this selection, the folder reverts to the relevant status in a new case folder tracked as a Remand.
Note: The Informal option is only available if the Formal Complaint originated as an Informal Complaint.
Enter the Period of Remand (in days) in the field.
Use the date picker to select the Start of Remand Period. The End of Remand Period field is automatically populated based on this selection.
For all Issue(s)/Basis(es) entry, select one of the Yes/No radio buttons for those requiring Remand(s).
Enter any relevant Comments in the field.
When complete, click Submit. The pop-up window closes, and the Complaint Information tab refreshes to display that the complaint is now in Accept/Dismiss Claims status, and a link is now present for easy access to the newly created complaint folder where the processing can proceed.
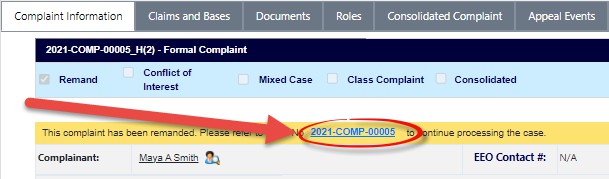
Click the Link to open the new complaint. The new case folder appears in a new tab, displaying the Complaint Information tab. Historical cases are listed in hyperlink format at the top of the Complaint Information tab.
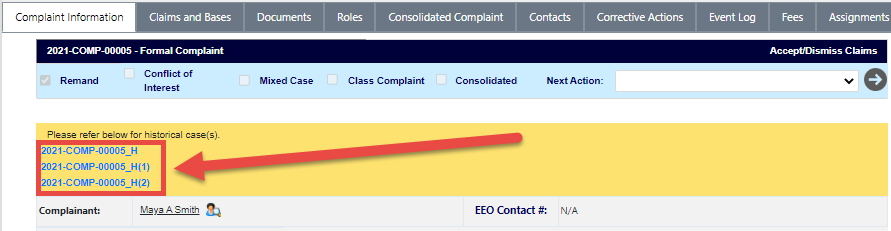
The complaint is marked as a Remand. The completed complaint is linked for reference. The Status and next action depend on the selection made under Remand for Agency.
Continue processing the case as required by the remand. See the related section(s) in this manual for details.
4.5.4 Reconsideration Request
Follow the steps below to process a Reconsideration Request after an Appeal:
Navigate to the Complaint Information tab, and select Reconsideration Request from the
Next Action list, then click the Next arrow.

The Request for Consideration screen appears as shown below.
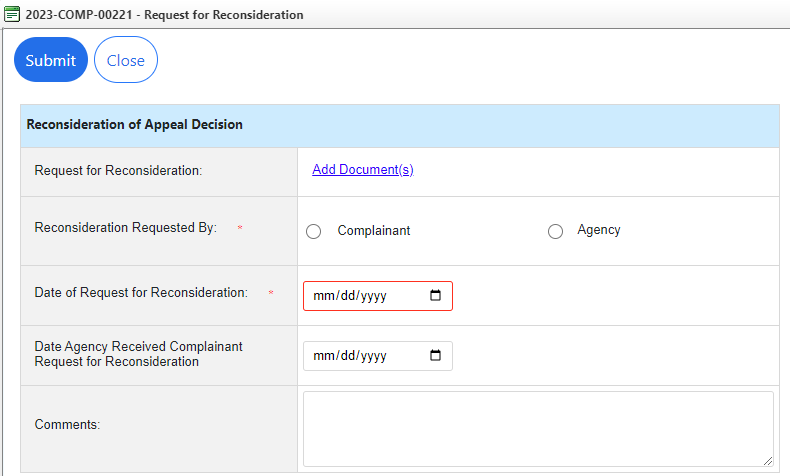
For Reconsideration Requested By select either Complainant or Agency.
Provide the Date of Request for Reconsideration.
When complete, click Submit.
To log the reconsideration decision, navigate to the Complaint Information tab. Under the
Next Action list, select Reconsideration Decision.
Click the Next arrow. The Reconsideration Decision screen appears as shown below:
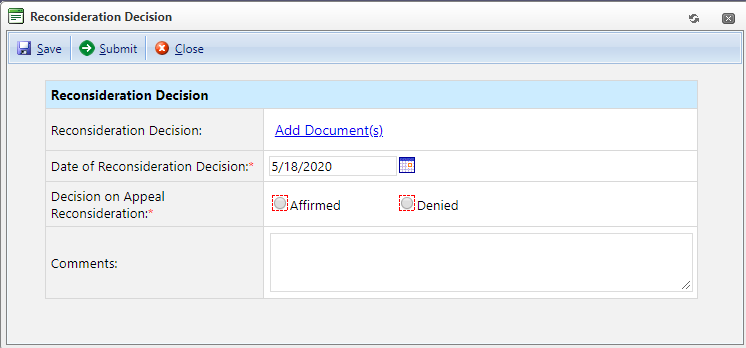
Provide the Date of Reconsideration Decision.
Select the Decision on Appeal Reconsideration. Select Affirmed to affirm or Denied to deny the reconsideration request.
Click Submit to submit the decision.
4.6 Formal ADR
At most points in the Formal Complaint process, the AP can be offered and accept Alternative Dispute Resolution. The Formal ADR process is the same as the ADR process for an Informal Complaint.
Some additional notes about Formal ADR:
ADR can be withdrawn at any time before it is complete.
Once settlement is reached, the Formal ADR is complete. Corrective Actions may be selected at the next step and entered in the Corrective Actions tab.
One or more Monetary and Non-monetary corrective actions can be added.
The disposition for the corrective action is also tracked at this stage. If the Disposition of a corrective action is Not Accepted, it is not counted in the 462 Report.
Follow the steps below to process ADR for a Formal Complaint.
Navigate to the Complaint Information page of a Formal Complaint that qualifies for ADR.
Select Offer ADR from the Next Action drop-down list and then click the Arrow button.

The Formal Offer ADR pop-up window appears. Use the date picker to select the Date ADR Offered by Agency.
Enter any Comments in the Comments field, then click Submit.
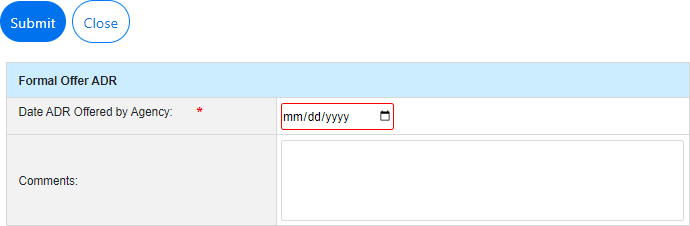
The pop-up window closes and the Complaint Information tab refreshes to display the Review IP status. Determine if the ADR has been accepted.
Select Capture ADR Acceptance from the Next Action drop-down list and then click the Arrow button.

The Formal ADR Acceptance Details window appears. Make a selection determining Has Complainant been provided the option to participate in ADR? using the Yes or No radio buttons.

Use the date picker to select Date ADR Accepted by Complainant.
Enter any relevant Comments in the Comments field.
If ADR has been accepted, select Yes or No in the Do you want to create ADR? field. If you select Yes, an ADR case will be created from eComplaint. If No is selected, you can proceed with ADR through eComplaint, but no ADR case will be created. When an ADR case is created, all pertinent fields specified on the eComplaint - ADR Configuration tab will map to the newly created ADR case.
Click Submit to submit the acceptance. Alternatively, click Save to save any updates to the ADR or click Close to close the window without sending the ADR Offer.
After clicking Submit, the pop-up window closes and the Complaint Information tab refreshes to display the new status of Review IP.
If ADR is accepted (Yes radio button selected in step 7 above), the ADR moves forward. See the Informal ADR section for details on ADR processing, as the steps are identical for a Formal Complaint.
If ADR is not accepted (No selected in step 6 above), see the Investigation section for next steps.
4.7 Investigation
After a Formal Complaint is acknowledged and the AP’s claims are accepted, the Formal Complaint moves to the Investigation phase. Investigation begins with Assignment of Investigation.
4.7.1 Assignment of Investigation
Follow the steps below to complete the Assignment of Investigation:
Open the Formal Complaint case folder that requires Assignment of Investigation and within the Complaint Information tab, select Assignment of Investigation option from the Next Action drop-down list.
Click the Arrow button.

The Assignment of Investigation pop-up window appears.
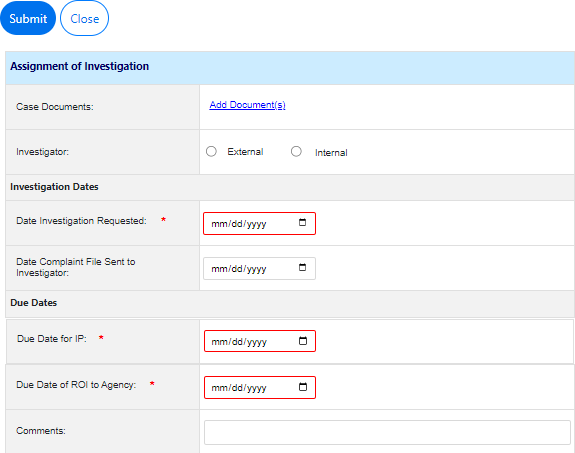
Click Add Documents open the Select Item pop-up window and upload supporting documentation, if desired.
Select one of the Investigator radio buttons. The pop-up window refreshes, and a list of all associated contacts appear under the selection.
Use the date picker to select the Date Investigation Requested. The Due Date of ROI to Agency field populates automatically based on this selection.
Use the date picker to select the Due Date for IP.
Complete the Communication to Investigator fields to customize the email message that is sent alongside this assignment.
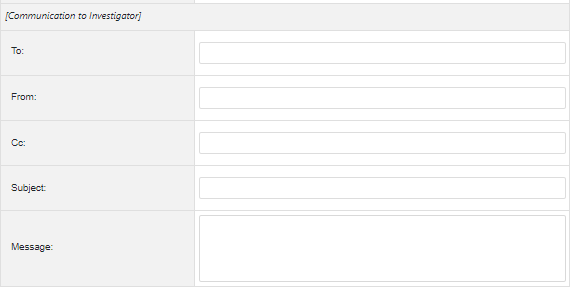
Field | Description |
|---|---|
To: | Enter the message recipient email address in this field. |
From: | Enter the sender email address in this field. |
Cc: | Enter any carbon copy recipients in this field. |
Subject: | Enter the subject of the message in this field. |
Message | Enter the contents of the message here. |
Complete any remaining required fields.
When complete, click Submit. The pop-up window closes and the Complaint Information tab refreshes to display the new status.
Assign/Reassign Investigator
Follow the steps below to reassign the Investigator for this investigation.
Open the desired Formal Complaint case folder and within the Complaint Information tab, select Assign/Reassign Investigator from the Next Action drop-down list, then click the Arrow button.

The Assign/Reassign Investigator pop-up window appears. Use the date picker to select the Date the new investigator is assigned.
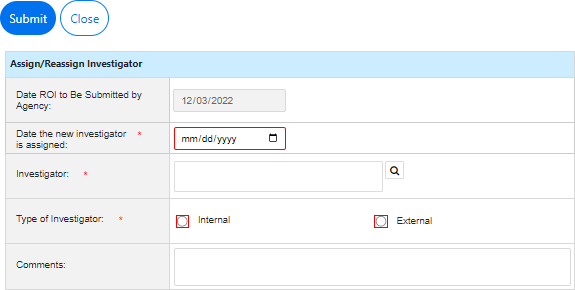
Use the Lookup icon to select an Investigator. The Search for Contact pop-up window appears. Use the fields in this window to create the search query and then click Search.
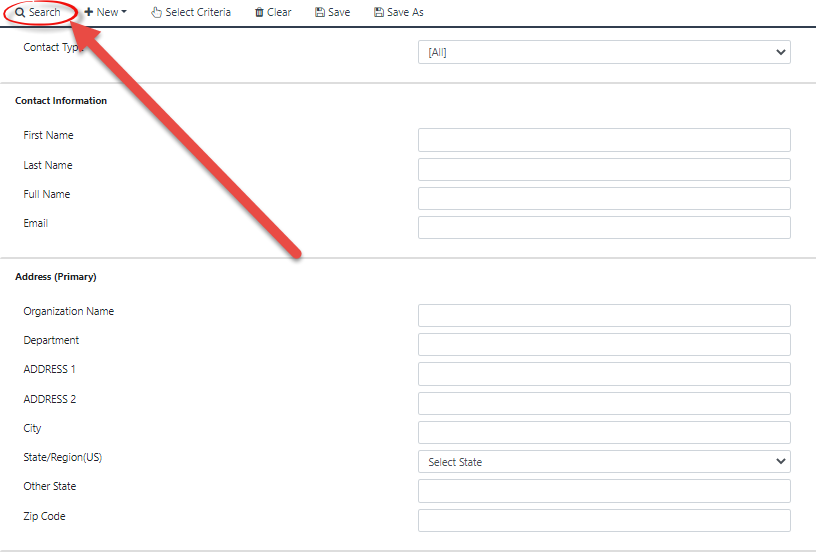
The pop-up window refreshes to display a list of matching contact. Select the desired contact and then click Select.

The pop-up window closes, and the selected Contact appears in the Investigator field.
Select the Type of Investigator (External or Internal) radio button.
Enter any relevant Comments in the field.
Click Submit to submit the reassignment. The pop-up window closes and the Complaint Information tab refreshes to display the new status.
4.7.3 Investigation Plan
If an Investigation Plan is required, follow the steps below to fulfill this requirement.
Open the desired Formal Complaint case folder and within the Complaint Information tab, select Review IP from the Next Action drop-down list, then click the Arrow button.
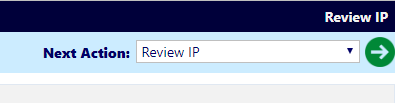
The Review and Approve IP pop-up window appears. Click Add Documents to open the File Explorer pop-up window and select the Investigation Plan Document to upload.
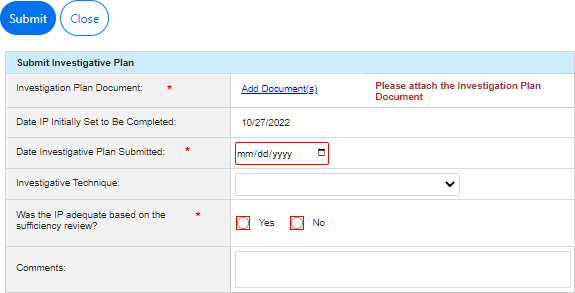
Use the date picker to select the Date Investigation Plan Submitted.
Under Was the IP adequate based on the sufficiency review?, select the Yes or No radio button to make a determination.
If the Yes radio button is selected, the tab refreshes to display the Date IP Accepted field. Use the date picker to select the Date IP Approved.
If the No radio button is selected, the tab refreshes to display additional fields. Use the date picker to select the Date IP Rejected.
Click Submit. The pop-up window closes and the Complaint Information tab refreshes to display the new status of Review Draft ROI.
4.7.4 Review Draft ROI
Follow the steps below to process the Review Draft ROI phase.
Open the desired Formal Complaint case folder and within the Complaint Information tab, select Review Draft ROI from the Next Action drop-down list, then click the Arrow button.

The Review Draft Report pop-up window appears. Click Add Documents to open the File Explorer pop-up window and select Report of Investigation to upload.

Use the date picker to select the Date ROI Submitted.
Under Was the ROI adequate based on the sufficiency review? select one of the Yes or No radio buttons to make a determination. Selecting either radio button prompts additional fields to appear.
If the Yes radio button is selected, use the date picker to select the Date ROI Accepted by Agency.
If the No radio button is selected, use the date picker to select the Date ROI Rejected by Agency.
Complete any remaining required fields and click Submit. The pop-up window closes and the Complaint Information tab refreshes to display the updated status: Send ROI to Complainant.
4.7.5 Send ROI to Complainant
When the ROI is accepted and ready to submit to the AP, follow the steps below:
Open the desired Formal Complaint case folder and within the Complaint Information tab, select Review Draft ROI from the Next Action drop-down list, then click the Arrow button.

The Issue ROI to Complainant pop-up window appears. Click Add Documents to open the File Explorer pop-up window and select the Report of Investigation document to upload.
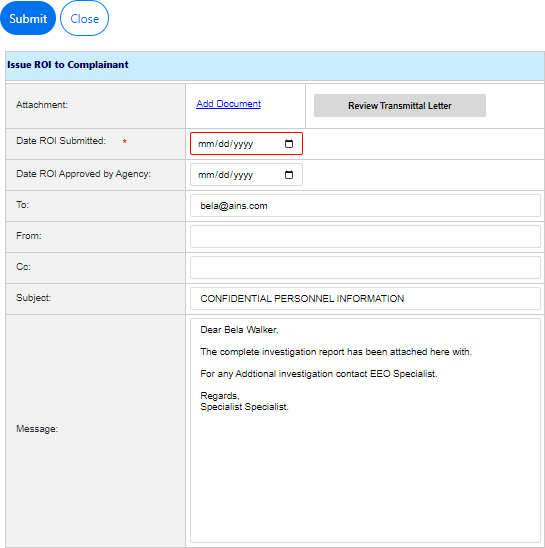
Use the date picker to select the Date ROI Submitted.
You can click the Review Transmittal Letter button to modify the attached transmittal letter, if desired.
Complete the From, Cc, Subject, and Message fields to compose the message to send the ROI to the AP directly from eComplaint.
Click Submit to submit the ROI.
The pop-up window closes and the Complaint Information tab refreshes to display the updated status: FAD/Hearing Request.
4.8 EEOC Hearing
An EEOC Hearing can be initiated through different channels. After a Formal Complaint enters EEOC Hearing status, there are several next steps available:
Notice of Hearing
Forward Complaint File
Add Hearing Events
Summary Judgment
Complainant Files Forward to AJ
Add Interim Order
Hearing Completed
Additionally, at any point in the hearing process the AP may elect for Settlement, ADR, FAD or Withdrawal of the complaint.
4.8.1 Hearing Request
Follow the steps below to process an AP’s request for hearing.
Open the desired Formal Complaint case folder and within the Complaint Information tab, select FAD/Hearing Request under the Next Action drop-down list, then click the Arrow button.

The Request for FAD/Hearing pop-up window appears. Select one of the Request For radio buttons.
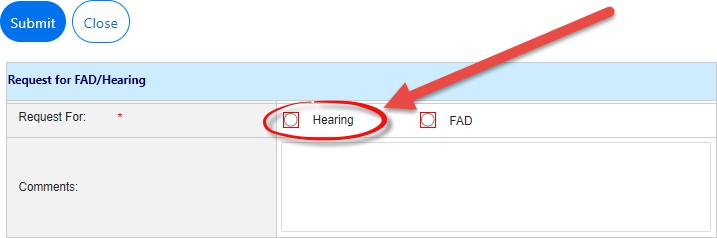
Note: Either Request For radio button selection prompts the pop-up window to refresh and display additional fields. This procedure utilizes the Hearing selection.
The pop-up window refreshes to display additional fields. Click Add Documents to open the Select Item pop-up window, where you can upload the Hearing Request attachment.

Use the date picker to select the Date of Hearing Request.
Complete any other required fields as needed, and then click Submit. The pop-up window closes and the Complaint Information tab refreshes to display the updated status.
4.8.2 Notice of Hearing
Follow the steps below to submit the Notice of Hearing:
Open the desired Formal Complaint case folder and within the Complaint Information tab, select Notice of Hearing from the Next Action drop-down list, then click the Arrow button.

The Notice of Hearing pop-up window appears. Click the Add Document(s) link to open the Case Attachments pop-up window and add the Hearing Acknowledgment Order document.
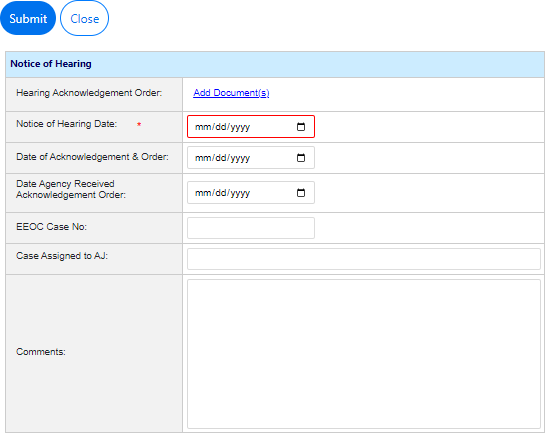
Use the date picker to select the Notice of Hearing Date.
Complete any other required fields as needed and then click Submit to submit the Notice of Hearing. The pop-up window closes and the Complaint Information tab refreshes to display the new status of EEOC Hearing.
4.8.3 Forward Complaint File
To forward the complaint file, follow the steps below:
Navigate to the Complaint Information tab, then select Forward Complaint File under the Next Action drop-down list, then click the Arrow button.
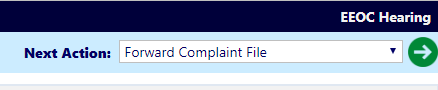
The Forward Complaint File pop-up window appears as shown below. Click Add Documents to open the Select Item pop-up window, where you can select the Forward Document file to upload.
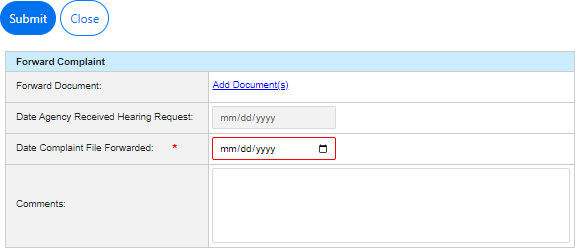
Use the date picker to select the Date Complaint File Forwarded.
Complete any additional required fields.
Click Submit to forward the complaint file. The pop-up window closes and the Complaint Information tab refreshes to display the new status EEOC Hearing.
4.8.4 Summary Judgment
To add a Summary Judgment to the Formal Complaint, follow the steps below:
Open the desired Formal Complaint case folder and within the Complaint Information tab, select Summary Judgment from the Next Action drop-down list, and click Arrow button.

The Summary Judgment screen appears as shown below.
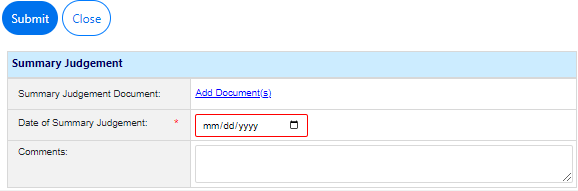
Use the Add Document(s) link to open the Select Item pop-up window, where you can add the Summary Judgment Document.
Use the date picker to select the Date of Summary Judgment.
Enter any Comments in the field provided, if desired.
When complete, click Submit to submit the Summary Judgment. The pop-up window closes, and the Complaint Information tab refreshes to display the new status Final Agency Decision.
4.8.5 Reconsideration Request (AJ)
Follow the steps below to process a Reconsideration Request (AJ):
Navigate to the Complaint Information tab and select Reconsideration Request (AJ) from the Next Action list, then click the Arrow button.
.png?sv=2026-02-06&spr=https&st=2026-06-16T07%3A33%3A28Z&se=2026-06-16T09%3A13%3A28Z&sr=c&sp=r&sig=rBfZLddJvTtTAXJKEG4ltuAeesprC2RMiAO2c0EnngE%3D)
The Request for Consideration (AJ) pop-up window appears. Click Add Documents to open the Case Attachments pop-up window and select the Request for AJ Reconsideration document.
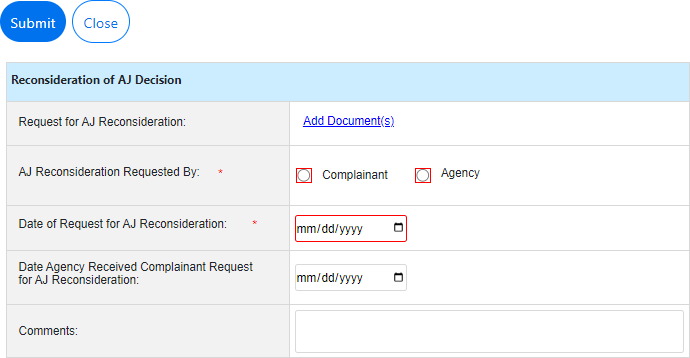
Select one of the Reconsideration Requested By radio buttons: Complainant or Agency.
Use the date picker to select the Date of Request for AJ Reconsideration.
When complete, click Submit. The pop-up window closes and the Complaint Information tab refreshes to display the new status: Final Agency Decision.
4.8.6 Add Interim Order
Interim Orders can be added as part of the Hearing process. Follow the steps below to add an Interim Order:
Open the desired Formal Complaint case folder and within the Complaint Information tab, select Add Interim Order from the Next Action drop-down list, then click the Arrow button.

The Add Interim Order pop-up window appears. Click Add Documents to open the Case Attachments pop-up window, where you can select and upload the Interim Order Document.
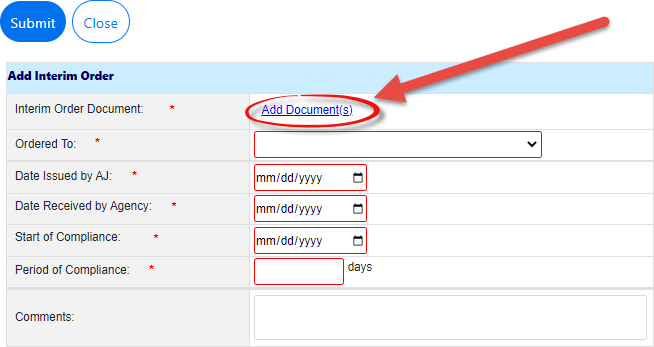
Select the outcome that has been ordered from the Ordered To drop-down list.
Notes: Remand for Counseling is only available if the complaint originated as an Informal Complaint. If you select Remand for Investigation a new folder is created to track the remand.
Some selections within the Ordered To drop-down list may prompt the pop-up window to refresh and display additional fields.
Use the date picker to select the Date Issued by AJ.
Use the date picker to select the Date Received by Agency.
Use the date picker to select the date for Start of Compliance.
Enter the number of Compliance Days in the Period of Compliance field. After selecting this date, the pop-up window refreshes to display the End of Compliance field appears and automatically calculates the end of the compliance period.
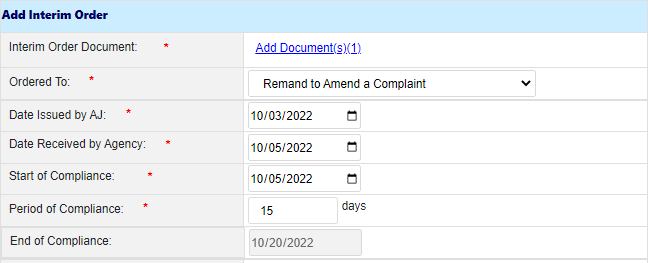
Enter any relevant Comments in the field, if required.
Click Submit to submit the Interim Order. The pop-up window closes and the Complaint Information tab refreshes.
The status updates depending on the selection made in the Ordered To field. See the corresponding subsection for next steps.
4.8.6.1 Remand for Counseling
Follow the steps below to process a Remand for Counseling.
Navigate to the Complaint Information tab and select Remand for Counseling from the Next Action list, then click the Arrow button.

The Remand for Counseling pop-up window appears. Click Add Documents to open the Case Attachments pop-up window, where you can upload the required Attachments to the case folder.
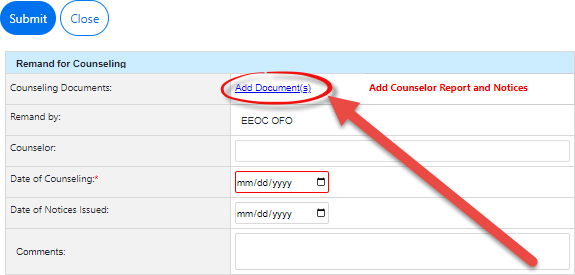
Use the date picker to select Date of Counseling.
Complete any other required fields and click Submit to submit the remand for counseling. The pop-up window closes and the Complaint Information tab refreshes to display the new status.
4.8.6.2 Remand to Amend a Complaint
Follow the steps below to process a Remand to Amend a Complaint.
Navigate to the desired case folder and then click the Claims and Bases tab.
Click Add Issue. The tab refreshes to display a blank New Issue entry.
Note: Any previously completed Issue entries are displayed in this tab. You can minimize the Issue Entry by clicking the +/- buttons.
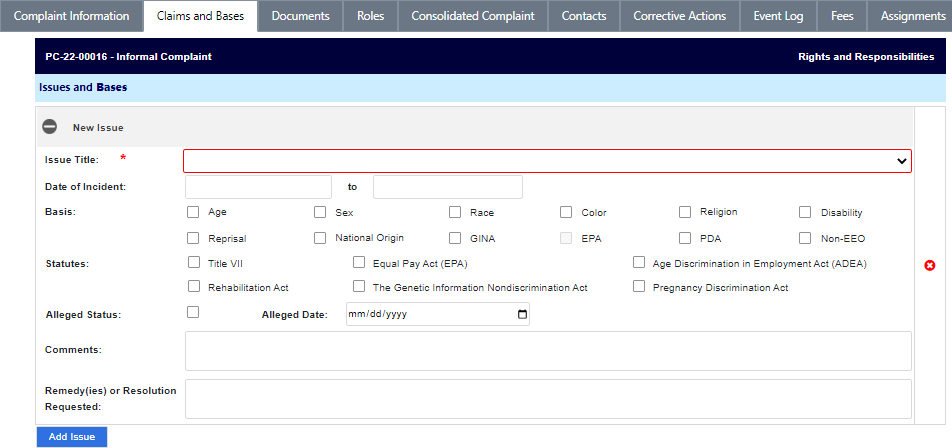
Select the Issue Title from the drop-down list. The workspace refreshes and the selected entry appears at the top of the new Issue entry.
Click any applicable Basis checkboxes.
Note: Depending upon the checkboxes selected, additional fields may appear. Complete these fields before proceeding.
Click any applicable Statutes checkboxes.
If applicable, click the Alleged Status checkbox to apply the Alleged status to the case folder, and then use the date picker to select the Alleged Date.
Enter any Comments in the field, if applicable.
Enter any Remedy(ies) or Resolution Requested information in the field, if applicable.
Select an Issue Title from the drop-down list.
The amendment section will not appear until an Issue Title is selected. Fields appear to capture the Amendment, as shown below.
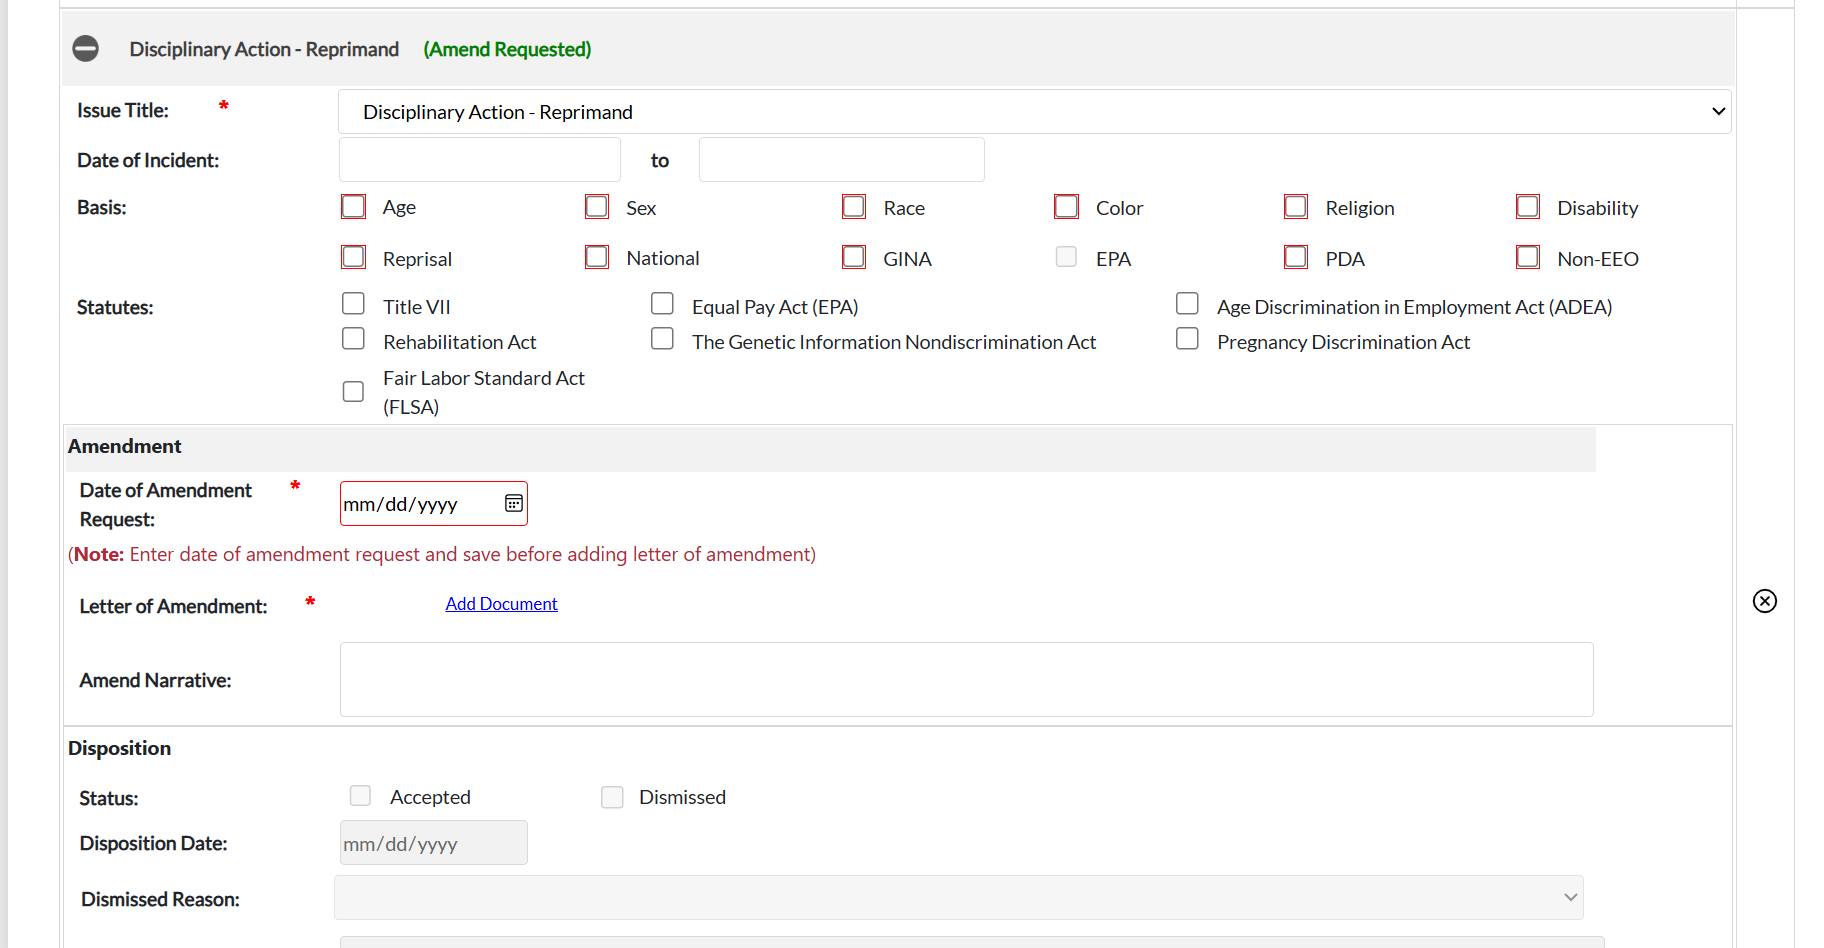
Click Save to record the new Issue information. The Claims and Bases tab refreshes and the new Issue is recorded.
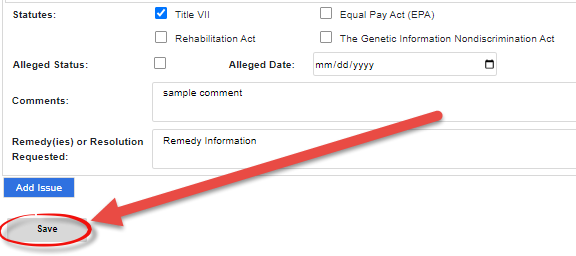
4.8.6.3 Complete Interim Order
Perform the steps below to complete the Interim Order:
Navigate to the Complaint Information tab and select Complete Interim Order from the Next Action list, then click the Arrow button.

The Complete Interim Order pop-up window appears. Click Add Documents to open the Case Attachments pop-up window, where you can upload supplementation documents.
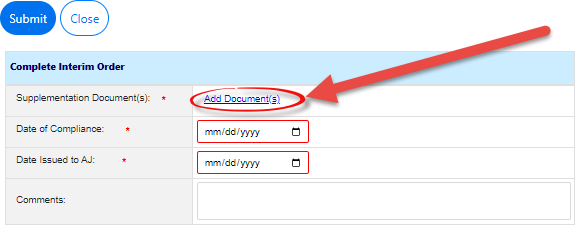
Use the date picker to select the Date of Compliance.
Use the date picker to select the Date Issued to AJ.
Enter any Comments in the free text field.
Click Submit to submit the interim order.
4.8.7 Hearing Completed
Follow the steps below to log the completion of the Hearing process.
Open the desired case folder and navigate to the Complaint Information tab.
Select Hearing Completed from the Next Action list, then click the Arrow button.

The EEOC Hearing Outcome pop-up window appears. Click Add Documents to open the Case Attachments pop-up window, where you can upload the Final Order attachment.
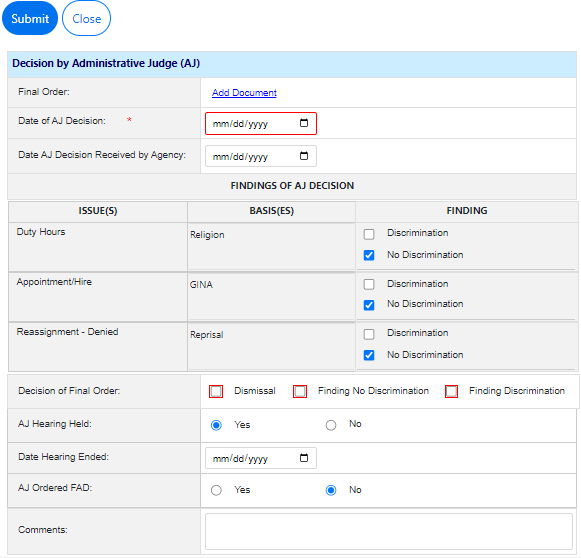
Use the date picker to select the Date of AJ Decision.
Within Findings of AJ Decision workspace, ensure the AJ decision is accurately reflected for all Basis(es).
Select one of the Decision of Final Order checkboxes. Each checkbox selected prompts the pop-up window to refresh and display additional fields. For additional information about these checkboxes, consult the table below:
Decision | Details |
|---|---|
Dismissal | If Dismissal is selected, also provide the Reason for Dismissal from the drop-down list:
|
Finding No Discrimination | If Finding No Discrimination is selected, no additional fields are required. |
Finding Discrimination | If Finding Discrimination is selected, fields appear to capture the Remedy Details. Click Insert Item to add fields for capturing remedies. Each remedy has fields to capture the Type, Benefit, and Amount:
Note: If a Remedy is added at this screen, it should also be entered in the Corrective Actions tab of the FC. |


Complete any remaining required fields.
Note: If the Finding does not match the Decision, an error message appears as shown below:

Click Submit to submit the outcome. The pop-up window closes and the Complaint Information tab refreshes to display the updated status.
4.9 Civil Action
At certain points in the process, it is possible for the AP to pursue Civil Action. Civil Actions have two parts: Civil Action and Civil Action Decision.
Open the desired Formal Complaint case folder and within the Complaint Information tab, select Civil Action from the Next Action drop-down list, then click the Arrow button.

The Civil Action Filed pop-up window appears. Click Add Documents to open the Case Attachments pop-up window, where you can upload the Civil Action Document.
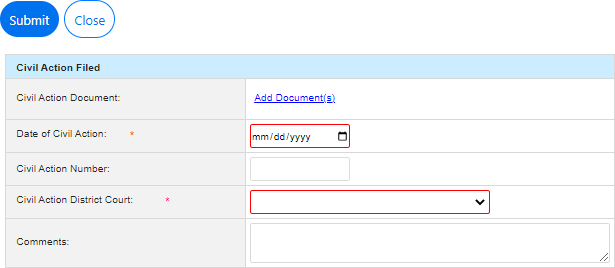
Use the date picker to select the Date of Civil Action.
Select the Civil Action District Court from the drop-down list.
Complete any remaining required fields.
Click Submit to submit the Civil Action. The pop-up window closes and the Complaint Information tab refreshes.
4.9.1 Civil Action Decision
Follow the steps below to log a Civil Action Decision.
Navigate to the Complaint Information tab and select Civil Action Decision from the Next Action list, then click the Arrow button.

The Civil Action Disposition pop-up window appears. Click Add Documents to open the Case Attachments pop-up window, where you can upload the Civil Action Final Order Document.
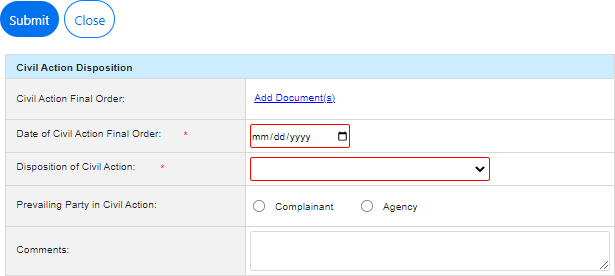
Use the date picker to select the Date of Civil Action Final Order.
Select the Disposition of Civil Action from the drop-down list.
Select the desired Prevailing Party in Civil Action radio button.
Enter any Comments in the free-text field, if necessary.
Click Submit. The pop-up window closes and the Complaint Information tab refreshes to display the updated status.
4.10 Remands
When an appeal is Denied or Denied in Part, a case is Remanded. The existing complaint is closed and maintained as a historical record. The details are duplicated in a new FC marked as a Remand. An example remanded complaint is shown below:
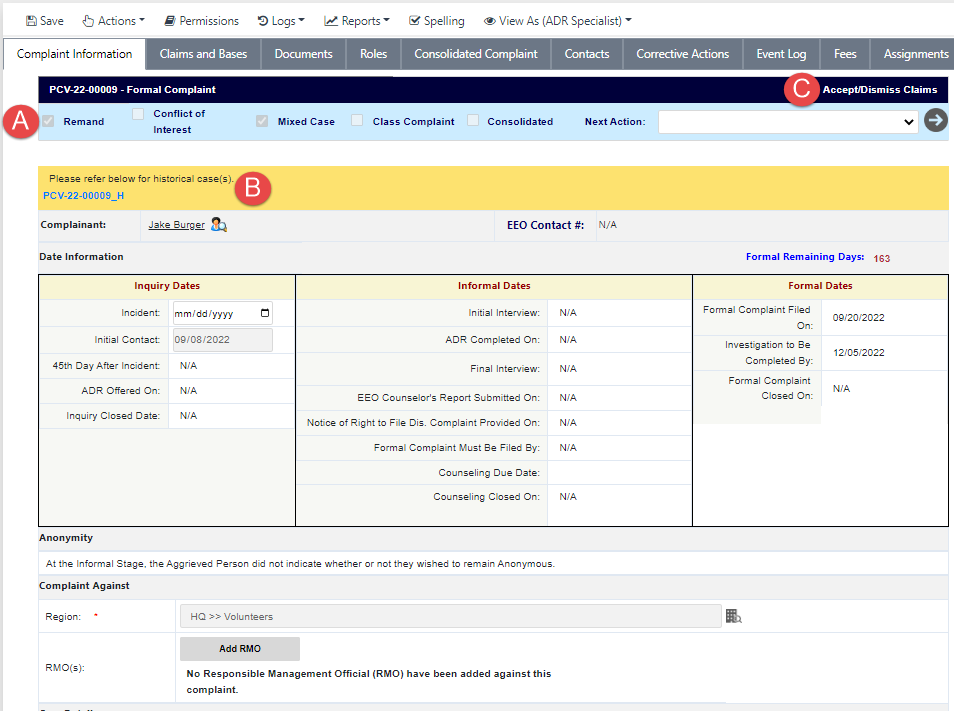
The complaint is marked as a (A) Remand. The completed complaint is (B) linked for reference. The (C) Status and Next Action depend on the selection made under Remand for Agency.
If you click the link to the historical case, where this remand complaint originated, the previous complaint appears as shown in the following example.
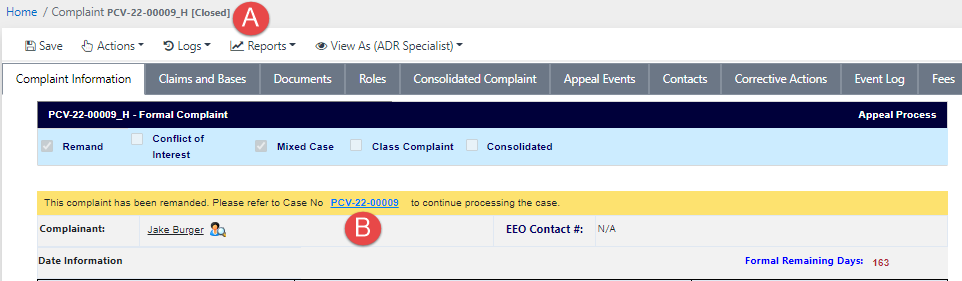
The complaint is marked as (A) Closed, and a link is now present for easy access to the (B) newly created complaint folder where the processing can proceed.
4.11 Formal Settlement
Follow the steps below to log the settlement of a Formal Complaint.
Open the desired case folder and navigate to the Complaint Information tab. Select Formal Settlement from the Next Action drop-down list, then click the Arrow button.

The Settlement pop-up window appears. Click Add Document(s) to open the Case Attachments pop-up window and upload a Settlement Attachment.
 2.jpg?sv=2026-02-06&spr=https&st=2026-06-16T07%3A33%3A28Z&se=2026-06-16T09%3A13%3A28Z&sr=c&sp=r&sig=rBfZLddJvTtTAXJKEG4ltuAeesprC2RMiAO2c0EnngE%3D)
Use the date picker to select the Date of Settlement.
Add any relevant Comments in the free-text field, if desired.
Click Submit to submit the Formal Settlement. The pop-up window closes and the Complaint Information tab refreshes to display the new status of Corrective Actions.
4.12 Compliance
Some FCs may require additional Compliance logging depending on the outcome of the complaint. Follow the steps below to log compliance:
Open the desired case folder and navigate to the Complaint Information tab. Select Start Compliance from the Next Action list, then click the Arrow button.

The Start Compliance pop-up window appears. Use the date picker to select the Start of Compliance Date.
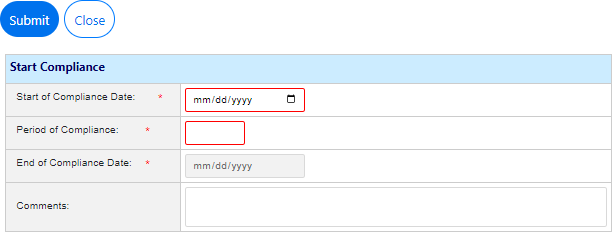
Enter the number of days in the compliance period in the Period of Compliance field. The End of Compliance Days field automatically computes the end date.
Enter any Comments in the field, if needed.
Click Submit. The pop-up window closes and the Complaint Information tab refreshes to display the Compliance Started status.
To manually end the compliance period, select Compliance Closure from the Next Action list, then click the Arrow button.

The Compliance Closure pop-up window appears. Use the date picker to select the New Date of Compliance.
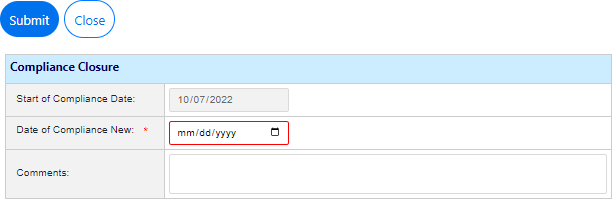
Enter any Comments in the field, if necessary.
Click Submit. The pop-up window closes and the Complaint Information tab refreshes to display the new status Final Agency Decision.
4.13 Abeyance
An abeyance period denotes time that is not counted against the deadlines for a Formal Complaint. Starting an Abeyance effectively pauses the clock until the FC is taken out of Abeyance.
Follow the steps below to initiate Abeyance:
Open the desired case folder and navigate to the Complaint Information tab. Select Start Abeyance from the Next Action list, then click the Arrow button.

The Start Abeyance pop-up window appears. Use the date picker to select the Start of Abeyance Period.
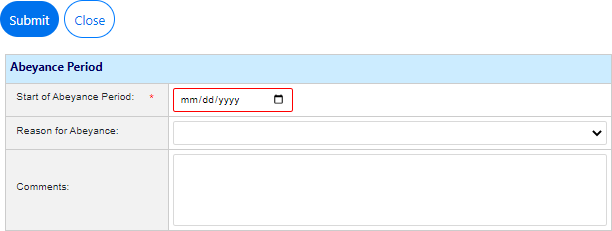
Select the Reason for Abeyance from the drop-down list
Enter any Comments in the field, and then click Submit. The pop-up window closes and the Complaint Information tab refreshes to display the updated status Held in Abeyance.
To end the Abeyance period, select End Abeyance from the Next Action drop-down list, then click the Arrow button.

The End Abeyance pop-up window appears. Use the date picker to select the End of Abeyance period (this cannot be a date in the future).
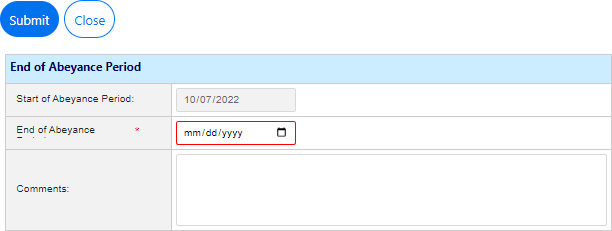
Enter any Comments in the free text field.
Click Submit. The pop-up window closes and the Complaint Information tab refreshes to display the last status before the abeyance began.
4.14 Close Complaint
A Formal Complaint can reach Close Complaint status in a number of ways, described in the procedures above. Once in a Formal Complaint is in Administrative Closure status, the next step is to Close Complaint. Complete the steps below to close the complaint:
Open the desired case folder and navigate to the Complaint Information tab. Select Close Complaint from the Next Action list, then click the Arrow button.

The Close Formal Complaint pop-up window appears. Use the date picker to select the Formal Complaint Closed Date.
Enter any relevant comments in the Comments field.
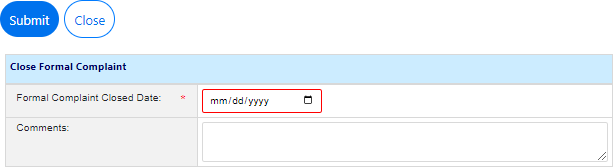
Click Submit. The pop-up window closes, and the Complaint Information tab refreshes to display the updated status Administrative Closure.
5. eComplaint Reports
eCASE eComplaint provides a detailed reporting tool, allowing authorized users to perform either preconfigured reports or ad hoc reports, including the following:
462 Reports
No Fear Report
Complaint Management Reports
Custom Reports

The following sections provide information on running and viewing these reports.
5.1 EEO Reports
The EEO Reports menu option contains reports required by law and custom reports which can be modified to suit organizational need. The subsections below instruct users on how to complete each EEO Report.
Notes: When working inside a report, do not alter the Select Query drop-down list.
When working inside a report, do not alter the Output Table Properties.
5.1.1 462 Reports
The 462 Report is required by the EEOC and is an annual federal equal opportunity statistical report of discrimination complaints. To generate the 462 Report:
Within the Launch Pad, click Main Menu > EEO Reports > 462 Report.
The page refreshes to display the Report Parameters page. Select the Year from the Year drop-down list, and then select the Quarter/Month from the drop-down list.
Note: After selecting the Year and Quarter drop-down list values, the page refreshes and the Report Start Date and Report End Date fields are automatically populated by the application.

Select the Office from the drop-down list.
Enter an Agency in the Agency field.
Click the Region lookup. The Region Selection pop-up window appears.

Expand the folder tree until you locate the desired Region selection. Click the checkbox adjacent the desired Region and click OK.

The pop-up window closes, and the selected Region appears in the field. Select an Export Format using the Export to: radio buttons. This is the file type format that the report data will be exported into.
Notes: Selecting the Web output radio button returns report results within the web browser.
Selecting the PDF or Excel export options prompts the page to begin downloading the report results immediately upon successfully executing the report.
Click Generate Report.
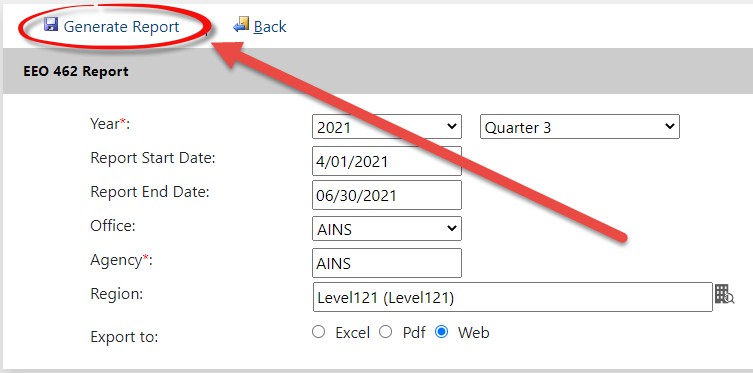
The page displays the report results in the selected output.
5.1.2 No Fear Report
The No Fear Report is the Notification and Federal Employee Anti-Discrimination and Retaliation report. This report is an annual report setting forth information about the agency's efforts to improve compliance with the employment discrimination and whistleblower protection laws and detailing the status of complaints brought against the agency under these laws. To generate the No Fear Report:
Within the Launch Pad, click Main Menu > EEO Reports > No Fear Report.
The page refreshes to display the Report Parameters page. Select the Year from the Select Year drop-down list, and then select the Quarter from the Select Quarter drop-down list.

Click the Region lookup. The Region Selection pop-up window appears.

Expand the folder tree until you locate the desired Region selection. Click the checkbox adjacent the desired Region and then click OK.
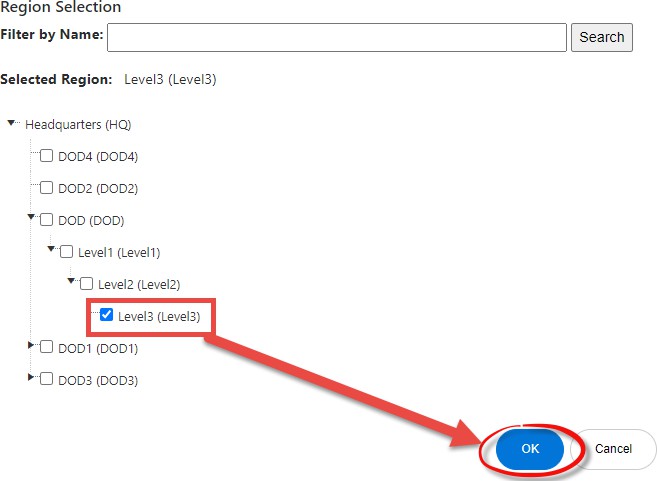
The pop-up window closes, and the selected Region appears in the field. Select an Export Format using the Export to: radio buttons. This is the file type format that the report data will be exported into.
Notes: Selecting the Web output radio button returns report results within the web browser.
Selecting the PDF or Excel export options prompts the page to begin downloading the report results immediately upon successfully executing the report.
Click Generate Report.
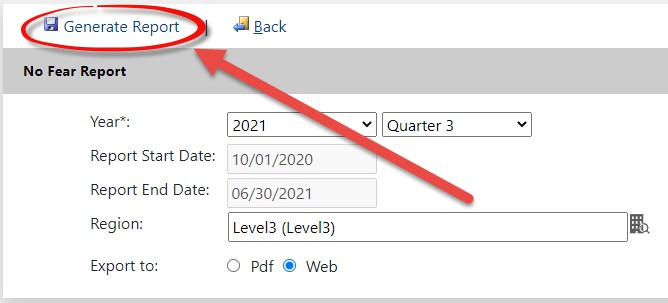
The page displays the report results in the selected output.
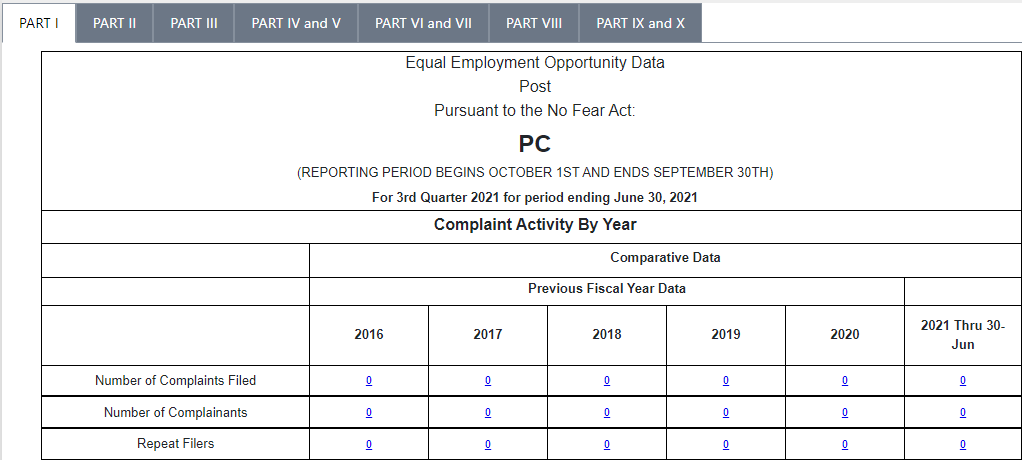
5.1.3 EEO Contacts Report
The EEO Contacts Report produces a complete list of EEO Contacts. Follow the steps below to generate the EEO Contacts Report.
Within the Launch Pad, select Main Menu > EEO Reports > EEO Contacts. The page refreshes to display the Report Parameters screen.
Within the Query Parameters subsection, use the date pickers to select the Start Date andEnd Date.
Click Run. The page refreshes to display the report results.

5.1.4 Informal Complaints Report
The Informal Complaints Report produces a complete list of Informal Complaints. Follow the steps below to generate the Informal Complaints Report:
Within the Launch Pad, select Main Menu > EEO Reports > Informal Complaints. The page refreshes to display the Report Parameters page.
Do not alter the Select Query drop-down list.
Do not alter the Output Table Properties.

Under Query Parameters, use the date pickers to select the Start Date and End Date.
Click Run. The page refreshes to display the report results.
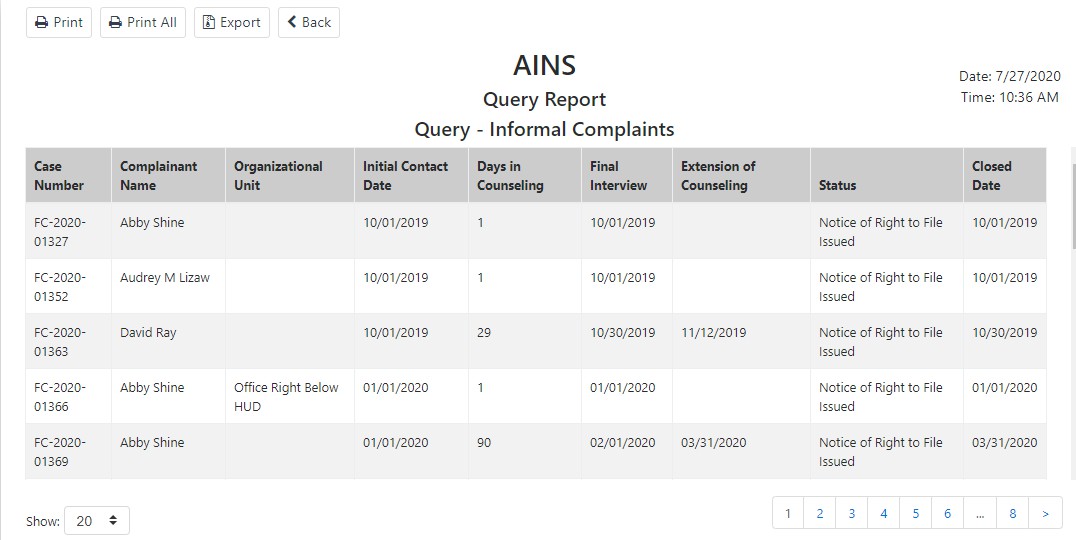
5.1.5 Formal Complaints Report
The Formal Complaints Report produces a complete list of Formal Complaints. Follow the steps below to produce the Formal Complaints Report.
Within the Launch Pad, click Main Menu > EEO Reports > Formal Complaints.
The page refreshes to display the Report Parameters page, with Formal Complaints selected in the Select Query drop-down list.

Do not alter the Select Query drop-down list.
Do not alter the Output Table Properties.
Under Query Parameters, select the Start Date and End Date.
Click Run. The page refreshes to display the report results.
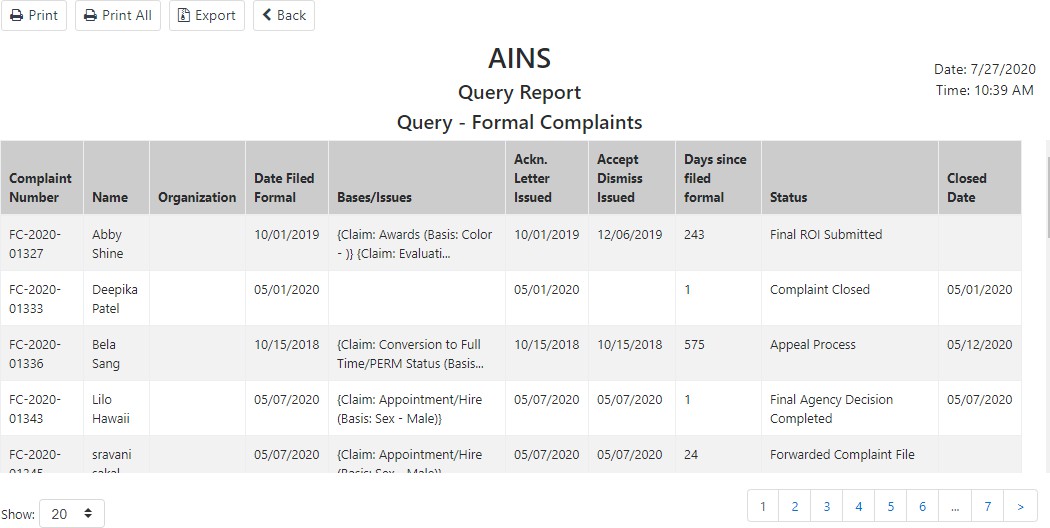
5.1.6 15 Day Waiting Report
The 15 Day Waiting Report is used by managers to track the time since the notice of Right to File was submitted. If the complaint is inside the 15 day Waiting Period, it appears in this report. To generate the 15 Day Waiting Report:
Within the Launch Pad, click Main Menu > EEO Reports > 15 Day Waiting.
The page refreshes to display the Report Parameters page. Under Query Parameters, use the date pickers to select the Start Date and End Date.

Click Run. The page refreshes to display the report results.
5.1.7 Investigations Report
The Investigations Report shows Investigations that began within a given date range. To generate the Investigations Report:
Within the Launch Pad, click Main Menu > EEO Reports > Investigations.
The page refreshes to display the Report Parameters page. Under Query Parameters, use the date pickers to select the Start Date and End Date.
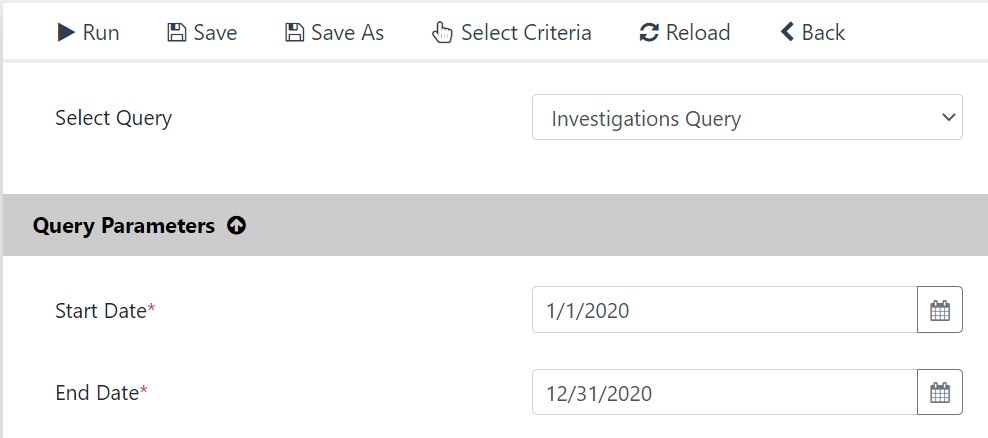
Click Run. The page refreshes to display the report results.
5.1.8 30 Days Election Notice Report
The 30 Days Election Notice Report shows Completed investigations within the given date range that have not had a hearing or request for Final Order by the “To” date. To generate the 30 Days Election Notice Report:
Within the Launch Pad, click Main Menu > EEO Reports > 30 Days Election Notice.
The page refreshes to display the Report Parameters page. Under Query Parameters, use the date pickers to select the Start Date and End Date.

Click Run. The page refreshes to display the report results.
5.1.9 Hearings Report
The Hearings Report shows Hearings that start before the “To” and which are completed or pending within the given date range To generate the Hearings Report:
Within the Launch Pad, click Main Menu > EEO Reports > Hearings.
The page refreshes to display the Report Parameters page. Under Query Parameters, use the date pickers to select the Start Date and End Date.

Click Run. The page refreshes to display the report results.
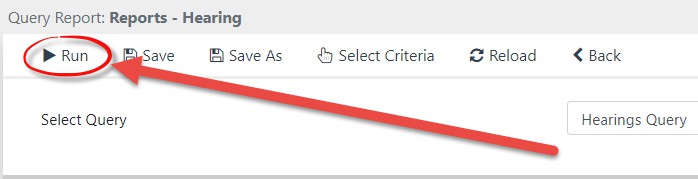
5.1.10 Final Agency Decisions Report
The Final Agency Decisions report shows the Final Agency Decisions that occurred within the given date range. To generate the Final Agency Decisions Report:
Within the Launch Pad, click Main Menu > EEO Reports > Final Agency Decisions Report.
The page refreshes to display the Report Parameters page. Under Query Parameters, use the date pickers to select the Start Date and End Date.

.jpg?sv=2026-02-06&spr=https&st=2026-06-16T07%3A33%3A28Z&se=2026-06-16T09%3A13%3A28Z&sr=c&sp=r&sig=rBfZLddJvTtTAXJKEG4ltuAeesprC2RMiAO2c0EnngE%3D)
Click Run. The page refreshes to display the report results.
5.1.11 EEO Decision Report
The EEO Decision report shows the EEO Decisions within a given date range. To generate the EEO Decision Report:
Within the Launch Pad, click Main Menu > EEO Reports > EEO Decision Report.
The page refreshes to display the Report Parameters page. Under Query Parameters, use the date pickers to select the Start Date and End Date.

Click Run. The page refreshes to display the report results.
5.1.12 30 Days Waiting Period Report
The 30 Days Waiting Period Report shows the Final Agency Decisions that do not have an
appeal within 30 days of the “To” date. To generate the 30 Days Waiting Period Report:
Within the Launch Pad, click Main Menu > EEO Reports > 30 Days Waiting Period Report.
The page refreshes to display the Report Parameters page. Under Query Parameters, use the date pickers to select the Start Date and End Date.
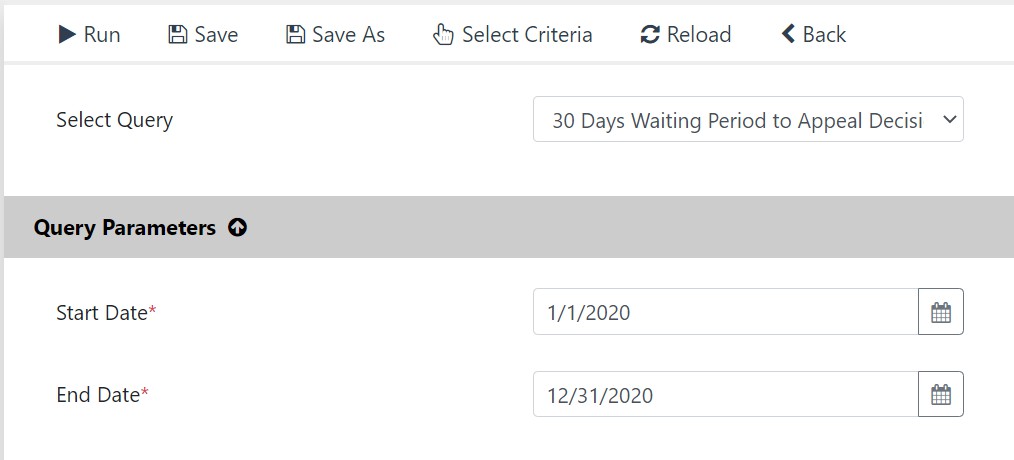
Click Run. The page refreshes to display the report results.
5.1.13 OFO Appeals Report
The OFO Appeals Report shows the Appeals filed within the given date range. To generate the OFO Appeals Report:
Within the Launch Pad, click Main Menu > EEO Reports > OFO Appeals Report.
The page refreshes to display the Report Parameters page. Under Query Parameters, use the date pickers to select the Start Date and End Date.

Click Run. The page refreshes to display the report results.
Note: Selecting the PDF or Excel export options prompts the page to begin downloading the report results immediately upon successfully executing the report.
5.1.14 Closed Report
The Closed Report shows the Closed Complaints within the given date range. To generate the Closed Report:
Within the Launch Pad, click Main Menu > EEO Reports > Closed.
The page refreshes to display the Report Parameters page. Under Query Parameters, use the date pickers to select the Start Date and End Date.

Click Run. The system compiles and displays the report in the designated format, indicating errors or incomplete information that must be corrected prior to successfully generating a Report.
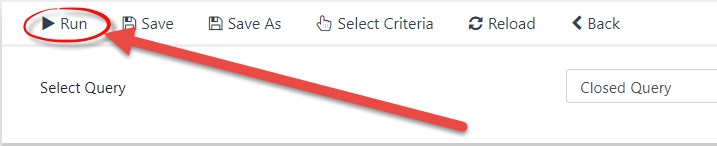
The page refreshes to display the report results.
5.2 Custom Reports
Custom reports can be run at the folder level, or at the task level, (i.e., any ad hoc task created after the workflow has begun.) To run a custom report:
Within the Launch Pad, click Reports.

The Reports List page appears. Click New.

The New Report pop-up window appears. Select the Report Type from the Report Type drop-down list and click OK. The pop-up window closes, and the Folders Report page appears.
Note: This procedure below utilizes the Folder Report selection; however, any report type can be executed using the same procedures.
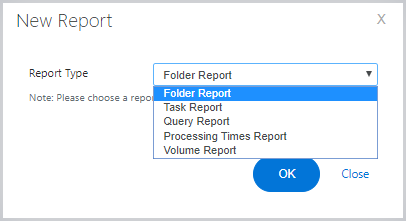
The Report Criteria page appears. This page contains multiple fields and selectable criteria, however, none of which is required to execute the report.
Note: The default values in Selected Columns can be removed by selecting and clicking the < button. Required Columns can be selected from the Available Columns box to add under Selected Columns by highlighting the columns and clicking >. The values are toggled between boxes per the user selections. The order of columns to be displayed in report from left to right can be defined by highlighting the value in Selected Column and using the ^ and v arrows to move the columns left and right, respectively.
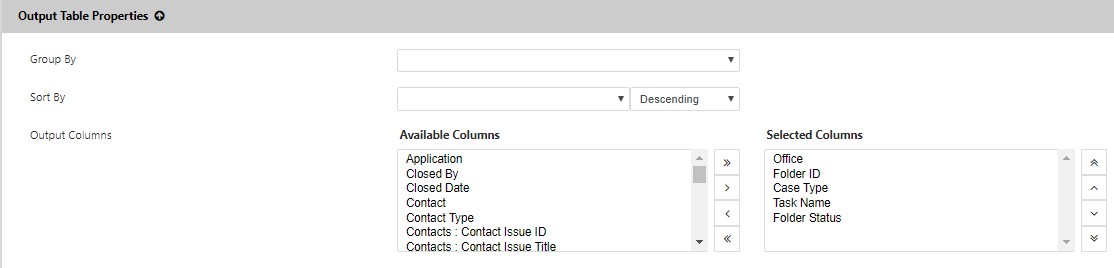
After selecting the desired report parameters, click Run.
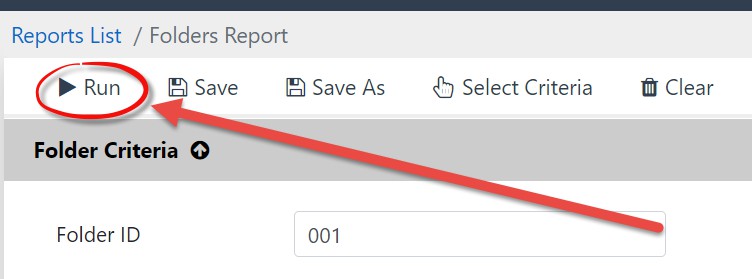
The report displays for the selected Case Type, per the user-selected criteria and columns.
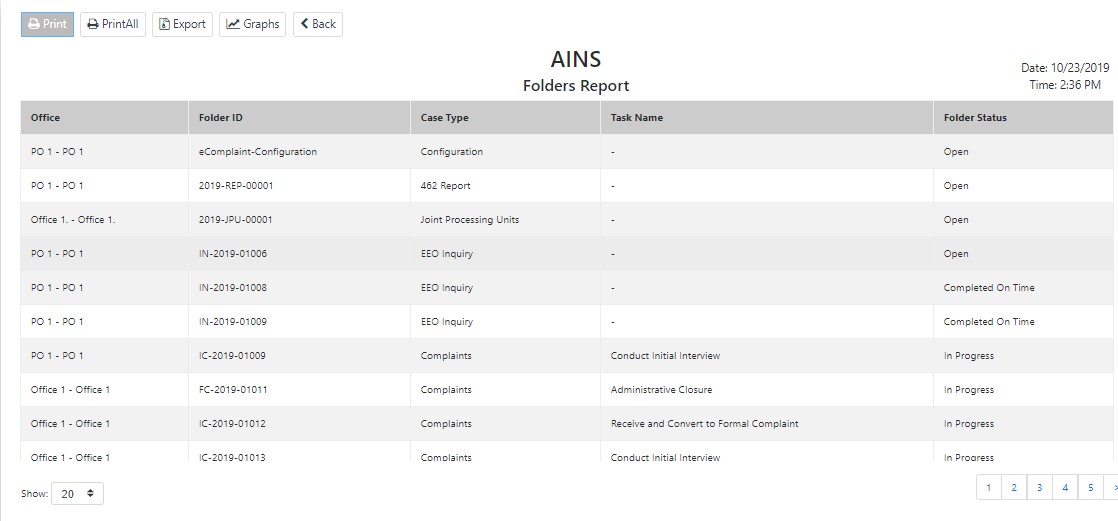
Note: Users can click the following options within the results page:
Print: Print the first page of the report output.
Print All: Print all pages of the report output.
Graphs: View a graphical representation of the report data.
Back: Return to the Reports List.
5.3 Export Reports
Reports can be printed or exported to be saved on computer or shared via email. To export the report:
Run the desired report.
Within the Report Results page, click Export. The Export Report window appears.
Select the file type from the Export Report drop-down list. This is the file format that the exported report file will utilize.
If desired, specify the Page Range to export using the Page Range drop-down list.
You can click Save to save the report to a local machine or click Email to share the report with other users or groups via email.

5.4 Save Report Criteria
Criteria used to generate a report can be saved for future use. To save report criteria:
Navigate to the desired report, select the preferred criteria and run the report.
The Report Results page appears. Click Save As. The Save Report Criteria window appears.
Enter a name for the new report criteria in the Criteria Name field and click OK.

The report criteria are saved. These saved criteria can be used to run the same report in the future by clicking the Reports option within the Main Menu. Saved Report Criteria appears in the Reports List.
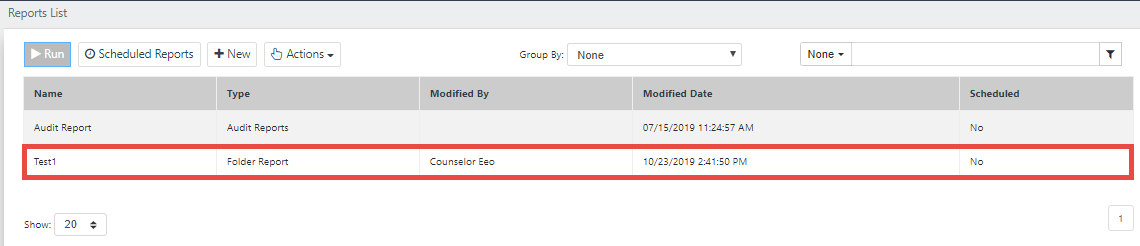
Note: Once the report criteria is saved, this report can be scheduled to run at preferred time and day.
6 eComplaint Configuration Folder
The eComplaint Configuration folder allows Admin users to configure eComplaint-specific settings.
Note: You must have administrator permissions to view and edit the Configuration folder.
To access eComplaint Configuration, navigate to Main Menu > Configuration > eComplaint Configuration. The Configuration screen appears as shown below:

Configuration opens to the (A) Entities Configuration by default. There are also tabs for (B) 462 Report Configuration, (C) 462 Report Choice List Values Mapping, (D) General Configuration, (E) Furlough Configuration, (F) Case Number Format Configuration, and (G) eComplaint – ADR Configuration. Each of these tabs are described in the following subsections.
Additionally, some app features are configured through general eCASE Administration. For details on configuring options like display names for form fields, or configuring insert fields for Complaint Letter Templates, see the eCASE Administrator Manual, accessible via the Help menu.
6.1 Entities Configuration
Entities Configuration allows administrators to view and manage eComplaint entities, with up the five levels for added flexibility in structure.
The Entities Configuration screen is shown below:
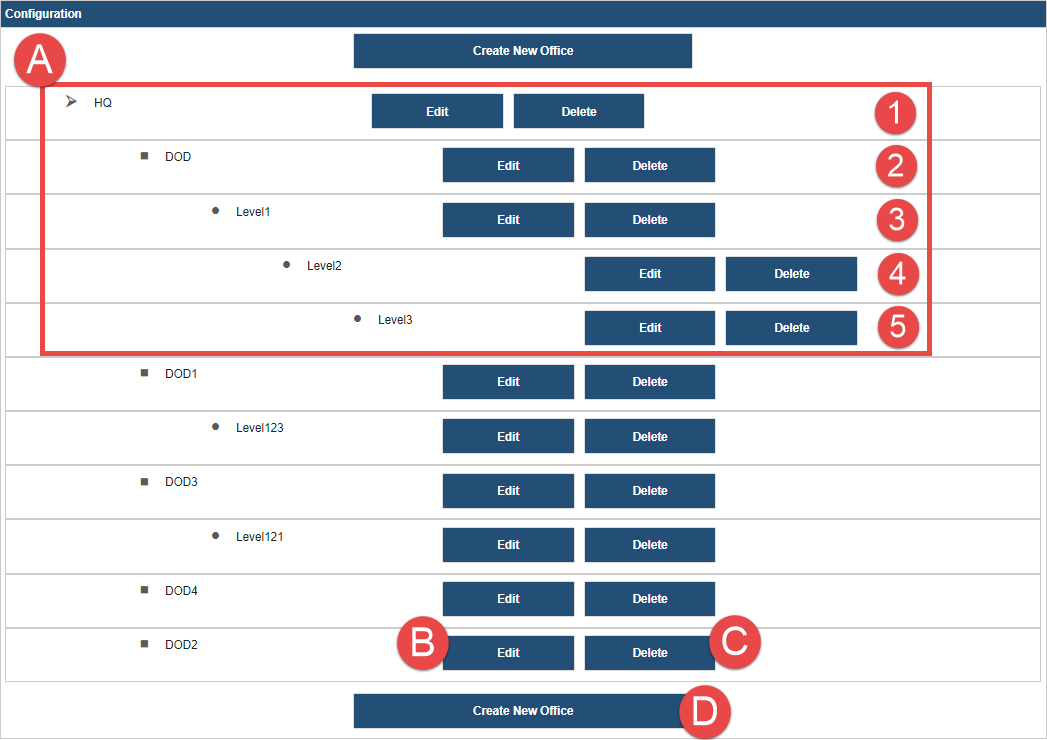
Each office is shown in the main portion of this tab. Each level of indentation indicates that lower level offices are children offices. Each (A) Office can have up to four levels of sub-office, for a total of five (1-5). Each office listed includes options to (B) Edit and (C) Delete. There is also the option to (D) Create New Office.
6.1.1 Create New Office
To create a new office:
Navigate to Main Menu > Configuration > eComplaint Configuration. The eComplaint Configuration folder appears, displaying the Entities Configuration tab.
Click Create New Office. The page refreshes to display the New Office workspace.

Enter an Office Code and Office Description in the fields provided.
Click the Lookup icon to select the Parent Office. The page refreshes to display the screen below:

Click the checkbox adjacent the level to add the New Office.
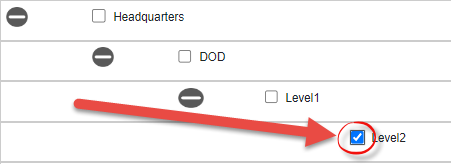
Click OK. The page refreshes to display the New Office workspace.
Enter an Office Code in the field.
Enter an Office Description in the field.
Note: Do not alter the Parent Office field, as this was selected in previous steps.
Enter an Email ID in the field.
Select the EEO Specialist from the drop-down list.
Click Save to record the new office.
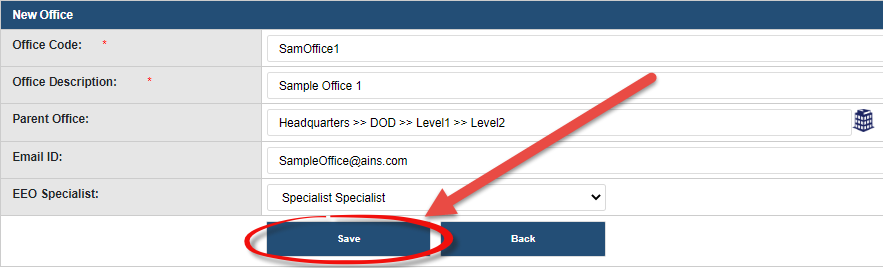
6.2 462 Report Configuration
The eComplaint Configuration folder allows Administrators to configure the 462 Report. To reach 462 Report Configuration, navigate to Main Menu > Configuration > eComplaint Configuration then select the 462 Report Configuration tab.

To configure the 462 Report:
Select the year to configure from the drop-down list and then click Edit.

The page refreshes to display the configuration for the selected year. Perform any required changes to the 462 Report configuration within this page.
Click Save to record the changes to the 462 Report.

6.3 462 Report Choice List Values Mapping
The 462 Report Choice List Values Mapping tab allows administrators to map where certain values appear within the 462 Report. The ADR Resources column is used to enter the custom value that will replace the default value. The ADR Resources Mapped To column is used to designate where the new custom value pairs with the existing resources within the 462 Report. Click Insert to add an additional row to the 462 Report Choice List Values Mapping tab.

6.4 General Configuration
General Configuration allows Administrators to configure eComplaint-specific settings. To reach General Configuration, navigate to Main Menu > Configuration > eComplaint Configuration then select the General Configuration tab.
An example General Configuration tab is shown below. When making changes to the settings on this page, click Save at the bottom of the page to save any changes.

The fields on the General Configuration tab are described in the following table:
Field | Description |
|---|---|
Agency Code | Agency Code to be appended to the Office identifier in each case folder |
Field | Description |
|---|---|
Default Counselor for Portal | Select a default counselor to receive assignments from the portal |
Add Case Number Prefix – IN for Inquiry, IC for Informal Complaint, and FC for Formal Complaint | Select to add prefixes to the case number identifying the type – IN for inquiry, IC for Informal Complaint, and FC for Formal Complaint |
Add Case Number Format based on Region | If selected, this checkbox adds the Region Code to the Case Number format |
Enable Checkbox of Root Level of Region Selector | If selected, this checkbox permits whole Regions/Organizations to be selected rather than a specific subdivision, whenever users select a Region checkbox |
Enable Initiating Office and Folder Owner | If selected, this checkbox automatically enables the Initiating Office as the Folder Owner, rather than the user creating the case folder |
Show Custom Actions in the Next Action dropdown | If selected, this checkbox permits custom events to be created and added as part of the workflow. No custom events are linked to the 462 report. |
Is Incident Date required in EEO Contact | Select to require the Incident Date field to be filled in When creating an EEO Contact |
Is Intake Form required in EEO Contact | Select this checkbox to require an Intake Form to be attached to an EEO Contact |
Field | Description |
|---|---|
Is Intake Person required in EEO Contact? | Select this checkbox to require that the person creating the EEO Contact be listed as the Intake Person |
Is Description required in Complaint | Select to require a Description when creating a complaint |
Is Region required in EEO Contact? | Select this checkbox to make Region a required field when creating an EEO Contact. |
Is Investigator required in Initiate Investigation? | Select this checkbox to make Investigator a required field before the case folder can reach the Investigation stage |
Is Region required in Complaint | Select to require a Region when creating a complaint |
Is Investigator required in Initiate Investigation | Select to require an Investigator to initiate investigations in the system |
Conflict of Interest Group | Select a default group for a Conflict of Interest |
Default Case Manager | Select a user to be assigned as the default Case Manager |
Default ADR Specialist | Select a user to be assigned as the default ADR Specialist |
Contact Type of RMO | Select a contact type to populate the drop-down lists for RMO |
Contact Type of Representative | Select a contact type to populate the drop-down lists for Representatives |
Field | Description |
|---|---|
Contact Type of Internal Investigator | Select a contact type to populate the drop-down lists for Internal Investigators |
Contact Type of External Investigator | Select a contact type to populate the drop-down lists for External Investigators |
Max Days to convert EEO Contact to Complaint from Initial Contact Date | Enter, in days, the maximum length of time allowed to convert an EEO Contact to a complaint, calculated from the Date Aggrieved Person First Contacted Agency |
When is EEO Specialist Mandatory | Select from the drop-down when an EEO Specialist is mandatory in the process. Options are Accept/Dismiss Claims, Add Counselor Report, and Send Acknowledgment |
Do you need Final Interview | Select this checkbox to require a Final Interview to be conducted |
Do you need investigation plan | Select this checkbox to require an Investigation Plan as part of an investigation. |
Issues Basis association validation required in Informal and EEO Contact? | Select this checkbox to require the application to enforce the Issues Basis Association between the checkboxes and the form fields. |
Calculate Deadline to File an Informal Complaint in EEO Contact from | Select a value from this drop-down list to designate which date is used to calculate the informal complaint deadline to file. |
Field | Description |
|---|---|
462 Report Template Name | This field is used to indicate which template is used for the 462 Report. It provides at a glance information to indicate if the template is out of date. |
6.5 Furlough Configuration
Furlough configuration allows for managing furlough time across the eComplaint application. To access Furlough Configuration, navigate to Main Menu > Configuration > eComplaint Configuration then select the Furlough Configuration tab. An example tab is shown below:

Any furloughs are listed in the (A) Furlough Days section. This includes the furlough Year, Start Date, End Date, and Description.
To add a furlough, click the (B) Add Furlough button. Fields appear to capture the furlough details, beginning with the Start Date, which is required. A Description field is available to add a description of the furlough event.

To save the furlough details, click Save. The screen refreshes with the details included in the
Furlough Days list. You can also add the End Date and Year. Add more furloughs with the Add
Furlough button or delete a furlough by clicking the Delete button. A confirmation appears as shown below. Click Yes to confirm deleting the furlough:

6.6 Case Number Format Configuration
The Case Number Format Configuration tab is used to define the Case Type, Region, and Format that case numbers utilize with the application. Select the Case Type from the drop-down list, use the Lookup to select the Region, and then use the Format column to create the Case Number Format.
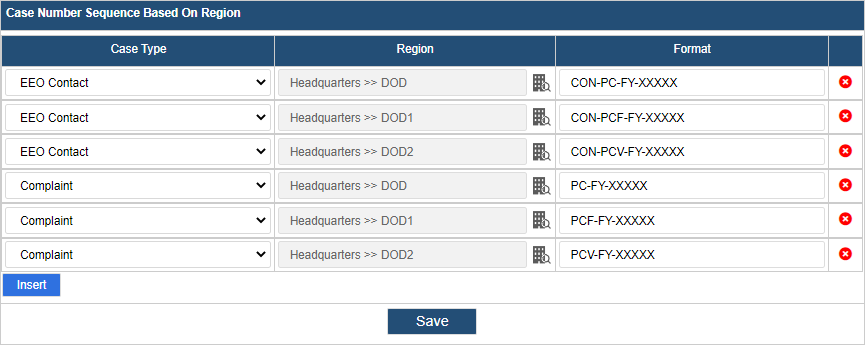
6.7 eComplaint – ADR Configuration
The eComplaint – ADR Configuration tab allows you to configure field mappings and email notifications for ADR cases created from eComplaint. It will display if the integration is implemented in your environment and stay hidden if it is not implemented.
You can configure field mapping for core fields in both eComplaint and ADR, including Issues, Basis, Aggrieved Person, Date of ADR Acceptance/Reject, and more.
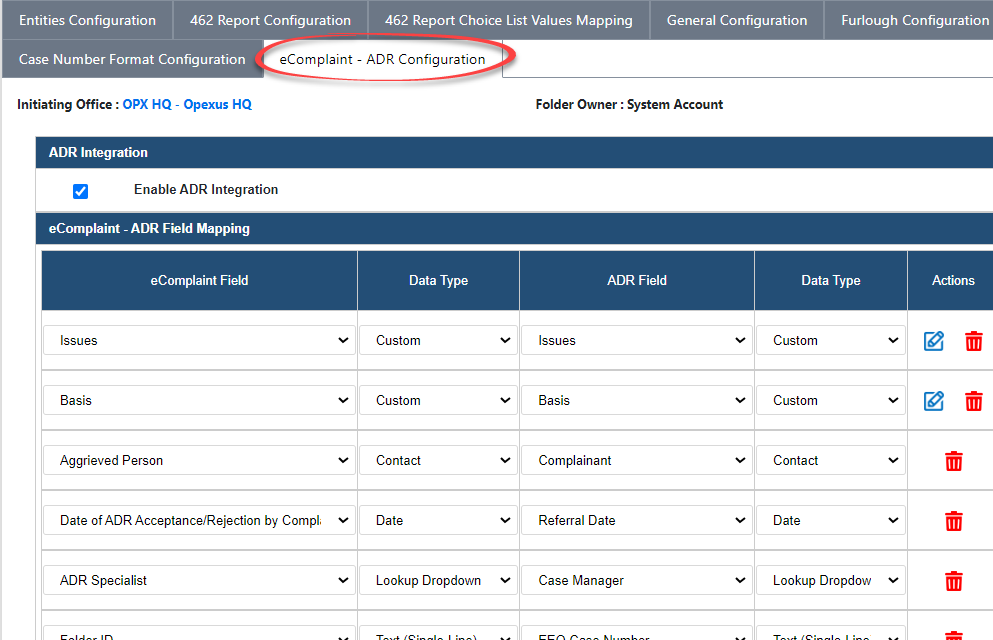
You can also configure email notifications in the Email Configuration section. There is a default Email Template available, or you can select your own. Then, add the Send To email recipients. Click Save when you’re finished making changes.